Thursday, October 31, 2013

Finest Kind Of Spider

It's Halloween, so it is a perfect day for a creepy spider picture.

I really like this spider. Even though he is big and scary looking.  He must be about 2 inches long.  Yet, he is my favorite kind.

For two reasons.


One, and the most important reason, is he is OUTSIDE.  Those are my favorite kind of any creepy crawly.


Two, when I took this picture he was chasing down a stink bug caught in his web.  I hate stink bugs.  I hope spiders don't have noses, but as long as they both stay outside, I'm happy.


I got this off stink bug picture after a Google search from bernardsblog.blogspot.com

Outside stink bugs are also way better than inside stink bugs.  But I really don't like them ANYWHERE.

Wednesday, October 30, 2013

More Shelves


I love the shelves and cubbies that Lee put up in my craft room.  As I get more supplies and fabric scraps and paper and stamps and and and.  I am running out of room and piling boxes on top of boxes.  I asked for more shelves.

The nice thing about Lee is when I ask, I usually get.  Mind you, I don't ask for things that are ridiculously expensive or impossible to obtain.  You know, world peace, full time help, like that.


The first problem we encountered is that the existing corner cupboard would no longer be able to open enough to use it.  We had to switch the hinges from the left side to the right.  The hole from the hinges will be invisible when the door is shut, so they will probably stay holes.


The studs were located in strange spots for the shelf, so we installed one of the wooden shelf supports on a stud and one with a drywall screw anchor.  And by we, I mean I handed Lee tools and he did the work.  And then I said not there and he nicely moved it for me.


The cat was very helpful, too.  He examined all the bags and boxes I had out for the two projects I am working on.  Kind of like the TSA.  He needs to make sure there is no contraband in anything.  When he is satisfied, then he needs to supervise.  In case we may be putting in something that a new cat might need.  THAT would be contraband.


Now I have more room.  But when I moved stacks of boxes and books and magazines around it looks like I still need more shelves.


Oh, Lee???

Tuesday, October 29, 2013

Purchase in Haste, Repent at Leisure

You know it and I know it.  Don't buy something when you are in a rush.  And never buy covered furniture.  I remember my mom telling me a story about her brother who bought a horse at auction with the saddle on.  When he got it home there was something terrible wrong with the horse's back.  So he took it back to auction and sold it to some other sucker.  This time I am the sucker.


I popped into a local antique shop and saw a little table.  It was just the right size and I liked the legs.  They were not the usual thing.  It had a bunch of things on top and the lady in the store assured me there were no cracks or anything hidden under the lamp and other bits and pieces.  The store was crowded and I was on my way somewhere else, so I paid for the table and arranged to pick it up later.


The  table was knotty pine and someone had fixed the top issues by sanding divots into it.  The worse part was the table was not level.  At all.  Not even close.  That alone was a table killer.  I wanted it for a lamp.  I'm not fond of shabby chic, so I didn't want to leave it terrible and just prop up a leg...or two.


First I sanded like crazy and filled the worst of the divots. 


Then I realized there was a major crack going on.  I had to glue and clamp the crack.  Then I had to glue and clamp the legs.  A few of the legs were no longer glued in and they were pulling away from the table. I hoped to fix the level issue by fixing the legs.  Oh. There is the problem.  The holes for the dowels that held the legs were drilled every which way and there was no way to level this table.


At this point I wanted to throw this horrible little table in the burn pile.  It was not even cheap.  Just cheaply made!

I don't seem to be able to give up and stop throwing good money after bad.  I might as well invest even MORE money and time before I burn this piece of cra  junk.  I'm wanting an axe or a sledgehammer right about now.


But, no.  More sanding and now I go buy some spray paint.  I am not going to try and stain or brush on paint for this table.


I try to address the uneven table top and start using this wedges of wood from wood shims to cut and glue to the bottom of various legs.  In order to get the top level and keep it from wobbling, I had to cut three different thicknesses of wood and glue them on three different legs.  One was so thick I had to sand and paint it to make it a part of the leg and keep it from being too noticeable.

WHY am I spending this time on a table I hate?  I don't know.  I'm asking YOU.  There must be some deep psychological reason for this insanity.

While this was going on an auction came up at a local consignment and auction house, Crowning Touch. I was able to get what they called a Duncan Phyfe Mahogany Drum Table.  I know it is a drum table, but with my current luck in furniture purchasing, who knows about the rest.


I got it for 1/3 less than the junk table.  It did have about one quarter of the top that had the finish burned off and a few scratches.  Lesson to furniture owners out there.  Don't put them in the full sun and then never oil  your nice pieces!

I bought some lacquer thinner and did a quick strip.  I got tired of buying Homer Formsby and spending day on refinishing a piece.  This did take quite a bit of color off and I used some of the dark cherry stain I had left over from another project.  I bought a can of spray lacquer and gave it two coats.  On the third coat the spray started spitting and the lacquer came out uneven.  Back to the store for one more can.


All that and it was still way less of a chore than the stupid pine table.  Look how pretty and it took maybe three hours or stripping, sanding and painting, not counting driving!


After all the expenses I bet the pine table cost twice what the drum table ended up costing.  I refuse to put it in the basement for the B&B.  I ended up putting it in our bonus room to set a lamp on. 


Which one would you prefer?  No question, right?

Here is my biggest fear.  When we die the kids will fight over this piece of junk table because if I spent so much time working on it, it must mean something to me.  And the beautiful drum table will go back to the auction.

Monday, October 28, 2013

Open Studios

This last weekend was the Third Annual Artist's Studio Tour-2013- in Botetourt.  We went the first year, but were out of town for the Second Tour.  I love going because it gives you an opportunity to see what some of the talented people in the county are doing.  Who knew there were so many talented people hidden in Botetourt?


Each year there are places we meant to get to and then didn't.  This year I got tired...and hungry.  Because we missed a few the first year...for the same reason...we started at the other end of the tour.


Some of the studios are in a separate building next to a residence.

 Some are inside the residence. 


Some are actual shops in town. 


They are all fabulous to visit.

The artists are all gracious and ready to answer questions from amateurs, like myself.  They also offer FOOD.  How can that be a bad weekend?  Furniture, wood turning, mixed media and paintings worthy of an art gallery and, almost as important...cookies!

Once again there are studios we missed and once again I have made a resolution to start earlier and maybe go for BOTH days next year, so I can see what all is going on here in Botetourt.  I will be speaking with one of the artists I know about painting something for me to go in the new B&B.

I can't wait.

Sunday, October 27, 2013

Another Chair

I scored an oak armchair with a needlepoint seat at an estate sale.  We went on Sunday when the prices are 50% off and got a pretty good deal.  The only problem that I could see with the chair was that the seat was sagging a bit in the middle.


I wanted to fix it even though it still worked.  It just felt kind of weird.  I had to wait until I was heading in to Roanoke so I could go to the fabric store.  I also brought along my coupon for Jo-Ann Fabrics that I get regularly.  More discounts!  I love that kind of shopping.

I bought some one inch foam.  I was worried that the needlepoint would not be big enough to wrap around the seat if I got a thicker cushion.  I didn't want the unfinished fabric to show around the edges of the cushioned seat. 


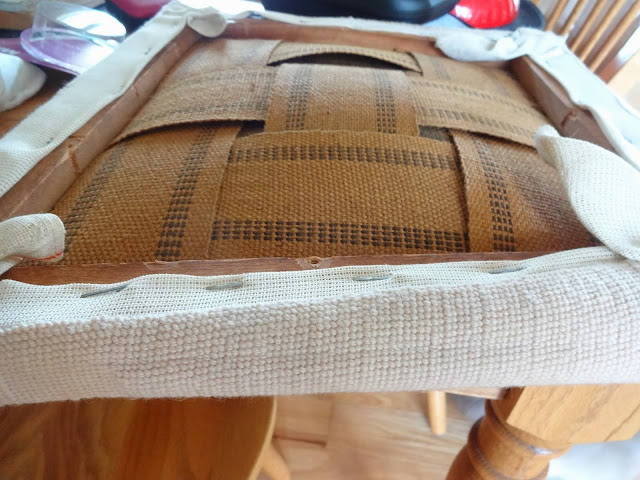
The seat had been recovered in the past.  There was some horrible, sticky vinyl under the needle point. 

Look at all the holes from previous  times when it was recovered.


Under the vinyl was some felt.


And under THAT was what I at first thought was horse hair.  After closer examination we discovered it was moss.  Including sticks.  Who puts sticks in a chair seat?

The moss was breaking down into dirt and sifting through the webbing to the burlap underneath.  I took everything off but the webbing that had sagged. 


Lee removed some nails from one side of the saggiest webbing so we could tighten them.  Once they were tight enough, I placed the chair seat on top of the foam to draw an outline.  Once again, I used my very expensive Cutco serrated knife to cut the foam along the line I had drawn.


I had some muslin left over from another project, so I used some to cover and protect the bottom of the chair. 


I wrapped the foam seat with some leftover batting to protect the edges and started to assemble the seat. 


I did five chairs earlier this year, so it went pretty fast.  A good staple gun is a real help.  It is also important to keep a screwdriver to pull out the staples that didn't go in properly.

The lighting is different on the finished chair because I took a break for dinner and it got dark on me.
But doesn't it look great?


What do you mean it doesn't look any better.  It is WAY better.  Wait.  I see what you mean.  Well, it FEELS better.  And that is the important thing.  And would you have wanted all the disgusting filling in your house?  Yeah.  Way better.  Totally worth all the effort!

Wednesday, October 23, 2013

We're Legal!

The last hoop we had to jump through to start our B&B was last night.  The Botetourt Planning Commission approved the zoning change so we could open a B&B in our home.  It remained for the Board Of Supervisors to vote on the proposal.


The local Fincastle Herald carried several legal notices to inform the public, in case anyone wanted to speak against the zoning change. 


There was also a story in the paper about the upcoming Board meeting.


While we waited in the empty meeting room, it slowly began to fill up.  More and more people filled the rows of seats behind us and I started to become a little worried.  No one has spoken against us during the Planning Meeting.  But maybe they were going to come and derail us at the Board meeting.

Fortunately, we were up first.   After a brief presentation from the Planning Commission on what we proposed and what stipulations they wanted us to have, there was a call for people to speak.  There was a long moment of silence and the Board approved our application for a Special Exceptions Permit.

One of the stipulations is that we are not allowed to have outdoor events, or even indoor events, such as weddings.  Supervisor Terry Austin asked if that included our own family holding a wedding here.  He knew we had a daughter of marrying age.  And in fact I mentioned to the Board that she was engaged.  She may want a wedding at a B&B or a winery, but at this time it seems she will be wanting a wedding closer to where she lives. A family wedding would be permitted here, but it doesn't look like it will happen.

We still have to get a business license and arrange for the Health Department to approve for the septic system to handle the additional bathroom.  It was already approved, but they want paperwork to that effect.  Governments of all sizes love their paperwork.

So now we are legal and need to do the business of starting a business.  And start a web site. And a business bank account.  This may take some time...


But if you are planning a visit to the Roanoke area, look us up.  We'd love to have you visit.

Monday, October 21, 2013

Apple Crisp with Cardamom and Caramel Cream

We were at Wal-Mart waiting for new tires.  We grabbed a bite at McDonald's and I found a free paper with items for sale.  I can't just sit somewhere, so I paged through it and found a recipe for Apple Crisp.  I love fruit Crisps.  This one was written by Angela Shelf Medearis, with minor adjustments by ME.


Apple Crisp with Cardamom and Caramel Cream

4 tart baking apples, peeled, cored and sliced.  I used Granny Smith
1 cup brown sugar, divided use
1/2 cup flour
1/2 cup oats  She recommended quick cooking, but I used Old Fashioned.
3/4 teaspoon ground cardamom
1/2 teaspoon cinnamon
1/4 teaspoon salt
6 tablespoons cold butter
1/4 cups chopped pecans, optional

1 cup heavy cream
1/4 cup caramel topping


Pre heat the oven to 375°.  Spray a 8X8 baking dish with Pam. Set aside.


After peeling and slicing, place the apples in the baking dish and add 1/3 cup of the brown sugar.  Stir to coat.  Set aside.


In a medium bowl stir the remaining 2/3 cup brown sugar, flour, oats, cardamom, cinnamon and salt.  Use a pastry blender to cut in the butter.  Stir in the pecans, if you are using them.


Spread the topping over the apples and bake for 35 to 40 minutes.  The topping should be golden brown and the apples tender, but not mushy.


Make the caramel cream.  Use a stand mixer for the whipped cream.  Before you start the mixer, use a metal whisk vigorously to give the heavy cream a bit of volume.  This makes the whipping process take less time.  Add in the caramel cream.  I didn't have the caramel ice cream topping, but I did have the little cups of caramel dip for use with slices of apples.


In fact, I plan on using the rest of them to make a deconstructed caramel apple.  I will chop up a bowl of peanuts and dip the apple in the caramel and then in the peanuts.  Caramel apple without nuts and caramel on my face!


Whip the caramel and whipping cream together.  It took about 1 1/2 little tubs of caramel sauce to make the 1/4 cup I needed.  Continue to whip the cream until stiff peaks form.

Cool as long as you can stand it.  We waited MAYBE five minutes.  Serve warm with the caramel cream.  (You may want to drizzle the rest of the little tub of caramel over everything.  I know I did.) 


Because we waited just five minutes, it was really hot and I had to add a LOT of whipped cream to cool it off.  But only to keep from burning my mouth.  A safety issue, really.

This was a REALLY good dessert.  The cardamom really made it special and I had never thought to use it before.  I will from now on!  The caramel cream was delicious, but I may just use Cool Whip in the future to cut down on calories and fat.  Not way down, mind you, but some.


Sunday, October 20, 2013

Marble Topped "Sewing" Table


Several months ago I bought a metal wine rack with two tops. It originally had a green marble top.  Then the previous owners remodeled their kitchen and had a matching granite top made for the wine rack.  I bought the wine rack at an estate sale and got both tops.  I kept the granite top with the wine rack and have been trying to find a base for the marble top.

I don't remember where, maybe Pinterest, but I saw a metal sewing machine stand used as a table.  This sounded so cute and just what I had in mind. We have been haunting antique stores and estates sales looking for furniture, but when you want something, it no longer exists. 


A week or so ago I found a Singer treadle sewing machine base with a primitive wood top.  It looked like something I might put in a garden.   It had some rust, but the treadle still worked and I negotiated a price I was willing to pay.

I spent several days using wire brushes, sand paper and steel wool to clean off the rust and get rid of the loose paint.

I sprayed it with a rust inhibiting glossy black paint, then let it dry.

Next I flipped it upside down to paint all the parts I missed on the first coat.  Once more I flipped the stand and walked all around it touching up the paint.

The marble top is wider than this base.  There are wider bases out there, but after I found this one I was afraid to let it go.  I worried that I might  not find another at a price I felt was reasonable. 


I was also concerned about attaching the marble top to the base.  I wanted it to be secure and solid.  I did not want to worry about it flipping off if a heavy object was put on one end.  We decided to cut a length of wood to screw to the base and "glue" the marble to that.    I painted it black to match the paint I had already used.

Then I squeezed out some caulk on the wood top and gently placed the marble on top of that.  We measured to make sure it was centered front and back, side to side.


After it cures, I want to put some castor cups under the wheels to protect the tile.  This is where we will place a Keurig coffee maker for the B&B guests.


Do you like it?  I think the mottled green of the marble goes with the gray walls.  I like the juxtaposition of the old base with a modern coffee maker. Or I will when I get around to buying one.  It seems to pair well with the old sideboard and the modern vessel sink.