Wednesday, June 24, 2020
No More Chickens
I was excited about inheriting chickens when we bought this house. Not only did the previous owners have chickens, but a really sweet set up for them. They had two chicken coops. and a lot of protective fencing.
After both of us got sick over winter and still had to go out and care for them on top of all the other things we had going on in our lives, we decided that if we could find a good home for them, we would let them go. Another factor was trying to buy the food and bedding during the lockdown. In addition, someone kindly went in to the feed store and bought all of the egg crates. Hundreds.
Our daughter has a friend with a small farm nearby. She had been planning on getting chickens, but their current coop was not fixed yet. She was excited about getting the coop, fencing and chickens. We waited for a few months, hoping the lockdown would be over. As it got to be warmer, we decided it would be better to get them moved before the hot and humid weather made it dangerous for the chickens.
After debating methods of moving the one coop that she was taking, she decided to hire a guy who moved small buildings for a living.
We spent one evening moving fencing, so the chickens would have a safe place to go to. Then a few days later we caged the chickens and took down one end of the fencing to remove the coop. He winched the coop up, secured it and took it away.
Then Lee took down the rest of the fencing and took out the brush we didn't want any more. We did save a few trees. He used some of the excess dirt we saved from other projects to start leveling the area and filling in the holes.
We still have one coop. It wasn't as nice as the one we sent with the chickens and it needs some repair. But I think it will make a cool playhouse for the grandson we are expecting in September. Obviously he won't use it for a few years, so we have time to fix it up.
The plan is to add a gutter to keep the water from splashing the from of the house and rotting the wood.
Then we will replace the wood on the front and paint the whole coop.
The top of the nesting boxes will be taken off hinges and secured as a roof with a roofing material. Then there will be little cubbies inside for toys.
The roosts will be removed and the whole inside cleaned.
The house has lights and electricity, so it will have a bunch of options to put in fun stuff for a little boy for his "fort". I will have plenty of time to plan for the "upgrades". I'm open to suggestions. Also open to carpenters to do the work!!
Thursday, May 28, 2020
White Chocolate Macadamia Nut Cookies
Like everyone else, I've been stuck at home with nothing I care to do, until Virginia is allowed to open up. So I have been doing some cooking. I'm bored with all my cooking. I want to got out to a restaurant and SIT DOWN and eat there. Not pick up and drive home with rapidly cooling food.
So I made some cookies. I don't need to eat another carb for months, but that hasn't stopped me. And if you are like me, you should make these cookies. I found some macadamia nuts in the baking section. I bought some white chocolate chips and started searching for recipes. I got this recipe from Allrecipes.com
White Chocolate Macadamia Nut Cookies
1 cup butter, softened
3/4 cup brown sugar
1/2 cup sugar
2 eggs
1 teaspoon vanilla extract
1/2 teaspoon almond extract
2 1/2 cups flour
1 teaspoon baking soda
1/2 teaspoon salt
1 cup coarsely chopped macadamia nuts
1 cup white chocolate chips
Preheat the oven to 350 °.
I use a kitchen Aid mixer for creaming the butter. But you can use any mixer or wear yourself out by hand. Set the mixer beating the butter while you get out the rest of the ingredients.
Add the sugar and scrape down the bowl. Mix well. Add the eggs and mix well. Add in the flavorings. Mix.
In a medium bowl place the flour baking soda and salt. Mix with a fork and add in stages to the butter mixture.
Add the nuts and chocolate and mix until combined.
I use Silpat baking sheets. If you don't, place walnut size lumps on an ungreased cookie sheet. I use a cookie scoop for this.
Bake for 10 -12 minutes or until slightly brown on the edges. Allow to cool on the baking sheet for 2 minutes and then transfer to a cooling rack .
Eat slightly warm with a cup of tea.
I wouldn't have thought to use the almond flavoring, but it was really nice and made these different than others I have tried. Sad to say, these were worth the calories and I will make them again. Hopefully after I have lost some of this lockdown, COVID weight.
But probably not.
Thursday, May 14, 2020
Stump Pulling AGAIN
When we bought this property the owner had left part of it with uncut grass. We wanted to get rid of it. Partly for the esthetics and partly to limit the wildlife. We were tired of finding snakes and RJ was only too ready to chase the deer way past the property line that he is incapable of seeing.
We found a lot of stumps from long cut bushes that made mowing an obstacle course. One of the advantages of a zero turn mower is that you can really zip through the mowing. You can't do that if you hit a highish stump. Our solution was to go over all 4 acres and mark the stumps with a reflecting pole. That way Lee could just avoid the areas until we got out those stumps.
We pulled a lot last year, but then winter came and we gave it up. It is now spring and we are locked down from the corona virus and don't have any more excuses. Except we don't want to.
So we want to get the last of them while the ground is moist from the rain and the heat and humidity haven't hit.
Our routine is to dig around the stump, wrap a chain around it and pull with the tractor. This rarely works the first time as the roots are long and the tractor is small. There we chop a root or two with the pickaxe and try again. And again. And once more. This is why we haven't gotten them all out. It's exhausting.
We have a large pile of dirt from the excavation for the shop. So, after we finish pulling, Lee picks up some dirt with the front loader and fills and smooths the hole.
Then we do another one. Until we give up for the day. Lately three stumps seems to be our limit. Getting old sucks.
But there are three more stumps, so with any luck, we can cross this project off our list by the end of the week.
Face masks
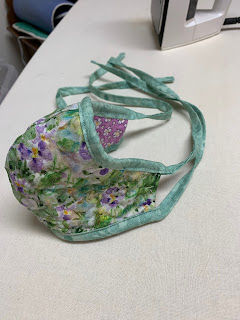
In the middle of finishing the dress quilt for my granddaughter, I started making face masks. The whole world is now in the middle of the COVID lockdown. Face masks are becoming a more common sight and they are hard to get. So a lot of people are making face masks from fabric they have in their homes.
I decided to make a few. I found free patterns online and chose a shaped one. I made one according to the directions and then started playing around with it a bit.
I didn't have any elastic or pony tail holders, so I chose to make fabric ties.
My sister in law said the CDC recommended three layers of fabric. I chose to use some remnants of batting material in the middle. The I did a simple free motion top stitch to hold everything together.
I had some left over cut strips from my most recent quilt and sewed them together. One I made into a crazy quilt design.
I made one for my granddaughter and my son and daughter in law. I also made some for their day care providers. They are considered essential workers, so they have to take their children to day care.
Hopefully this will help keep everyone safe.
Monday, May 11, 2020
A Pillow For The Dress Quilt
When I made the dress quilt for Rachel, I made a practice square. I cut out a dress shape and fused it to a scrap piece of off white fabric.
After I finished the quilt, I didn't want to discard the practice square. I thought I could use some of the left over batting to make a simple pillow.
I added a simple border from the dotted fabric. and a yellow dotted fabric for the back.
I stuffed it with many layers of the batting. Batting is pretty thin, so I used a lot, but the end result is still pretty flat.
I like the combination for a young girl.
I hope Rachel likes it.
I wish I could fly in to visit. Guess I'll wait a few months until it isn't so virus-y.
Labels:
big girl quilt,
dress pillow,
Dress Quilt,
matching pillow
Sunday, May 10, 2020
Dress Quilt
I needed to add a striped border to my dress quilt.
I used the fabric from the dresses and cut a bunch of strips.
I had a lavender fabric for the back of the quilt. It is a pain to drag out two tables to make the quilt sandwich, but I need a large surface to lay every thing out. The backing get placed face down. The the batting is smoothed over it. The last part is the pieced top. Then I pinned the whole thing and started quilting.
I frequently had a helper. But not a very helpful one.
The binding is more of the dotted blue fabric I used around 5 of the dresses.
And now the quilt is done!
Sadly, I had to cancel the trip out to California to deliver the quilt. So I will save it and hope the world goes back to normal soon.
Saturday, May 9, 2020
Big Girl Quilt
I started a quilt before the corona virus lockdown. I'm grateful I had the fabric and a project to occupy myself. But I have also lost interest in keeping up with my blog. So I'm forcing myself to write about my most recent quilt.
I made a baby quilt for my older granddaughter. It was a Rubber Duck Quilt with different rubber ducks on it. It was a quilt for a young child. But now Rachel is 4 and therefore a big girl! I had the urge to make another quilt and I had made on for all of my grandchildren, so I thought a big girl quilt would be fun.
I found a few designs I thought would be fun and I had a FaceTime visit with my granddaughter so she could pick one out. I thought she might enjoy having a connection to the quilt I made for her. She chose one that had a bunch of dresses embellished with cute details.
AFTER we decided on the quilt I discovered that the dress pattern was on pre-printed fabric. And the fabric was discontinued. This meant there was no template to make the basic dress shape. I took a lot of pictures of the pattern up close and spent a long time printing it out and then playing around with the size and shape on cardstock until I had the shape that I thought would work.
I cut it out and used it as a template to cut out dress shapes in different fabrics with small details. I used Steam A Seam fusible web to fuse the dress shape onto a plain square of white fabric.
Then I embedded each one with bits of lace or ribbon to make cute little dresses.
I sewed several different apron styles similar to the ones in the inspiration quilt. There were no instructions, so I had to wing it, but I like the end results.
I made and embellished 15 different dresses. I really like the way they turned out. Next I sewed a border of dotted yellow, blue or purple on each dress square.
I added a pink sashing and now I am ready to add the border.
The cat likes to "help"
Tuesday, January 21, 2020
Lemon Butter Chicken
I recently started a new low carb diet. I saw a recipe that fit my diet on Tip Hero. It was a one pan meal, so that was nice, too.
Lemon Butter Chicken
4 large chicken breasts
1 1/2 teaspoons paprika
dash salt and pepper
1 Tablespoon butter
1 teaspoon minced garlic
1/2 cup chicken broth
1/2 cup heavy cream
1/2 cup grated parmesan cheese
2 cups baby spinach, chopped
1 lemon, zested and juiced
1 teaspoon dried thyme
Preheat the oven to 400°.
Cut the chicken breasts in half, lengthwise. Place them on a plate and season both sides with the paprika and salt and pepper to taste.
Melt the butter in an oven proof pan. I used cast iron. Sear both sides of the chicken for 2 to 3 minutes. Remove to a plate. Add the minced garlic and stir for about 20 seconds. Stir in the broth, heavy cream and cheese.
Bring the mixture to a simmer and add the chopped spinach. Cook until the chicken is wilted and the cream has thickened slightly.
Stir in the lemon juice, zest and thyme. Place the chicken back in the pan and put it in the oven. I turned the pieces a few times in the sauce to get the lemon flavor on both sides of the chicken. Bake for 15 to 20 minutes.
I served the chicken with a small salad. I stayed within my Atkins guidelines and had a really nice meal. Lee liked it and he isn't on a diet, so I considered that a win.
Labels:
Atkins,
lemon butter chicken,
low carb,
one pan meal,
Tip Hero
Subscribe to:
Posts (Atom)