Showing posts with label quilt. Show all posts

Saturday, May 9, 2020

Big Girl Quilt

I started a quilt before the corona virus lockdown.  I'm grateful I had the fabric and a project to occupy myself.  But I have also lost interest in keeping up with my blog.  So I'm forcing myself to write about my most recent quilt.

I made a baby quilt for my older granddaughter.  It was a Rubber Duck Quilt with different rubber ducks on it. It was a quilt for a young child. But now Rachel is 4 and therefore a big girl!  I had the urge to make another quilt and I had made on for all of my grandchildren, so I thought a big girl quilt would be fun.

I found a few designs I thought would be fun and I had a FaceTime visit with my granddaughter so she could pick one out.  I thought she might enjoy having a connection to the quilt I made for her.  She chose one that had a bunch of dresses embellished with cute details.


AFTER we decided on the quilt I discovered that the dress pattern was on pre-printed fabric.  And the fabric was discontinued.  This meant there was no template to make the basic dress shape.  I took a lot of pictures of the pattern up close and spent a long time printing it out and then playing around with the size and shape on cardstock until I had the shape that I thought would work.


I cut it out and used it as a template to cut out dress shapes in different fabrics with small details. I used Steam A Seam fusible web to fuse the dress shape onto a plain square of white fabric.


Then I embedded each one with bits of lace or ribbon to make cute little dresses.


I sewed several different apron styles similar to the ones in the inspiration quilt.  There were no instructions, so I had to wing it, but I like the end results.


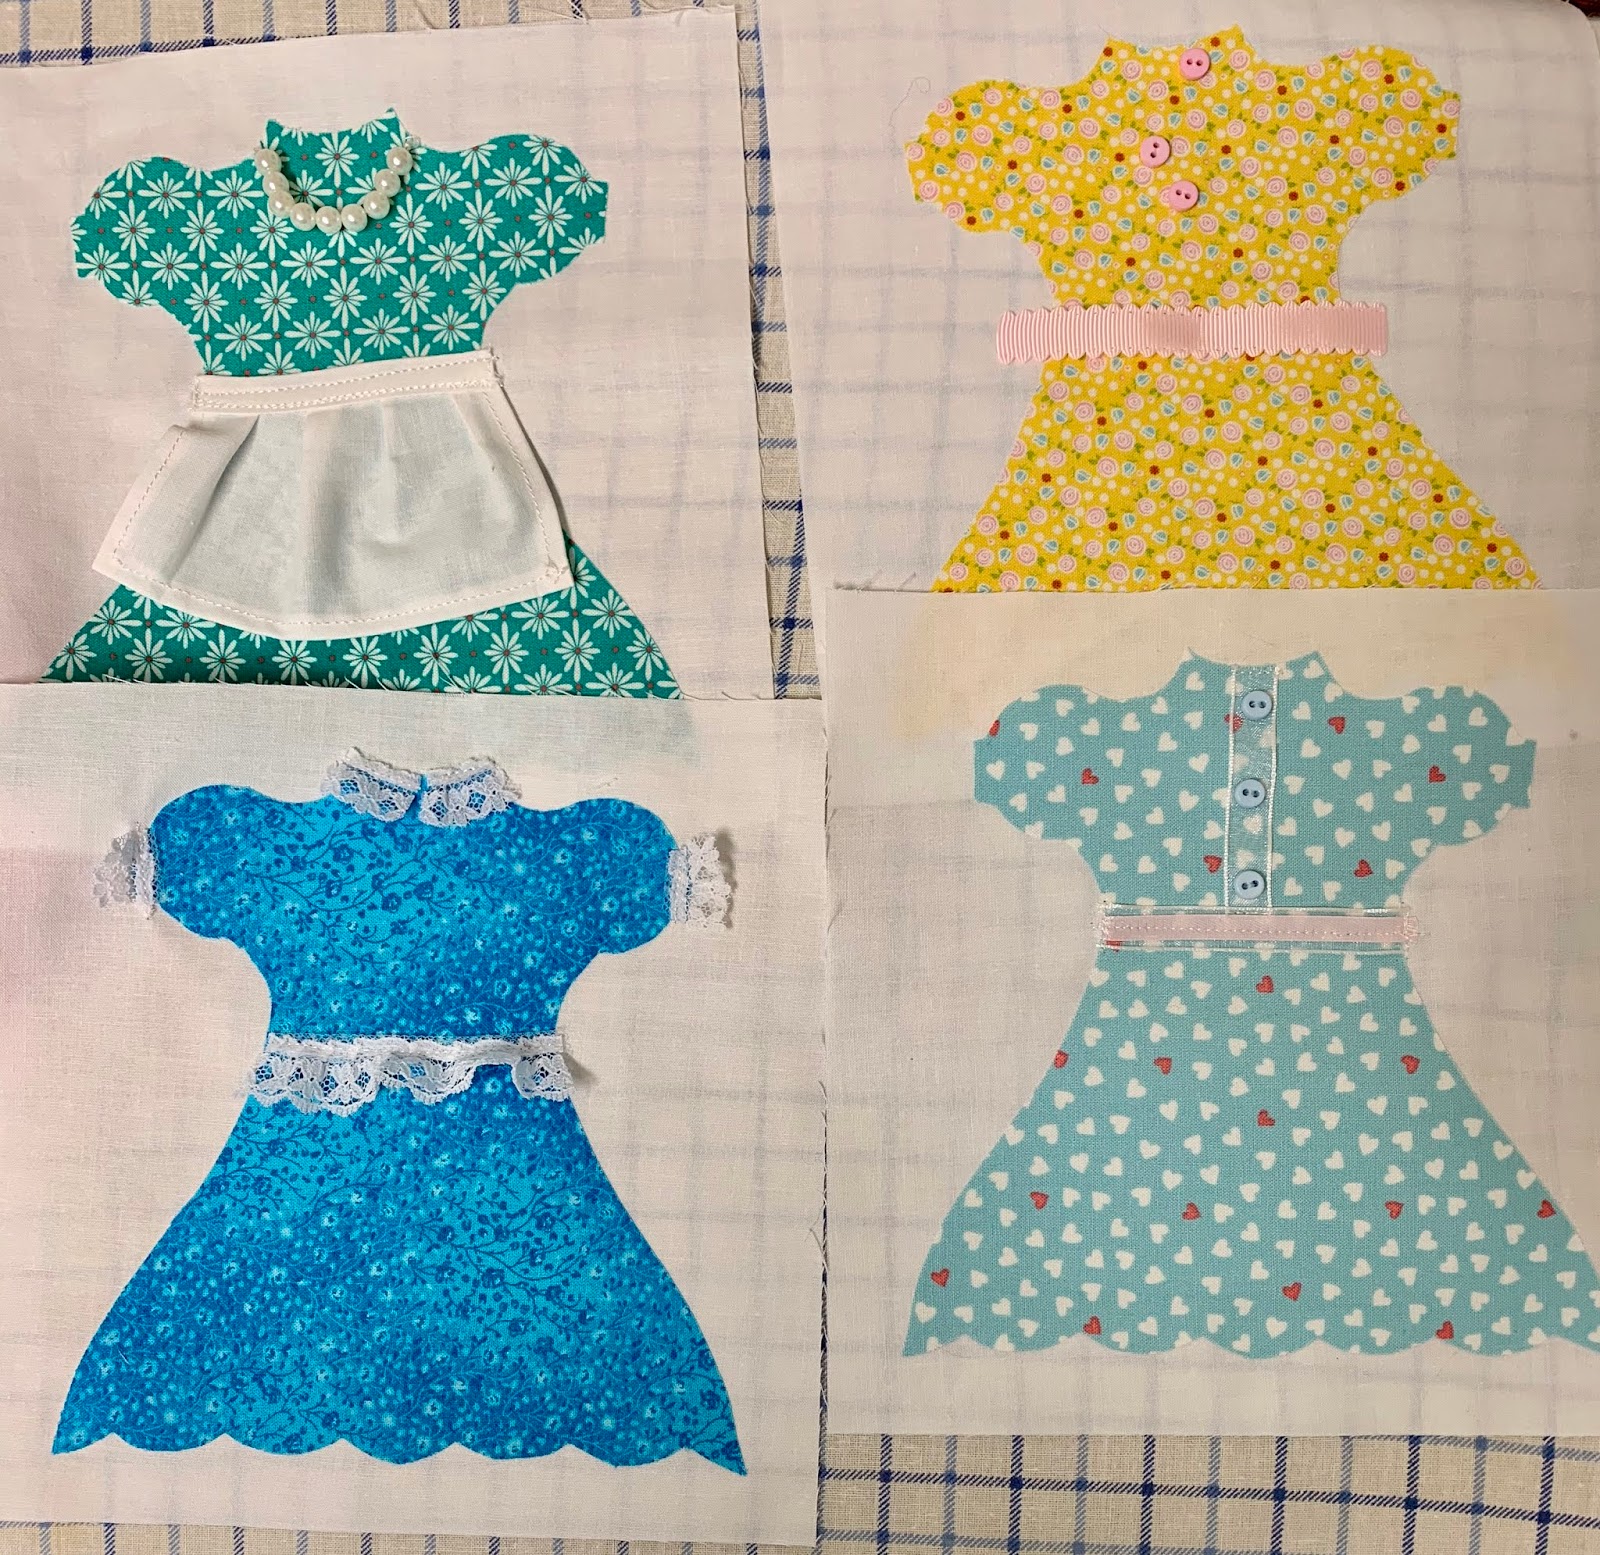
I made and embellished 15 different dresses.  I really like the way they turned out. Next I sewed a border of dotted yellow, blue or purple on each dress square.


I added a pink sashing and now I am ready to add the border.


 The cat likes to "help"


Thursday, October 10, 2019

More on Rosalind's quilt

Rosalind started this cathedral window quilt and I am going to finish it.  It won't be exactly as she planned but I wanted to highlight her work, not mine.


I found one square that Roz had written on with pencil.  She wore her name and birthdate on  corner.


Her husband was Arnold Yasui. She had written his name and birthdate on the opposite corner.


I used an off white thread to backstitch those details. This square will be the center of my quilt.


My sister's nickname was Pinky. and the colorful fabrics she chose had various shades of pink.  I chose a pink fabric with tones from the "window" pieces.  This became the sashing between the squares.

I thought too much pink would take away from the squares, so I picked a green fabric that worked with the green of the "windows".


I need to add a back piece, some batting and start quilting.

Monday, October 7, 2019

Rosalind's Quilt


My sister Rosalind started a quilt. It is a cathedral window pattern and is all hand stitched.  It is made with triangles of a light fabric.  You fold the edges of the triangles over a square of a patterned fabric, to sew it to the fabric in a diamond shape.  Like this.


Roz hand stitched everything.  I don't know if she even owned a sewing machine.

Then she passed away and the pieces were forgotten in a storage space.  Her husband remarried and then he got cancer and passed away.  His widow contacted me and as she went through the storage unit and has Kindly sent me several boxes of Rosalind's keepsakes.  The quilt squares were in one of the boxes.

I decided the quilt needed to be finished.


The finished squares had a lot of issues in terms of evenness.  I tried to fix them with ironing.  This was minimally effective.


There were over 100 squares.  The original pattern called for all the finished squares to be sewn together and then continue adding in the colorful squares. There was enough fabric to do so and I thought about finishing it that way.  ButI didn't want to hand stitch a quilt that was going to end up King size.   If I machine sewed it, there would be an obvious difference between the triangles.  Also, it would be more my quilt, at the end, then the quilt Roz started.


I decided to keep the squares as she made them and assemble it as I would any other quilt.

I also chose to take the advice of the folks at my local fabric store, Web Fabric.  They suggested  breaking the quilt up into two smaller quilts.  It would be much easier to do the quilting on my regular sewing machine.  It meant that I could make the second quilt for my niece.  She and Roz had started the quilts together and she was a thrilled when I asked if she wanted a finished piece.

I chose some pink fabric to be the sashing between the squares and to try to even them up. My sister's nickname was Pinky, so this was an homage to that.  I'll get to that next.

Friday, December 8, 2017

Quilting Again


Years ago I bought what is known as a jelly roll when my favorite quilt shop was going out of business.  A jelly roll is  a bunch of fabrics that all work together, cut into strips for quilting or other projects.  Then I started making my fabric baskets and the jelly roll sat on a shelf in my craft room.

I have sufficient baskets, so I decided to take a shot at a new quilt.

My friend, Doris, showed me a fun way to use jelly rolls to make a lot of fabulous quilting squares.  This technique was originated by 3 Dude's Quilting by way of Missouri Quilting.  You can see the video here


Take four strips and sew them together.


Cut them into squares.  Place one square with the strips running vertically.


Then cover that square, with the right sides together, and the top square running horizontally.


Sew a 1/4 inch seam around all four sides.


Cut the square from corner to corner, making four triangles.


Press them open and that is the basis of the finished square.


I have been having fun trying different ways of putting these squares together.  I have tried using two squares from different strips.


Next I tried two squares from the same strip set.


I like them all!

I have quite a few finished squares and will spend then next few weeks making up all of my strip sets into quilt squares.


This technique is quick and I am having fun putting them together.


Sadly, now I need to go back to the fabric store to but the rest of the fabric to finish the quilt top.  It is always a risk going to a fab ricin's store.  I may need to buy some extra fabric for more baskets.

Friday, April 5, 2013

More Quilting


I am really liking my Deco 340 embroidery machine.  This is even when it messes up.  I tried the other quilt program I bought and it took a little work, but I finally figured it out.

The first one I tried fit in the 4 patch squares of the Star Points.  I was able to line up the grid marks of the hoop for the embroidery on the cross where the fabric was stitched together in the middle of the squares.  The squares I was working on today are much larger.  Each square of the 4 patch is the size of the whole 4 patch in the Star Points.  I decided to use the simpler pattern and to do one in each square.  I would have just enlarged the pattern and done one big one, but the pattern can only be enlarged about 106%.  I DID try it, even with a larger hoop.

So I did one in each corner.  Naturally there were issues at the start, but this time I learned my lesson.  Stand with the machine and if it messes up, STOP it.  This greatly lessens the number of stitches you have to remove!


The pattern is too busy to mark a line on the fabric, even if I had remembered to buy one at Alpine Sewing when I was there.   (I did order one online, but I have to wait for that.)  Instead I measured each corner and put a pin in the exact center.  Then I measured from the other side and marked that.  The hard part is getting the fabric centered exactly in the hoop.  Tug a little here and it pops out there.  Once it is in place I removed the plastic grid and attached the hoop to the machine. 


There are little arrows on the screen that I press to move the needle a minute amount one way or the other.  I play with them for awhile and then start the machine.


My Deco kindly stitches a few stitches and then pauses while I cut the ends of the top thread and the bobbin thread.  Then I push start again and away it goes.  There are times when the design call for a row of stitches to be stitched over again.  This is both to make the line thicker and more noticeable and to get to the next area to be stitched.  At times the lines are not right over the first row.  I could be bothered by this, or I could assume it is because the fabric of the quilt is big and heavy and that causes the discrepancy.  I'm going with the latter and not worrying about it.  If someone examines my quilt that closely there are going to be WAY more problems than that!  This is only my third quilt, after all.  I expect to get better, but I don't expect to be perfect right off the bat.  Good thing, too, because I am not!


It obviously takes longer to finish a square when you have to do four different hoops full of stitches.  Each one has to be measured and then aligned and then stitched.  It takes 10 to 15 minutes for each hoop, so this is not a quick process.  It is, however, WAY faster than hand stitching the whole thing!  I also like the way the four areas stitched look on the back of the quilt.  It is fun and I love learning new things.


 Even as I work on this quilt I am planning the things I am going to embroider next.  After this I will write a label and use that for the back of the quilt.  I have to decide if I want to do a label and then stitch it on or stitch the label right on the back of the quilt.  Hmmmm.

Monday, April 1, 2013

Blue Border, Quilted


We had a bunch of errands to do today, so all I did was quilt the blue border.  I didn't know what to do there.


I found a template that I used back when I was doing a lot of scrapbooking.  It has a scalloped edge for making scalloped borders.  I used my chalk marker and ran a scallop down the middle of the border strip.

I would have marked the whole thing and done a continuous line, but in the past this has been a mistake.  The chalk is very light and rubs off easily.  You can't mark too many things at one time or the markings disappear.


This border is very narrow and close to the edge of the quilt so it fit easily under the machine arm.  I had to go slowly.  If I sewed too fast, it was difficult to make the turns smoothly.

It turned out OK.  This fabric is thinner that the rest and can pull and stretch a bit. It also collected an amazing amount of cat hair.  Not sure where THAT came from. 


 My hope is that any anomalies can be ironed out when I am all done!  And sticky tape should help....


Next I have the wider green border to decide.  I don't know what I will do there.  I want to do triangles within triangles i side the light blue triangles and I think they will be not too difficult to do.  Once again I will have to stop and start to keep the bulk of the quilt from jamming under the sewing arm when I turn the fabric

Tomorrow I take the embroidery class and I hope to learn how to do some really fun things.  I'll let you know!.

Sunday, March 31, 2013

Quilted Star Points


It took a while, but I finally have the outside of the star points quilted.  I just tried to get 1/4 inch from the edge and went all around the star.  I love my new Janome and can't blame the machine.  Any mistakes are ALL operator error!


  The lucky thing is most of the Star Point Squares are close to the edge.  When I do the middle squares I will have to get really good at free hand quilting.  Trying to spin a quilt and get all the fabric jammed under the machine is no easy task.  I got a free hand foot with my new machine and have been practicing.  I wish this one went backward with out holding the reverse button down.  I THINK I could do that OK.


The hardest part is when you have to turn the quilt and there is a bunch of fabric under the arm of the machine.  In those cases where I just could not do it, I cut the thread, turned the whole quilt around so the smaller edge was under the sewing machine arm and then finished that particular square.  It worked pretty well and now I have to decide what to quilt next!


Maybe I'll do that blue strip.  I can't do the light blue triangles until I get a thread that matches it.

I have a class on the Deco 340 on Tuesday and I think I will take my quilt.  Maybe they can show me how to embroider on it right there. I want to learn how to use the embroidery machine with the quilt patterns to do the center of my Star Point Squares.   That way there is no chance for me to mess it up when I get home and forget what they just told me.  Ain't old age grand???

Saturday, March 23, 2013

The Quilting Shall Commence


I haven't taken any classes on my new machines, but I thought I was ready to start the quilting process.  This takes a looong time for me.  I have to sit and look at each section and figure out what I want to do there.  The easiest part seemed to be the keyboard striped section on my quilt.  It is fairly close to the edge, so no fighting to get it in and I am just going to go up and down each line.


Naturally I had to stop and take out some stitches.  I was going to stitch 1/4 inch in and then decided to do it right on the edge.  Seriously, Rebecca, it would be a lot easier if you could make up your mind BEFORE you started, rather than after!  The new machine tends to take one, or maybe even two stitches after I stop pressing on the foot thingy. ( Is it called an accelerator? Can't be.  Ooh.  Speaking of cars, Lee just bought another one. A 1974 Camaro.  He says this will get him going on finishing the truck that is waiting for paint. : /)


The thread I got for some of the top stitching is pretty cool.  It is variegated and it seems to disappear into the more colorful sections of the quilt.  I learned to pick a bobbin color that fades into the backing after the first quilt.  This is also helpful in hiding mistakes that a novice, such as myself, might (will) do. 


The hardest part is turning the quilt around and around.  As long and the area in front of the needle is smooth and flat I just go for it!


I can't do too much sewing today.  I have to go take a nap. We're going to the Carrie Underwood concert tonight!  (You know you're really old when you have to plan a nap to go to a concert.)  It is supposed to snow tomorrow and that will be a good time to get some sewing done.  Assuming we have power!

Sunday, December 23, 2012

Don't Do As I Do


I had this brilliant idea.  Why cut the borders for my quilt to a set length and then discover it was too short or too long?  I cut them a bit longer until I finished sewing them on and then cut the perfectly on the edges.  How smart am I?

Not so smart.  I guess I pulled a little too much on one of the borders and it got stretched out.  Just a wee bit.  About 1/2 inch.  But enough that I couldn't get the next border to sit properly.  So THAT is why Carolyn at the Old Trinity Quilt shop told me to cut it to size?  Then she reminded me to pin it at each end and the middle and then make sure it fit evenly all along the edge.  This seemed overly fussy to me at the time, and now that I know there is a good reason for it, I will be overly fussy in the future.  I guess I have to know the WHY of something.  I'm too stubborn to just follow the rules.  Gotta know why.  Good thing I'm not in the Army.


That meant I had to take out the whole side and then cut a bit off , pin it the RIGHT way and sew it again.  Next I cut and put on the rest of the borders and I am done with the top.


I put the quilt away for the rest of the year.  I may get a new sewing machine and I will use that to do the final quilting.  Two of our kids (adult children) are coming for Christmas and when I am working on a project I tend to get engrossed and forget about everything else.  I want to finish it.  Then I need another project.  So I will think about it next year.


So what did I do?  I set up the craft room for stained glass, that's what. 


I will go with the kids to Christiansburg to visit Tech and use that as an excuse to see the stained glass store there.  I hope they are open between Christmas and New Year's.  After I finish the transom I will start thinking about the quilt again.


So family will take precedence and I will wish you all a Merry Christmas and a Happy New Year.  There will be some baking going on, so I hope to have some recipes to post soon.