Saturday, August 30, 2014

Breakfasting

We have had quite a few visitors to our B&B recently.  This means I am too busy making tried and true meals and have no time for experimenting with recipes.  I hesitate to make something for B&B guests that I haven't made for us at least once.  You don't want people to think this was a great place to stay , but the food was a bit iffy.

So here are a few of the items we've had for breakfast lately.

Chocolate Hazelnut Croissants.  They are made with puff pastry and the pastry is flaky and the chocolate is warm and melted and they are REALLY good.


Sometimes we serve red grapefruit. I covered the grapefruit halves with brown sugar and broiled them for a few minutes to warm the fruit and melt the sugar.


Last was the frittata with diced red potatoes sautéed with onions and sausage.  I used a mix of Mozzarella and Havarti cheeses and baked it in a cast iron pan.  The frittata was served with a sprinkling of cilantro and a few slices of cantaloupe..


All are served on china with silver flatware.  And the guest don't have to do the hand washing and polishing.  That is Lee's job.

Don't forget coffee or tea and orange juice.

One of the best parts of our breakfast is that it is served on the screened porch with some gorgeous views of the mountains.

Wednesday, August 27, 2014

Cast Iron Care

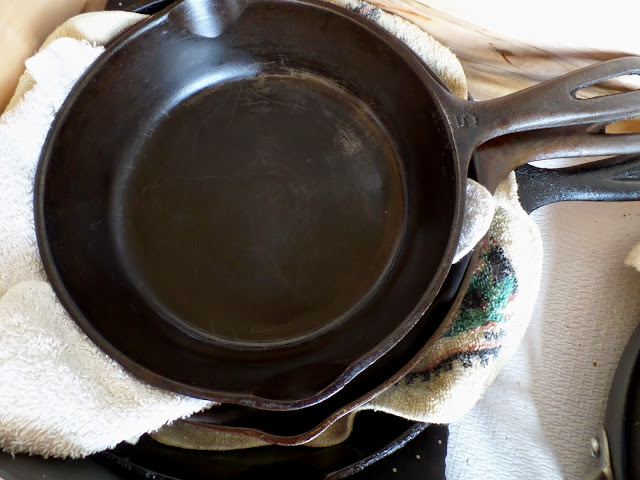
I have acquired a small collection of cast iron pans.  I use them quite a bit.  There are a few dishes I make for the B&B guests where the cast irons pans are perfect. 

Then you have to clean them.  You are not supposed to use soap.  And soaking them in water is also a no-no.

One suggestion I have found is to fill it with hot water when the pan is still hot to loosen any stuck on food.  That works if you do it when the pan is still hot.  When the food loosens, scrape it out and empty the pan.  Then wipe it dry.  You can't leave water in it to soak.  Sometimes, when serving and preparing, I don't get the hot water in the pan soon enough. Then I resort to using a sponge with a scratchy side.


Recently I came across an article suggesting I use Kosher salt.


You sprinkle the salt in the pan and use a paper towel to rub it all around and scrub the pan clean.  I tried this and it worked!

After it is clean, you wipe it out and then you have to oil the pan.


I place a dollop of canola oil in the pan and rub it all around with a clean paper towel.


Then I store my pans in a small stack with an old dishrag in between to keep them from scratching.  The rags absorb a bit of the oil, so they also help to keep the pans oiled and rust free.

I buy pans from antique stores.  Just make sure they are smooth on the inside and well seasoned.  Any rough spot will be a place where food will stick.

And it is an easy source of iron for your nutritional needs!

Monday, August 25, 2014

Green Candy

We recently bought a bag of salt water taffy.  I know.  Not something we should have done.  My excuse...shopping, hungry, convenient.


I was good and had a few while we were out.  The bag went on a shelf in the pantry.  Yesterday I noticed a small pile of just the green ones.  All the others had been consumed.  Except for them.

Why do candy manufacturers make green candy?  Is there anyone that likes them?  Think about it.  Don't you pick out the green jelly beans? 


I'm not talking green Jelly Belly flavors.  Those are great.  But the regular green jelly beans.  Gross.


Now I started thinking about green candy.  And I must admit I do like the green Skittles.


It is obvious that I have an appreciation for all things candy  I blame my parents.  We rarely got candy and if we did it was a special treat or given for doing something special.  So we CRAVED it.  And I still love the unhealthy little blighters.  Granted, I am a grown adult and should have overcome minor childhood traumas by now.

So, tell me.  Do you like green candy?

Saturday, August 23, 2014

Roasted Blueberry Tart

My cousin Saja sent me a link for a blueberry tart.  I printed it out and saved it.  I have been working through my pile of saved recipes and came upon it.  It was delish.  I am going to make it for my next guests.  That good.

This recipe is from the lemonsforlulu.com site and I didn't change a thing.  It was perfect the way it is.  Although, I may try to do it with lemon zest next time instead of the basil..  That would be good, too.  Yep.  Good idea.  I'm going to do the lemon zest!


Roasted Blueberry Tart

1/2 package puff pastry
4 oz. mascarpone cheese, softened
2 oz. goat cheese, softened
1 1/2 cups fresh blueberries
1 teaspoon vanilla
4 Tablespoons sugar
1/4 cup basil, thinly sliced

Set the frozen puff pastry package in the refrigerator overnight.  It will be thawed in the morning.


Heat the oven to 400°.  Place some parchment paper on a large cookie sheet.  Set aside.


Sprinkle some flour on the VERY clean and dry countertop.  Open the puff pastry and remove one of the two puff pastry dough sections.  Tape the package closed and put it back in the freezer for your next adventure.  In fact, you can go to my post on chocolate hazelnut croissants http://shenandoahgatewayfarm.blogspot.com/2014/05/chocolate-hazlenut-croissants.html
(Don't look at the misspelled title.  I can't fix it!) and use the other half  of the puff pastry dough for that.


Roll out the dough until it is about 13X11 inches.  Place it on the parchment covered cookie sheet and bake for 12-15 minutes, or until golden. 

While it is baking place the mascarpone and goat cheese in a small bowl.  If it isn't soft enough, and mine wasn't, pop it in the microwave for about 8 seconds.  Hey, if 8 seconds is good enough to revive a not Fresh Hot!  Krispy Kreme doughnut, it is good enough for softening this cheese.  Stir until combined.

Remove the puff pastry from the oven and let it cool.  I lifted the parchment paper by the edges and moved it to the counter. 


Turn the oven up to 450°.  Place the blueberries in a medium bowl.  Pick through them for any stems and remove them. 


Add the sugar and vanilla to the berries, stir to coat and spread on the cookie sheet you used for the puff pastry.


Roast for 10 -12 minutes, or until bubbly. 


While the berries are roasting, spread the softened cheese mix onto the cooled puff pastry. 


Wash, dry with a paper towel and stack a few basil leaves. 


Thinly slice them.

Take the berries from the oven and scrape them off the cookie sheet and on top of the cheese mixture.


Sprinkle the thinly sliced basil leaves on top of the tart and serve warm. If you wish you may skip the basil and try using some lemon zest.  I'm going to try that next time I make this delicious treat.


This WAS delicious and not overly sweet.  The goat cheese added a nice tang.  I will be making this for guests at the B&B.

Friday, August 22, 2014

Freezing Corn

Our corn is ripening faster than we can eat it.  I surfed around the Net to see what to do with it. I thought about canning it and then decided to freeze it. 


It is recommended that you cook it before you remove it from the cob, so I started some pots of water and went picking.


RJ helped.


I then set up a husking station to keep most of the corn silks outside.


Almost all of the corn has a bug or worm at the tip.  The older the cob the more that was eaten.  Just a tad gross. 


I broke off the cobs with major damage and brushed off any small critters into the trash.  I wanted to keep those out of the house, too!


First I cut off the tips where the depredation had occurred.  Then I washed and removed the majority of the silk and popped the corn into the boiling water.  OK.  I didn't POP the corn.  You know what I meant.


While one batch was cooking I worked on the remaining corn.  I boiled for 7 minutes.

Then I removed the corn and rinsed them under cold water to stop the cooking and drained them.  You don't want watery corn.


I had already removed the tips, so I set the corn tip down on the cutting board and cut down through the kernels.  Cut about 3/4 of the way through to avoid the tough bits where the corn comes out of the cob.


Keep a trash bag handy for the cut off bits.  Then you just tie it closed and toss.


I placed the cut kernels in a single layer on cookie sheets.  They sometimes come off rows, still stuck together.  You can separate these rows to get the trapped bits of silk that wouldn't come off earlier.

Freeze for an hour or two.

When the cookie sheet came out of the freezer, the corn was stuck to the sheet.  I waited a few minutes and they had melted just enough to scoop them up with a spatula and dump into a Ziploc vacuum bag.


After I sucked all the air out , I had a nice full bag to freeze for winter soups or southwestern dishes.

Here's the thing.  First I prepared the ground, digging out the weeds, and double digging to work in the soil amendments.  Then I planted the corn in three rows of about 8 feet long.  I did three sets of rows, planting them in two week intervals so they wouldn't all come ripe at the same time.  I had to water when there had been no rain for a few days.  I weeded between the rows until the corn grew about 4 feet high.

The picking, cleaning, cooking, cutting and freezing took about 2 hours.  I have one full bag of corn to show for it.  Granted I still have corn that isn't ripe, yet. 

I will not be freezing any more corn.  I will probably not grow any more corn, although it is quite tasty.  I can buy three ears of corn at the grocery store for $.99 all summer long.  They do not have bugs in them.  Farmers in Iowa (Is this Heaven?) or other corny places grow lots of corn and I like to support farmers.  If I buy it at the store when I feel like corn, I only have to eat THAT corn.  I don't have to eat corn at times when I don't feel like corn for dinner, merely because it is ripe. 

Canned corn is even cheaper.  It has no silk in it that has to be picked out.  It sits on my shelf, patiently waiting for me to desire corn.

When I eat my frozen corn, if I figure minimum wage for all the work I did to get it, each kernel will have cost about 75 cents.  I liked doing it.  I will like eating it.   I will not do it again.


At least I won't do it until the zombie apocalypse.  Then I will have to raise my own food and fight off hoards of zombies and others trying to eat me or my food.  But I can wait until then.

Thursday, August 21, 2014

Cheesy Chicken and Rice

I started thinking about a dish I used to make when the kids were little.  If you have kids, you know that a lot of meals are geared towards getting them to eat and not complain.  I used to make what I called Turkey, Gravy and Rice.  Basically I made rice, cut up some leftover turkey and covered it with a white sauce.

I wanted to make it a bit healthier, so I added some zucchini and I had corn in the garden, so I put in some of that.  But then I decided to make a cheese sauce rather than just a white sauce.  Well, there goes the whole "make it a bit healthier" part!  But cheese has protein, right?  That HAS to be better than just a white sauce.  Besides, this is comfort food.  And I used brown rice.  So there.


Cheesy Chicken and Rice

1 cup brown rice, cooked according to the directions
1 very large chicken breast, diced
1/2 cup chopped onion
1 cup diced zucchini
corn kernels from one ear, about 1/2 cup
1 teaspoon minced garlic
salt and pepper to taste

Cheese sauce

2 Tablespoons butter
2 Tablespoons flour
1 teaspoon dry mustard
1/4 teaspoon salt
1 cup milk
1 cup shredded cheddar cheese


Start the rice.  Brown rice takes almost an hour to cook.


Go out to the garden and pick an ear of corn.  What?  You don't have corn growing in your garden?  Well, then use one of those little cans of corn.  Do I have to spell out everything? 


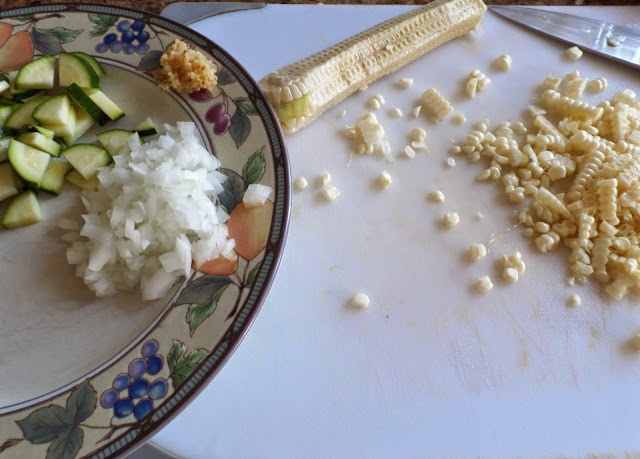
Shuck the corn and cut off the kernels.  Set aside


Dice up the chicken breast and heat some olive oil.  The diced chicken will cook quickly.  When it is no longer pink inside the biggest piece, remove it to a bowl and add a bit more olive oil to the pan.  Place the zucchini, corn and onions in the pan over medium heat and cook for about 5 minutes.  The onions should be translucent and the corn and the zucchini may start to get brown.  Add the garlic and cook for just a minute or two.

Garlic can get bitter if you cook it too long, that's why you add it last.

Place all the cooked veggies on top of the chicken in the dish.

Start the cheese sauce.


Melt the butter in a medium saucepan.  Add the flour, salt and mustard. cook for a few minutes so the flour gets a bit toasty.  Add the milk and continue cooking and stirring.  It may be lumpy, so use a whisk to make the sauce smooth.  In a few minutes it will thicken.  Then add the shredded cheese.  Stir until all the cheese is melted and remove from the heat.


By this time the rice should be done.  Put the rice on top of the chicken and veggies and stir to combine. 


Pour the cheese sauce over the top and give it another stir.  Don't spill on the lottery ticket.  That could be your ticket to retirement in the country.  Wait.  We are retired in the country.


Are you tired of cooking?  Me, too.  So serve with a wedge of watermelon or something else easy.

If you are serving small children, leave out all the healthy bits.

Sunday, August 17, 2014

Peaches and Cream Cheese Muffins

So I've been in a muffin sort of mood, lately.  Also, I have been trying to use the local peaches that are so good right now.  And healthy.  Yes, I'm trying to make them healthy.  Sort of.  Mostly.  Hey, look!  Oatmeal and peaches.  A healthy break right there!


But, delicious.  No point in making something healthy and gross.


Peaches and Cream Cheese Muffins

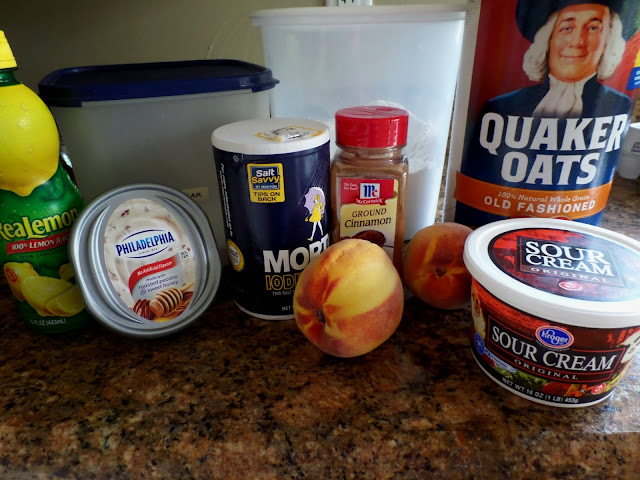
1 egg
1/2 cup sour cream
1/4 cup canola oil
1 cup flour
1/2 cup oatmeal
1/2 cup sugar
2 teaspoons baking powder
1/2 teaspoon cinnamon
1/2 teaspoon salt
1 cup peeled and chopped peaches
1/2 teaspoon lemon juice

Optional cream cheese filling

Philadelphia Honey Pecan Cream Cheese , set out to soften.


Heat the oven to 400°.  Spray a muffin pan with Pam and set it aside.  This recipe made 10 muffins.


Place the egg in a large bowl and whisk it up.  Add the sour cream and oil and whisk some more. You can place all the dry ingredients in a separate bowl, then mix them and add, but I didn't do that. 

Mix in the sugar.  Then sprinkle the baking powder, cinnamon and salt on top of the egg mixture.  Whisk it in. Replace the whisk with a spoon and mix in the flour and oatmeal.  Set aside


I like to let the oatmeal sit with the moist ingredients.  That way it disappears into the muffins.  Now peel and chop the peaches.  It took me about two medium sized peaches to make a cup.  Stir the lemon juice into the bowl of peaches to keep them from turning brown. 


Fold the peaches into the batter.


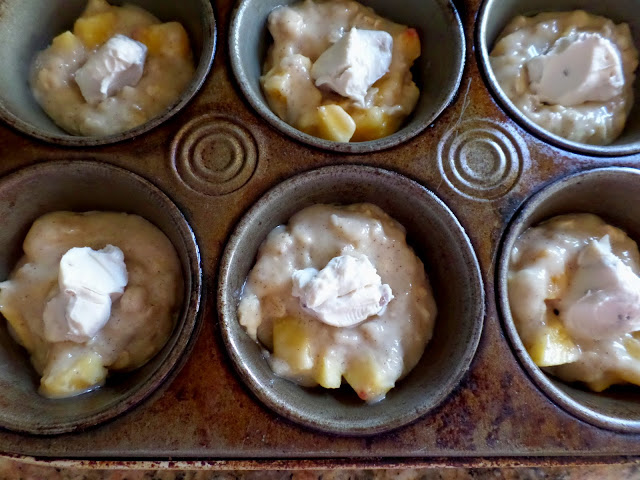
Fill the muffin indentations about 1/3 full.  Place a teaspoon of the flavored cream cheese filling in the center of the batter.  Then cover it with a similar amount of batter.


Bake for 20 to 25 minutes.  Insert a toothpick at the edge of a muffin to check to see if it is done.  You want a clean toothpick, but you might not get one if you dip it in the cream cheese filling.

Cool for a few minutes and then turn out onto a wire rack to finish cooling.  These are best served warm.  And a tad of butter never hurt any muffin. 


They were also good the second day.  And the third.  Hey, there are only two of us.  We kept them in the refrigerator, because of the cream cheese filling, and then warmed them in the toaster oven.  But they were the best on the first day.

We really liked these with the flavored cream cheese filling and it was so easy to do.  You may make them without the filling, though and they will still be delicious.