
I took the quilting class on Saturday. We spent 6 hours learning a new technique and reminding myself of a couple of old ones. The new one is the stack and whack. This is where you stack various layers of fabric and cut them (whack) into squares. I will try to explain how it works.
First we had to tear down the center of our floral fabric . It is too wide to use otherwise. Then you have to figure how far apart the repeat on the fabric is. All fabric repeats the pattern over and over and it is can be 8 inches or 12 inches or whatever. You just have to pick a spot and see where it comes up again. We were told not to cut off too long of a piece as it is difficult to work with. My repeat was 8 inches and I needed to cut off two repeats.

There is kind of a cool trick. First you need to straighten one end and to square it up, so use the long ruler to cut an inch or so off the fabric making sure it is square. This strip is your repeat finder. Slide it along until you find where the patter repeats. Then go to the next one. Carefully pin it so that strip disappears into the pattern. Use the ruler to cut the two repeat section.
Using the cut piece, lay it down on the fabric and find the exact spot where the pattern matches up. You want to be exact. Then cut another one. Repeat this until you have 4 layers. We were cutting for a 4 patch posie, but there are other versions where you need 6 or even 12 layers. Better use a new cutting blade for those!
Now is where you line everything up EXACTLY. Line your layers up as evenly as you can. Start in one corner with a straight pin. Find a pointy part or a corner in the pattern and stick the straight pin into it.

Then lift up each layer and reposition the point in the exact location on the next layer.

Once you have gone through all four layers, pull the pin all the way through and use your flat head pins to pin on either side of the straight pin.

Pull out the straight pin and pick another point and start all over. Do this across the top and the middle and the bottom of your fabric, about 4 pins across the width. Now it is perfectly lined up and you can cut your strips.

This is where you will be glad you are using the flat head pins. Otherwise when you set the ruler down on top of the pins to cut your strips, your ruler would not sit flat and the cuts would be off.

DANGER Will Robinson! Please do not smooth your hand across the fabric to get rid of any unevenness in this process. You will poke yourself. You will bleed. And bloody spots are very unattractive in quilts. And remember before you cut a strip to CAREFULLY run your finger down beside the ruler to make sure no pins are sticking into the cutting area. This will dull your very expensive cutting wheel.
For our quilt we cut one big set of squares (9 1/4) for the center of the quilt

and then strips of 3 inches and 4 1/4 inches. These were then sub-cut into 3 inch and 4 1/4 inch squares. Pin each set of four to keep them separate from the others.

Now for the fun and creative part. Deal out the four squares. Place the identical part of the pattern in the center of the square. Does that look like an interesting pattern?
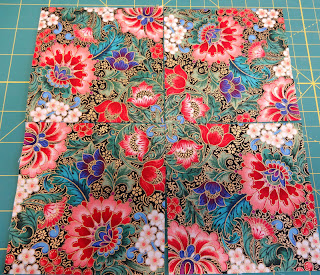
Well, try the others before you decide. Many times you will like one you didn't think you would like until you placed the fabric and then stood back. The best ones are where there is fancy swirl in the middle. Or when colors pop out at you that you hadn't noticed before! Even though they are all from the same fabric, you will have many different designs.

Now I have all the centers sewn together and I have to start cutting out frames for the larger squares and Flying Geese for the smaller squares.
Even though I have just started, I am getting excited about this quilt. It is really going to be pretty and interesting to look at. I can't wait. I have to take a day to do some trimming and some work in the basement. But I don't want to. I tend to get myopic when working on a new project and I would rather do that than any of the other projects that aren't as fun! Time to be a grown up. I hate that.


