I had company coming and wanted to make some ice cream with my Kitchen Aid stand mixer. I got a nifty ice cream attachment for it and it has been languishing in my freezer. Just hoping for someone to crave ice cream. That would be me. And not just chocolate ice cream. I can make brownies and add brownie bits to it. Ohhh. I also have fudge ice cream topping I can swirl in it. A nice, simple, ice cream treat.
Chocolate Brownie Ice Cream with Fudge Swirls
2 cups whipping cream
2 cups half and half
2 ounces semi sweet baking chocolate
1 ounce unsweetened baking chocolate
1 cup sugar
1/2 cup cocoa powder
5 egg yolks
4 teaspoon vanilla
1/8 teaspoon salt
1 1/2 cups brownie bites
1/4 cup fudge for swirling
You have to freeze the Kitchen Aid ice cream tub for HOURS. So make sure you put it in the night before you want to use it. You also have to chill the ice cream mix for hours. I found someone that suggested freezing it with lots of stirring for 2 hours and then mixing it in the Kitchen Aid, so that is what I did. It comes out soft serve and can be eaten that way. But it really needs to freeze for a few more hours or overnight. This is a plan ahead type of thing!
First I made brownies so they could cool and be ready to add in to the ice cream at the end of mixing. You can purchase premade brownies if you wish. Just make them according to the package. I used the recipe for the fudgy type brownies, rather than the cake brownies.
Heat 1/2 cup of the whipping cream with the two types of baking chocolate bars, broken into chunks. Stir frequently over low heat until the chocolate has melted. Remove from the heat and set aside.
Heat the half and half in a larger pan over medium heat until bubbles start to form around the edges. You don't want to boil the half and half. Just warm it up and set it aside.
Whip the yolks until a smooth yellow and then add the sugar and cocoa powder.
Start to mix slowly so you don't make a chocolate powder mess. Mix until well blended.
Now you have to temper the eggs and warm them up without making scrambled eggs. Add a small amount of the chocolate milk to the eggs while continuing to whip them. Then do it some more. Keep drizzling in the chocolate milk until it is all mixed in.
Add the half and half while whipping.
Return the whole shebang to the larger pan and heat until bubbles form. Stir frequently. Remove from the heat and add the rest of the whipping cream, vanilla and salt. Stir to mix.
Pour the ice cream mixture into a large bowl, cover and chill for 8 hours. I didn't do the 8 hour thing. I placed the covered bowl in the freezer and stirred it after one hour. Then I stirred it every 15 minutes until it had been in the freezer for 2 hours and set up the Kitchen Aid mixer.
You have to start the Kitchen Aid mixer before you add any of the ice cream mix. Once it is going on STIR speed, pour in the ice cream mix and let it run, according to the instructions. It takes at least 20 minutes.
While it was running I cut the brownies into small bites and heated up the fudge topping to make it easier to swirl in the ice cream.
The Kitchen Aid started to make a noise and struggle, indicating it was done. Also the ice cream expands and fills the mixer when it is done. At this point I needed help. Lee poured the ice cream into a large container and I added some brownies half way through. I also added a few large dollops of fudge and swirled it around. Lee poured the rest and held the mixing bowl while I scraped out the last of the ice cream.
I added the rest of the brownie bites and the fudge and swirled and mixed. Then we all ate a small bowl. The rest went into the freezer for the next day.
The batch of brownies made more than I needed for the ice cream, so of course I had to make some brownie sundaes! Wouldn't you?
A brownie was placed in a large bowl and scoops of ice cream were placed on top. My friend noticed that I had some salted caramel ice cream topping in the refrigerator. Naturally she insisted that we drizzled some on top of her sundae. I didn't want her to feel like a total PIG, so I drizzled it over EVERYBODY'S .
And it was darn good.
Wednesday, November 18, 2015
Sunday, November 15, 2015
Maple Drizzled Grilled Ham and Cheese Sandwich
I read about a teacher in a prison that bought a food truck and was using it to train released prisoners in food service. This is a great idea. It gives them practical experience with food prep and customer service. A laudable goal. But what REALLY caught my eye was one of the recipes they were known for, Maple Drizzled Grilled Cheese sandwiches. That sounded pretty good, so I decided it needed to be investigated.
I decided a Panini sandwich might work with this. The only thing holding me back was the lack of a Panini press. But I DO have a George Foreman Grill and it makes a darn good Panini press. We have a pretty big kitchen, but not enough room for every gadget on the market.
Maple Drizzled Grilled Ham and Cheese Sandwich
Provolone slices
shredded Cheddar cheese
Sliced ham
bread
softened butter
maple syrup
There are no amounts given here. Just pile on what you like and make a sandwich. You are only limited by what stays in between the bread slices.
Heat up the grill of choice. A hot pan would work, too.
I placed the cheese on each slice of bread. I wanted the melty cheese to hold the ham in. I thought that if I had the ham against a slice of bread, it might slide around and the cheese would work to hold it in. I wanted to see what went better with the ham and maple, so I used Cheddar and Provolone. Any cheese that you like on a sandwich should work.
If you think ham and syrup are strange then you have never had pancakes with sausages and dipped the crispy sausages in a syrup puddle.
Place the thinly sliced ham on top of one of the slices of bread and cheese. Layer the sandwiches and brush softened or melted butter over the outside of the bread. Place the butter side down on the grill and butter the top side. Close the grill and wait impatiently.
I lifted the top for a peek a few times and when it was sufficiently brown and crispy I put the finished sandwiches on a plate and drizzled them with some Maple syrup.
In order to investigate fully, I cut the sandwiches in half so we could each have some of both sandwiches.
These sandwiches were buttery, crispy and the syrup added a nice sweet touch. I worried that it would be too sweet, but it was great. Don't over syrup your sammies!
I think I liked the Provolone better with the ham as it had more of a bite than the sharp Cheddar. Both of the sandwiches were good and worth having again.
And these are the lengths your intrepid reporter goes through to investigate claims on the internet.
You're welcome.
Monday, November 9, 2015
Playdough
I recently had a friend of mine visit me. She is in second grade and a delightful child. We needed something to occupy our time and I thought she might like to help me make some playdough. I have had this playdough recipe since my older daughter was in pre-school. I made it for my kids and the kids I had in my daycare. It is big fun and so easy. It is non toxic in small amounts, but has a lot of salt, so shouldn't be eaten.
Similar to commercially made playdough, it will dry out if left in the open, but can last a long time if you return it to a sealed container after each use.
Playdough
1 cup flour
1/2 cup salt, that reminds me. Gotta put salt on the list.
2 teaspoons cream of tartar, go ahead and buy it. You need it to make snickerdoodles
1 Tablespoon oil
1 cup warm water
Optional
food coloring
food flavoring
Mix all the ingredients in a saucepan. I used 1/2 teaspoon peppermint flavoring and 4 drops of red food coloring. If this got on a carpet, I didn't want any staining. It gave the playdough a faint pink appearance.
Use whatever flavors and colors you like, and have in the pantry.
Heat over medium heat. My friend needed a chair to help and I made sure to keep her far from the flame of my gas cooktop. Don't walk away. This doesn't take long.
Keep stirring until the dough forms into a ball.
That's it!
It is quite warm when you finish, so wait a bit before little hands start forming shapes.
Why, yes. We DO allow 7 year olds to get tattooed in Virginia.
Doesn't everyone?
Sunday, November 8, 2015
Broccoli and Cheese Soup
The weather these days is very strange. First it feels like winter, then back to fall. I rarely know how to dress myself any more. Recently it was very cold and felt like winter was coming early, so I made some soup. This recipe made just enough for two large bowls of soup, but you can double or triple it if you need to serve more people.
Broccoli and Cheese Soup
1/2 cup diced onions
1/4 cup butter
3 Tablespoons flour
1/2 cup milk
1/2 cup half and half
You can use 1 cup half and half instead of using any milk, but I didn't want the soup to be that rich.
3 cups broccoli florets
1/8 teaspoon nutmeg
1 cup shredded Cheddar cheese
3/4 cup shredded pepper Jack cheese
1 cup chicken broth
salt and pepper to taste
Melt the butter in a Dutch oven over medium heat. Add the onions and cook until translucent. Cut the tops off the broccoli while the onions are cooking. Don't forget to stir the onions to keep them from browning.
Sprinkle the flour over the onions and stir until lightly browned. Reduce the heat to medium and add the milk, half and half, chicken broth, nutmeg and s&p.
Stir for about 10 minutes or until the milk starts to bubble around the edges. You don't want to boil the milk.
Add the broccoli and cook for about 5 minutes. It should be thick and look like it is ready to eat.
But wait! You forgot the cheeses! That's the treat you are giving yourself for eating the broccoli!
Stir in the cheeses and wait for them to melt. If the soup is too thick for your taste, you can add more chicken broth to thin it a little. Stir until it looks like soup again.
NOW it is ready to serve. In a deep bowl and a glass of your favorite adult beverage. Your OTHER treat for eating a (mostly) healthy dinner.
Thursday, November 5, 2015
Individual Blueberry Bread Pudding
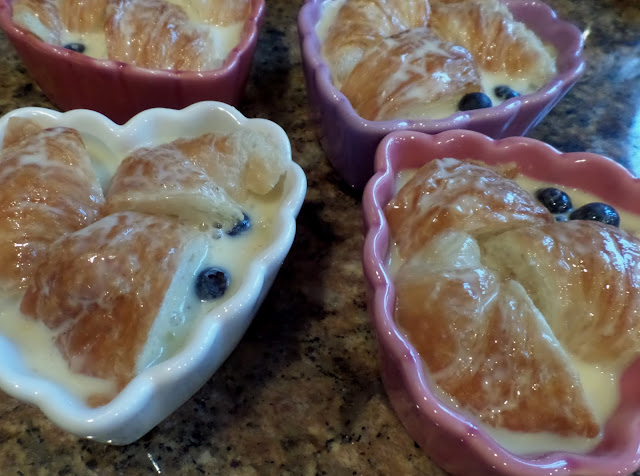
I had an idea to make individual bread puddings for our B&B guests. I didn't want to make a whole pan of bread pudding, because then I would eat the leftovers and that is too rich to have on a regular basis. I have some heart shaped ramekins that hold about 3/4 of a cup and decided they would be perfect. I used mini croissants, but you could use the larger ones and cut them up in smaller pieces. This recipe is for four servings, but it can be reduced or enlarged for any number of servings.
Individual Blueberry Bread Pudding
4 teaspoons melted butter
4 mini croissants
4 eggs
1/2 cup cream
1/2 cup half and half
or use one full cup of one or the other so you end up with 1/4 cup per ramekin
1/2 cup sugar
1 teaspoon vanilla
1/4 teaspoon nutmeg
1/2 cup blueberries
Whisky sauce and sliced strawberries, optional.
Heat the oven to 350°.
I put the butter in each ramekin and popped them in the microwave to melt, but you can melt the butter and then pour an equal amount in each ramekin.
Cut the croissants in half lengthwise and then into thirds.
Whisk the eggs, sugar and the cream together until the sugar dissolves. Add the vanilla and nutmeg and whisk again.
Swirl the melted butter around the ramekin and place the bottoms of the croissants to cover the bottom of the dish.
Sprinkle an equal number of blueberries on top of the croissant halves and then pour half of the egg mixture over the croissants, equally divided.
Place the croissant tops on the blueberries and arrange them to cover the whole ramekin. Carefully pour the rest of the egg mixture over the croissants.
You may have to pour a bit and then press down on the croissants to absorb the mixture. Then pour the rest of the mixture over the croissants. Don't over fill. These will puff up a bit and over flow if you don't leave some room.
Let the croissants sit for 10 or 15 minutes. Press down one more time so they can absorb even more of the egg mixture.
Cover a baking sheet with foil to catch the spills and bake for 30 minutes or until a knife inserted in the middle comes out clean.
Let cool and serve in the ramekin. If you really want to make it special, add some rum or whiskey sauce and sliced strawberries. That is super simple.
Whiskey Sauce
2 Tablespoons butter
1 Tablespoon half and half
1 cup powdered sugar
2 Tablespoons booze of choice. Rum, brandy and whiskey will all work.
Melt the butter in a sauce pan over medium low heat. Stir in the cream and the powdered sugar. When everything is combined, remove from the heat and add the booze. If you are not someone who likes the flavor of alcohol, I suppose you could add vanilla flavoring and stir have a wonderful, rich, buttery sauce.
Pour the whiskey sauce over the bread pudding and add some sliced strawberries, if you wish. Serve warm.
Sunday, November 1, 2015
Hash Brown Nests
I saw a version of this recipe on a Facebook post that Lee's niece had. It sounded good. I don't know if is B&B guest worthy, but it is blog worthy and would be fun to have again.
I made this version in a set of overlarge muffin stone bakers. You know, the size muffin that you get at the big box stores and are really two servings. This made 4 servings. It would probably have made 6 to 8 servings in a normal size muffin pan. The nice thing about this is you can double or halve it to make the right number of servings for you.
Hash Brown Nests
2 cups thawed, shredded frozen hash browns
1 cup shredded cheddar cheese, divided use
salt and pepper
4 teaspoons butter, melted
2 or 3 three sausage patties I used a bit more than two and ate the rest!
3 eggs
1/4 cup cream
2 green onions, thinly sliced
salt and pepper
Heat the oven to 400°. Pour the butter in the number of muffin cups you will be using. My muffin baker is stone, so I just placed the butter in the wells and popped it in the microwave. After the butter melted I swirled it around to coat the bottom and sides.
In a medium bowl mix the shredded hash browns, 1/2 cup of the cheddar cheese and salt and pepper. Place 1/4 of the hash brown mix in each of the buttered wells and press it into a nest on the bottom and sides.
Bake for 25 to 30 minutes, until it starts to turn brown.
While the nests are baking, brown the sausage patties, mix the eggs and cream or milk in a medium bowl with some salt and pepper. Chop the sausage and slice the green onions.
When the nest finish baking, remove them from the oven and place the chopped sausage in the nests. Then pour the egg mixture on top of the sausage and sprinkle the green onions and the rest of the shredded cheese on top.
Return it to the oven and bake for 12 or 15 more minutes, when a knife inserted in the center comes out clean.
The hash brown nests were crispy on the outside. The eggs were soft and fluffy and the cheese and onions made it a perfect pocket breakfast. Which we had for dinner.
Subscribe to:
Posts (Atom)