Showing posts with label Kitchen Aid Ice cream recipe. Show all posts

Friday, March 25, 2016

Lemon Gelato with White Chocolate Chips

I had a heavy dinner planned and wanted to make a light dessert.  But I still wanted it to be special.  I wanted to make gelato, but I don't have a gelato maker.   I used a gelato recipe and then made it in my Kitchen Aid ice cream maker.   The lemon is really tart so I added some chopped white chocolate chips.

Lemon Gelato with White Chocolate Chips

1 cup whole milk
1 cup sugar
5 egg yolks
3 Tablespoon lemon zest, this took 3 lemons
3/4 cup lemon juice, this took 3 1/2 lemons, so buy 4
2 cups heavy whipping cream
1/2 cup chopped white chocolate chips


Start the recipe at least one day before you mean to serve it.  You have to chill the ice cream base and then you have to chill the finished product until it firms up.  Place the ice cream maker bowl in the freezer, if it isn't already there.  You will want it REALLY frozen.

Heat the milk over medium low heat.  Do not let it boil.  Stir in the sugar and continue to stir until it dissolves.  Remove from the heat.


Whisk the egg yolks. 


Zest the lemons.  I used 4 lemons for this recipe.  But I only needed 3 for their zest.  I zested them all and then saved the additional lemon zest for the cookies I was going to make for this dessert.  Just place any zest you don't need in a Ziploc bag and stick it in the refrigerator.

The milk should have cooled for a bit.  Take about 1/4 cup and drizzle it into the whisked eggs, while whisking.  Do this two more times.  You are trying to get the eggs heated up without making scrambled eggs.  Then slowly add the rest of the milk mixture to the eggs, still continuing to whisk.  Return the eggs and milk to the pan and place it back on the heat. 


Add the lemon zest and cook over low heat, stirring constantly, until the mixture thickens slightly and is thick enough to coat the back of a metal spoon. Do not boil.  If you do it will get that yucky milk skin and this does not make for good ice cream.


Remove from the heat and stir in the lemon juice and cream.  Place in a bowl with a lip for pouring.  Press plastic wrap on the surface of the custard and chill for several hours or over night.  I planned ahead for this, so I chilled it overnight.  If it isn't super cold, it won't freeze into ice cream well.


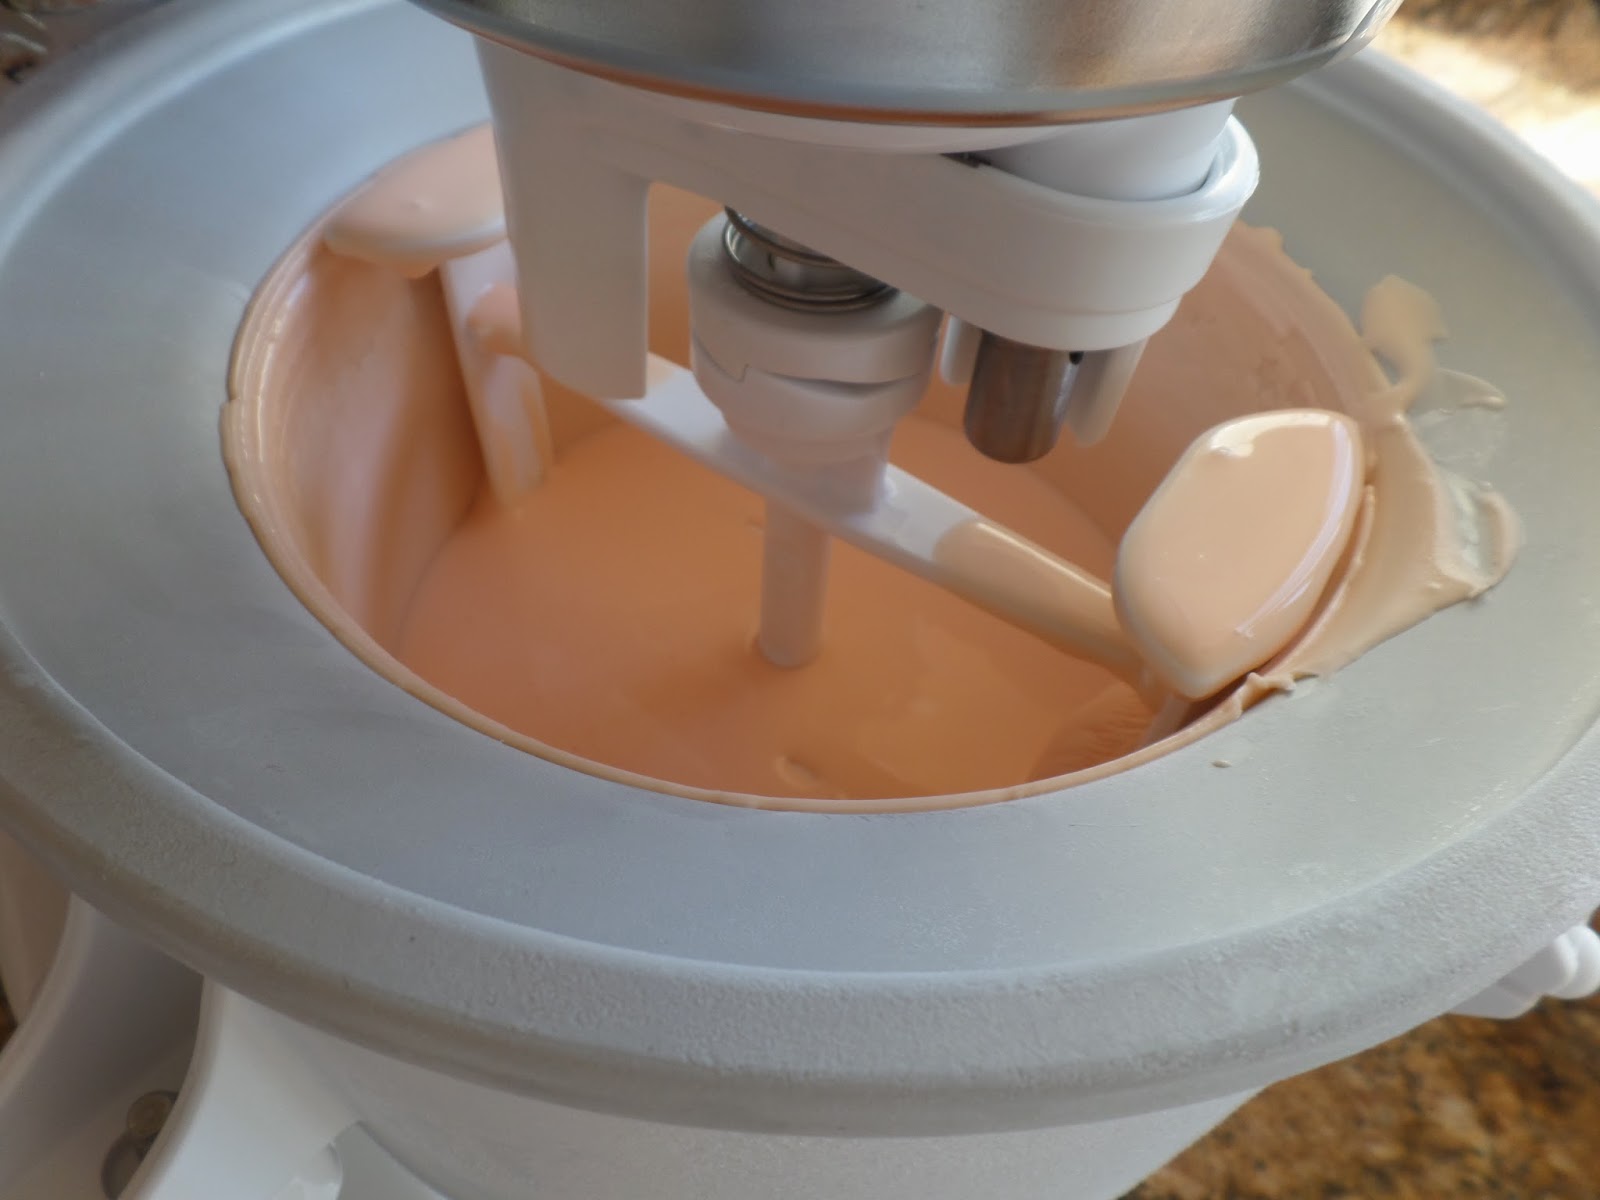
Before you remove the custard from the refrigerator, set up the ice cream maker.  Start it turning very slowly.  Then get out the custard, remove the plastic wrap and pour it carefully into the ice cream maker bowl, while the paddle is turning.  It will be really thick and creamy, so use a spatula to get it all in.  If you pour it in first, the ice cream (gelato!) may freeze in too thick of a layer for the paddle to turn.  It should fill a Kitchen Aid bowl about 2/3 full.  The paddle will add air to the mixture and it will rise to the top of the bowl.


While the ice cream maker was doing all the work for me, I chopped some white chocolate chips.  I looked for mini chips, like they have for chocolate chips, but there were none.  I didn't want big hunks of frozen chips in the ice cream.  That might be disconcerting to bite down on.


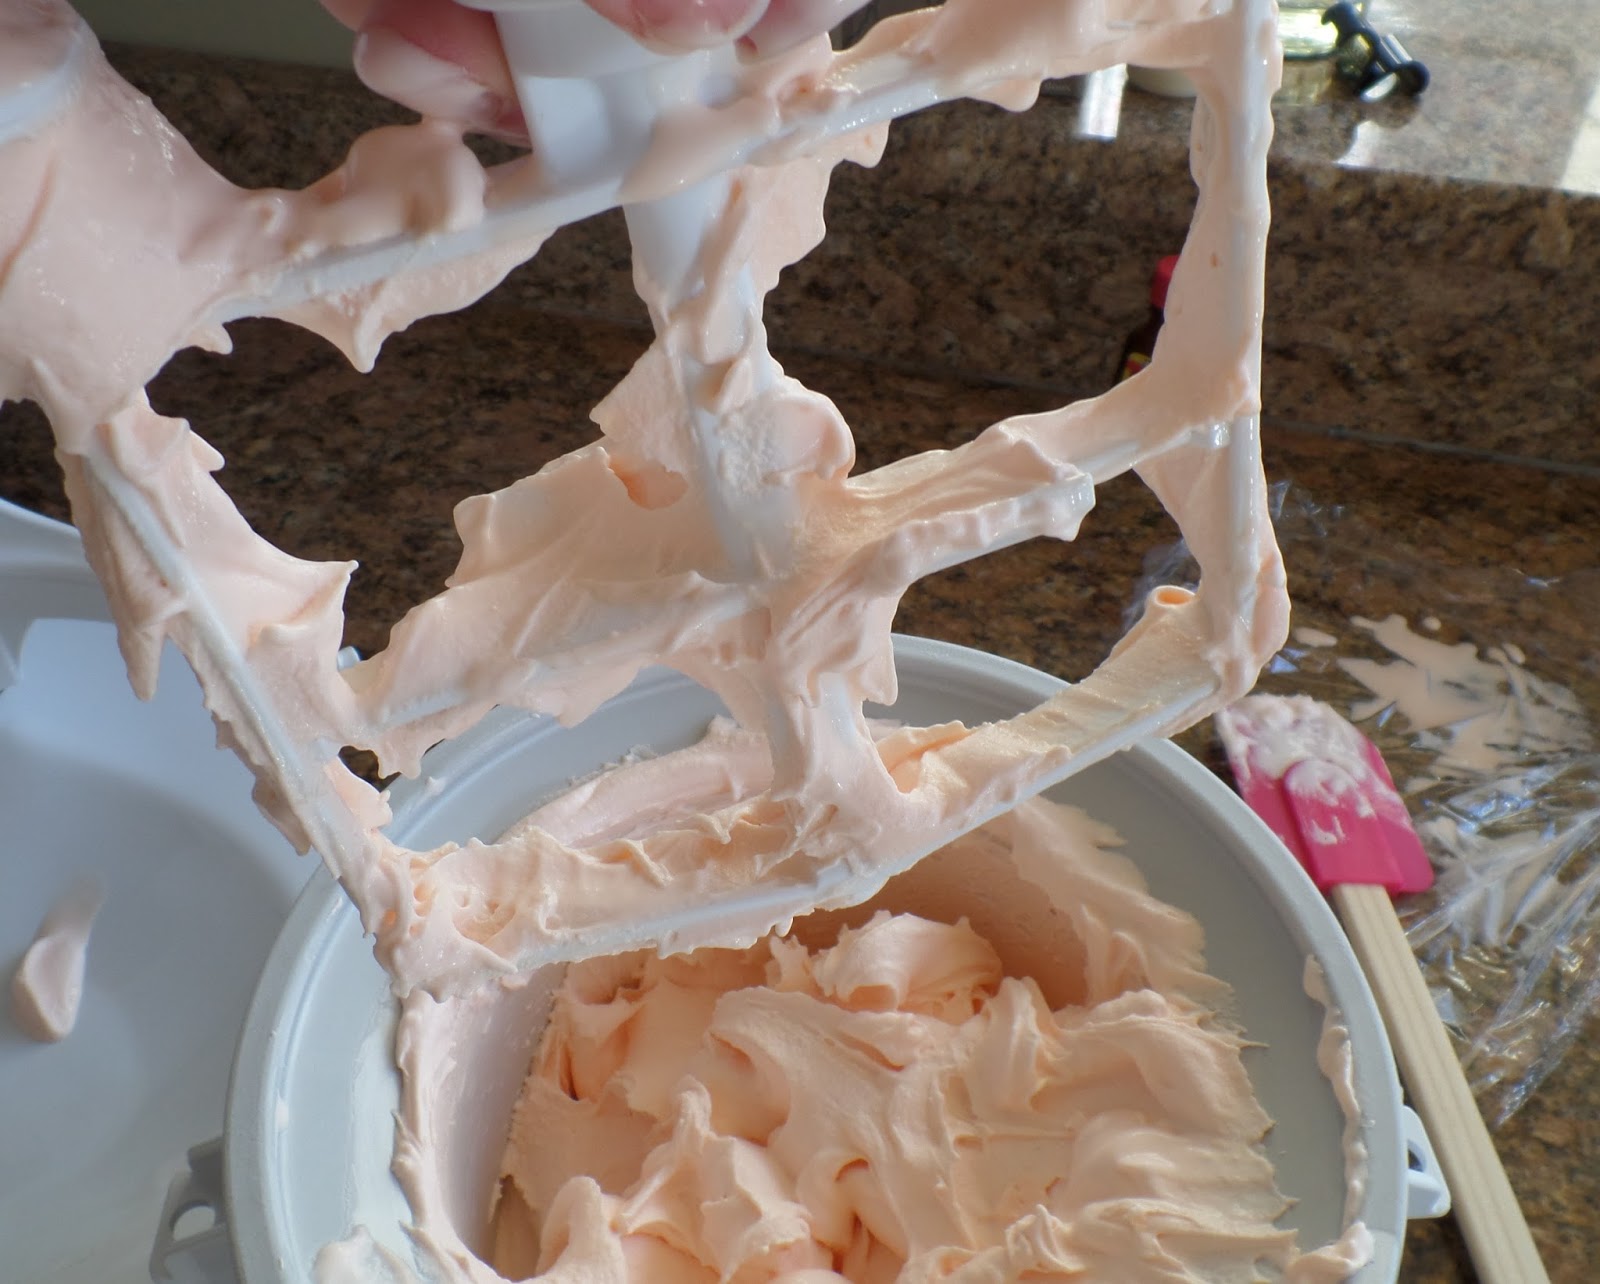
After the ice cream had risen to the top of the bowl, I added the white chocolate chips, making sure there were no large, unchopped ones.  This can be done by chopping some more, or by eating the big ones.  Your choice.  No points for guessing what I did!


Run the ice cream maker for a few more minutes to make sure the chips are all mixed in and then remove the base and use a rubber spatula to transfer the ice cream (gelato!) to a plastic freezer container. 


Chill for 2 to 4 hours, or until firm.


I served this in a champagne glass with a sprig of mint and a lemon palmier.  Those were easy and fast and I will tell you how soon. 

Friday, December 18, 2015

Peppermint Ice Cream

I had invited company for dinner and knew that dinner wasn't complete for my guests without a bit of ice cream.  This called for another experiment in ice cream making in my Kitchen Aid.  The creamiest ice cream bases involve a lot of egg yolks.  This time I saved the egg whites to make meringue cookies at later time.  I'll give that recipe another day.

Peppermint Ice Cream

2 1/2 cups heavy whipping cream
1 1/2 cups half and half
6 egg yolks-save the whites for another use! Like meringues, for instance.
3/4 cup of sugar
1/4 teaspoon salt
about 2 teaspoons peppermint extract
1/2 cup chopped peppermint candies
5 drops red food color, optional

Freeze the Kitchen Aid ice cream base overnight.


Place the milks, sugar and salt in a large saucepan. 


Heat on medium, stirring to dissolve the sugar.  Don't let it boil.  Set it aside to cool.


Whip the egg yolks.  (I saved the whites, but you can toss them if you don't have a plan for them.)  Then you need to temper them so you can cook them and not end up with scrambled egg ice cream.  To do this, slowly drizzle a small amount (about 1/4 cup) of the partly cooled milk mixture into the whipped eggs, while stirring vigorously.  Then do it again.  And again.

  
Now pick up the pan and continue to drizzle and whip until you have incorporated the whole shebang into the eggs.  Then return the eggs and milk to the pan and place it over medium low heat. 

Cook for about 5 more minutes, stirring constantly.  Don't let it boil.  The mixture will thicken slightly and coat the back of the spoon.


Strain the mixture through a wire strainer and chill for at least 4 hours , or overnight.

When you get the ice cream base out of the refrigerator, it will be thick and sort of custardy.  Because it IS custard!  Add the peppermint extract.  I put in 1 teaspoon and tasted it.  Then I added a 1/2 teaspoon at a time, tasting after each addition.   I used 2 teaspoons.  You may need more or less depending on the flavoring you use and your own taste buds. 


I added a bit of food coloring to make it pink, but that is up to you.


Assemble the Kitchen Aid mixer with the ice cream attachment and start it on stir.  While it is stirring, add the ice cream base.  It will take about 30 minutes.  This is a good time to crush the candies.


My method was to unwrap and place the candies in a Ziploc bag.  Squeeze out the air and seal.  The stick that into ANOTHER Ziploc bag, squeeze and seal.  Place on a cutting board and whack away.  I used a muddler and a rolling pin and STILL I had a bunch that didn't smash sufficiently.  If you care for your teeth, pick out the big chunks.


When the ice cream has risen to the top of the mixer  and it appears to be struggling to mix, turn it off and remove the ice cream mixer bowl.  Scrape off the paddle and look around for a child to lick it clean. 


Scrape about half of the soft ice cream into a food saver container with a lid and fold in about 1/4 cup of the crushed candies.  Scrape the last of the ice cream into the container and fold in the rest of the crushed candies. 


The ice cream can be served now, but it will be very soft. 


Freeze it for a few hours and it will become ice cream consistency.


I chose to serve it with hot fudge drizzled over it.  You may not know that hot fudge drizzled over just about ANYTHING is a good idea.  But trust me on this!  I also added a few sprinkles of even more crushed peppermint candies.  Because it is almost Christmas and that means peppermint.


I wonder how it would taste in coffee?  Peppermint latte, anyone?

Wednesday, November 18, 2015

Chocolate Brownie Ice Cream with Fudge Swirl

I had company coming and wanted to make some ice cream with my Kitchen Aid stand mixer.  I got a nifty ice cream attachment for it and it has been languishing in my freezer.  Just hoping for someone to crave ice cream.  That would be me. And not just chocolate ice cream.  I can make brownies and add brownie bits to it.  Ohhh.  I also have fudge ice cream topping I can swirl in it.  A nice, simple, ice cream treat.


Chocolate Brownie Ice Cream with Fudge Swirls

2 cups whipping cream
2 cups half and half
2 ounces semi sweet baking chocolate
1 ounce unsweetened baking chocolate
1 cup sugar
1/2 cup cocoa powder
5 egg yolks
4 teaspoon vanilla
1/8 teaspoon salt
1 1/2 cups brownie bites
1/4 cup fudge for swirling


You have to freeze the Kitchen Aid ice cream tub for HOURS.  So make sure you put it in the night before you want to use it.  You also have to chill the ice cream mix for hours.  I found someone that suggested freezing it with lots of stirring for 2 hours and then mixing it in the Kitchen Aid, so that is what I did.  It comes out soft serve and can be eaten that way.  But it really needs to freeze for a few more hours or overnight.  This is a plan ahead type of thing!


First I made brownies so they could cool and be ready to add in to the ice cream at the end of mixing.  You can purchase premade brownies if you wish.  Just make them according to the package.  I used the recipe for the fudgy type brownies, rather than the cake brownies.


Heat 1/2 cup of the whipping cream with the two types of baking chocolate bars, broken into chunks. Stir frequently over low heat until the chocolate has melted.  Remove from the heat and set aside.

Heat the half and half in a larger pan over medium heat until bubbles start to form around the edges.  You don't want to boil the half and half.  Just warm it up and set it aside.


Whip the yolks until a smooth yellow and then add the sugar and cocoa powder.


Start to mix slowly so you don't make a chocolate powder mess.  Mix until well blended.

Now you have to temper the eggs and warm them up without making scrambled eggs.  Add a small amount of the chocolate milk to the eggs while continuing to whip them.  Then do it some more.  Keep drizzling in the chocolate milk until it is all mixed in. 


Add the half and half while whipping.


Return the whole shebang to the larger pan and heat until bubbles form.  Stir frequently.  Remove from the heat and add the rest of the whipping cream, vanilla and salt.  Stir to mix.

Pour the ice cream mixture into a large bowl, cover and chill for 8 hours.  I didn't do the 8 hour thing.  I placed the covered bowl in the freezer and stirred it after one hour.  Then I stirred it every 15 minutes until it had been in the freezer for 2 hours and set up the Kitchen Aid mixer.


You have to start the Kitchen Aid mixer before you add any of the ice cream mix.  Once it is going on STIR speed, pour in the ice cream mix and let it run, according to the instructions. It takes at least 20 minutes.


While it was running I cut the brownies into small bites and heated up the fudge topping to make it easier to swirl in the ice cream.


The Kitchen Aid started to make a noise and struggle, indicating it was done.  Also the ice cream expands and fills the mixer when it is done.  At this point I needed help.  Lee poured the ice cream into a large container and I added some brownies half way through.  I also added a few large dollops of fudge and swirled it around.  Lee poured the rest and held the mixing bowl while I scraped out the last of the ice cream.


I added the rest of the brownie bites and the fudge and swirled and mixed.  Then we all ate a small bowl.  The rest went into the freezer for the next day.


The batch of brownies made more than I needed for the ice cream, so of course I had to make some brownie sundaes!  Wouldn't you?


A brownie was placed in a large bowl and scoops of ice cream were placed on top.  My friend noticed that I had some salted caramel ice cream topping in the refrigerator.  Naturally she insisted that we drizzled some on top of her sundae.  I didn't want her to feel like a total PIG, so I drizzled it over EVERYBODY'S .


And it was darn good.