Monday, June 16, 2014

Poplar Forest

Bedford is a cute town just across the Blue Ridge Parkway from us.  We frequently take guests to the D-Day Memorial there.  It is also a place to check out antique shops.  Every time we go there we see the signs to visit Thomas Jefferson's Poplar Forest.  And every time we say, "We should do that."  But we don't.


Last week we saw a notice in the paper that there was a discount at Poplar Forest for dads on Father's Day.  So that is where we went.
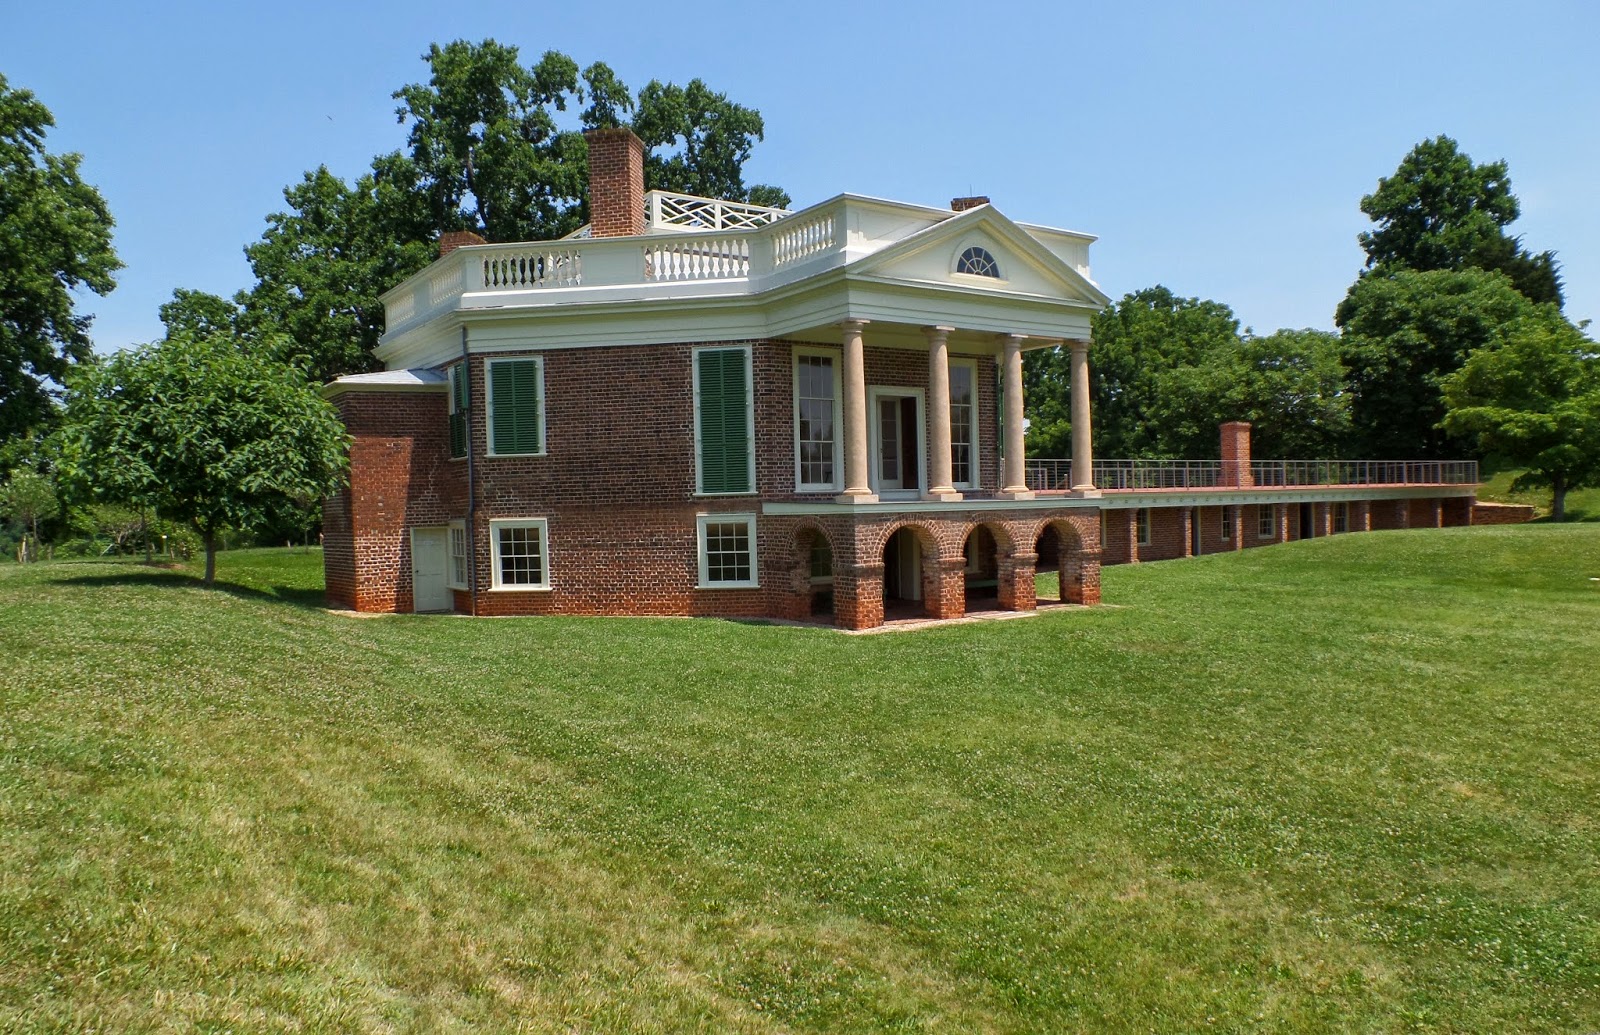
 

If you are comparing Poplar Forest to Monticello, you would be very disappointed.  They have similar architectural elements, but Monticello is restored and has a lot of period furniture, if not the original furniture.  It is a home for a large family and an important man.  The grounds are landscaped as close to the original as they can determine and you have to park in a lot far from the house and take a tour bus up with all the other tourists.  It is a wonderful glimpse into the period and the mind of a very interesting Founding Father.


Poplar Forest , on the other hand was his escape.  It was inherited by his wife and they farmed it all along, but the home was built to Jefferson's minutely detailed instructions after he left the presidency.  It was his escape from public life and a place of respite for him.  The design was his alone and not too many people would find it to their taste today, but he loved it.  A two bedroom home would also prohibit many unwanted visitors.


Jefferson was an architect and landscape designer in his own homes and you can see that in Poplar Forest.  In fact, you can also see the Poplar Trees that Jefferson saw.  Some of them are still flanking the front of the house. 


The inside is currently under restoration (no pictures allowed) and they are going by Jefferson's drawings and instructions that survived to do so.  The grounds are also being restored.  The money to do this is from donations and from the tickets purchased to have a tour there.  So go and help restore this historic home and have a lovely outing.  Why is it we never tour the interesting place close to home unless we have out of town visitors?

Don't fall in to that trap.  GO SOMEWHERE on the weekend.   And didn't we pick a gorgeous day to do so?

Friday, June 13, 2014

More Mobius


I recently wrote about a scarf I was trying to knit.
http://shenandoahgatewayfarm.blogspot.com/2014/06/mobius-scarf.html


I managed to get the amount knitted before I had to connect the scarf. 


The technique to sew the scarf together where you can't see the seam is called a Kitchener stitch.  It looked a bit complicated and all the directions were based on connecting purl stitches or knit stitches.  This is a ribbed scarf with both purl and knit stitches.  great

Back to Yarn Explosion.  They helped me remove the gray yarn I used to start the scarf, but along the way, two stitches disappeared.  We all spent quite some time trying to find them.  I finally took the piece home and unknitted two rows.  Is unknit a word?  Yes.  It is because I said so.

This isn't as easy as unknitting two rows from the top.  There you just remove the knitting needle and pull the tail of the yarn.  I had to literally unknit and then carefully use a tapestry needle to pull through the yarn.  A very painstaking process.  But it worked and I found the two dropped stitches and re knit the two rows.

Now I am back where I started and I need to go BACK to the yarn shop. But that is an excursion, so I decided to start another yarn project. 


This time it is a knitted lace cowl pattern.  I found a beautiful yarn with lots of colors.  It should match SOME outfit or other!


The pattern seemed like an easy one, but it kept twisting as I cast it on and then when I knit a row or two it wouldn't work.  Undo the knitting. Start over.  I did this about three times before looking up another method of casting on the stitches. 


So I KNIT the stitches on the needle.  I am not sure I like the look of the edge, but it didn't twist, so it is staying!!


I have never knit in the round before.  After you cast on the stitches you start knitting from the top of the row to the bottom of the row to connect them.  Then you just keep knitting until you have enough rows.  I have a marker that lets me know when I have finished a row and I just slip it from the left hand needle to the right hand needle and keep going.


I may finish this second scarf before I get back to the yarn shop for help in finishing the first scarf.  Then I have another scarf I am going to try.  I have two daughter and one daughter-in-law.  And a mom.  Guess what they will be getting for Christmas?  So this won't be a surprise for them.  If you have a preference, girls, let me know!


Monday, June 9, 2014

Baked Donuts

I like to wander up and down the Wilton aisle whenever I am in a store that carries their baking items.  You never know, I might find something I have to have.  Hey, look at this?


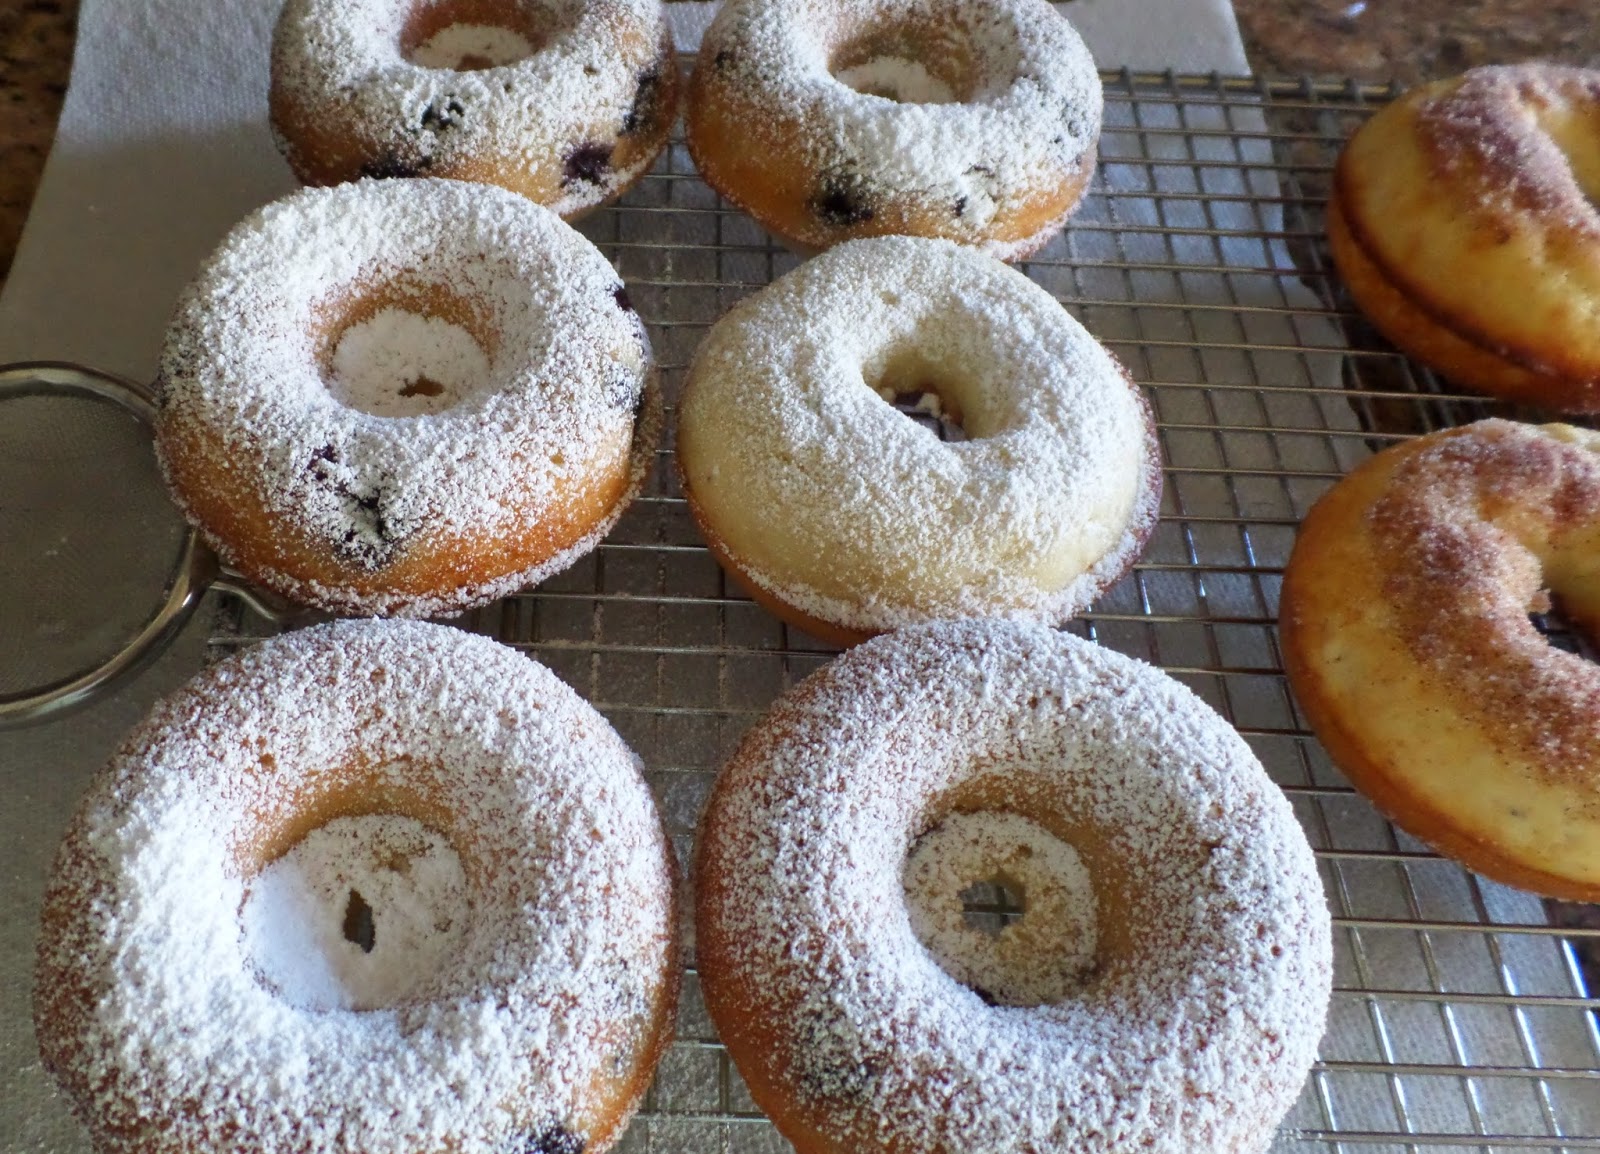
Pans for baking donuts.  I guess you can't exactly have a healthy donut, but a less unhealthy one sounds good to me!

I had company and that is always a good time to experiment with a recipe.  They can give a candid opinion and I don't get stuck eating too many treats all by myself.


Baked Donuts

2 cups cake flour
3/4 cup sugar
2 teaspoons baking powder
1/4 teaspoon nutmeg
1 teaspoon salt
3/4 cup buttermilk
2 eggs
2 Tablespoons butter

Optional
blueberries
powdered sugar
cinnamon sugar
chopped peanuts
chocolate glaze, recipe below


Preheat oven to 425°.  Spray the donut pans with Pam.  Set aside.

Melt the butter and let it cool a bit.   I didn't have buttermilk, so I had to make a substitution.  I placed a teaspoon of vinegar in 3/4 cup of regular milk and let it sit while I got the rest of the ingredients together.


Place a sifter in a large mixing bowl and fill it with the flour, sugar, baking powder, nutmeg and salt.  Sift.  I found a few grains of sugar that would not sift and I just dumped them in with the rest of the dry ingredients.


Whip up two eggs with a fork.  Add the buttermilk and pour it into the flour mixture.  Add the cooled, but melted butter and beat until just combined.

Fill each donut cup until 2/3 full and bake for 7 to 9 minutes.  The tops should spring back when gently touched. 

Let cool in the pan for 5 minutes until removing.

Glaze with chocolate or powdered sugar or cinnamon sugar.

Here's what I did.


I made half with the plain batter and then I added 1/2 cup of blueberries to the remaining batter and filed the second donut pan. 


Here's what I also did.  I got the bottoms browner than the tops. 


I sprinkled powdered sugar on top of the blueberry donuts and I dipped the plain donuts in melted butter and then pressed them into a bowl of cinnamon sugar. 


Both were pretty good.


On another day, I turned the heat down and baked longer to eliminate the disparity between the tops and the bottoms..  They were done before they got brown.  Guess the 425° was right after all.  I didn't like the paleness of them, but they tasted OK.  I guess I'll stick with the higher temperature! 

For the topping for the pale donut,s used the Wilton recipe for chocolate glaze

Chocolate Glaze

1/2 cup chocolate chips
2 Tablespoons butter
2 Tablespoons corn syrup
1-2 teaspoons hot water


Place the chocolate chips, corn syrup and butter in a microwaveable bowl and heat on 50% power for 30 seconds.  Stir.  You may have to put it in for longer to get everything melted.  Do not over heat.

Add 1 teaspoon hot water and stir until glossy.  You may want to add another teaspoon of water if it is too thick.


Dip the donuts in the glaze and if you are lucky, someone will have chopped you up a 1/2 cup of peanuts.  Dip the chocolate covered donuts in the peanuts and let set for a few minutes.  You won't even notice how pale they are!


I don't have a particular favorite.  Just don't put in too many blueberries as it is hard for the donut to hold together when you are removing the warm ones from the pan.  And really, it is hard to beat chocolate and peanuts.  However,  the pop of warm, sweet blueberries was particularly nice.  But then, who doesn't like cinnamon sugar??

Sunday, June 8, 2014

Fluffy Chocolate Ricotta Pancakes

I tried another recipe out of the book I received from my son, Travis.  It is called The Art Of Breakfast, by Dana Moos. 


Fluffy Chocolate Ricotta Pancakes

1 cup ricotta cheese
1 cup milk
1 Tablespoon extra virgin olive oil
1/2 teaspoon orange extract
3 eggs, separated
3 Tablespoons sugar
1 Tablespoon cocoa powder
1/4 teaspoon salt, divided us
1 Tablespoon baking powder
1 1/2 cups flour


optional
chocolate chips, powdered sugar, orange zest and my version of the...


Orange Rum Syrup

2 Tablespoons frozen orange juice concentrate
2 Tablespoons rum
1/3 cup pancake syrup. 


I didn't use real maple syrup because I find it too thin for my taste.  Use the maple flavored (or REAL) syrup of your choice.


Separate the eggs.  I put the egg whites in the bowl of my Kitchen Aid mixer and the yolks in a large bowl.


Add the ricotta cheese, milk, olive oil, orange extract, sugar, cocoa powder and 1/8 teaspoon of the salt and whisk together. 


When it is smooth and well blended add in the flour and the baking powder.  Mix again.  Set aside.


Whip the egg whites and the remaining 1/8 teaspoon salt in your stand mixer until they form stiff peaks.  Fold the egg whites into the batter. 


Be gentle as you don't want to smash all the air out of the egg whites you just whipped in.


I used a 1/3 cup measure to drop the batter onto a hot griddle.  When the top forms bubbles, flip and cook the other side.  If you choose, you can drop chocolate chips on top of the batter before you flip them over.

Make the Orange Rum Syrup.  Just combine all ingredients and whisk together.


Serve the pancakes with orange zest, powdered sugar or the Orange Rum sauce.  Or all three!

I liked these pancakes. But I am not sure pancakes are a good fit for my Bed and Breakfast.  Unless kids are involved.  They LOVE pancakes and a quiche doesn't thrill them. I suppose I will have to serve them without the booze, though.  Poor kids.

Saturday, June 7, 2014

A Different Maple Rum Sauce

My cousin and her daughter (also my cousin) came for a visit.  They are readers of my blog, so they requested the Blueberry Oatmeal Streusel French Toast.  I love it when people request a particular food.  It takes the guess work out of what to serve them.  http://www.shenandoahgatewayfarm.blogspot.com/2014/05/blueberry-oatmeal-streusel-french-toast.html

I wanted to try a different Maple Rum sauce this time.  It was really good and I haven't decided which one I liked better.

Maple Rum Sauce

4 Tablespoons butter
1/2 cup powdered sugar
1 teaspoon Maple flavoring
3 Tablespoons Rum


Melt the butter in a small sauce pan. 


Add the powdered sugar and stir until combined. I had to use a small whisk to completely incorporate the sugar into the butter.


Add the maple flavoring and the rum.  (In the interest of full disclosure, I started with 2 Tablespoons rum.  I tasted it and decided in favor of another Tablespoon.  If you want to limit the rummyness (this is a word, right?), stick with 2 Tablespoons rum.)


Stir until everything is mixed in and serve warm over the breakfast treat of your choice.  This is also good over any dessert of bread pudding.  I  would be hard pressed to think of a dessert that would NOT be improved by melted butter, sugar and rum

Thursday, June 5, 2014

Forbidden Rice Pudding

I frequently tear out recipes from the local paper, The Roanoke Times.  I sometimes make those recipes.  Occasionally I make the recipe BEFORE the paper yellows and becomes brittle. This recipe is for rice pudding, which is a perennial favorite.  The twist is that it is made with black rice.

Black rice was first cultivated in China and was once considered so nutritious and so rare that it was reserved for the emperor.  Forbidden for all others.  I found it at a local Kroger, so it must no longer be very rare.


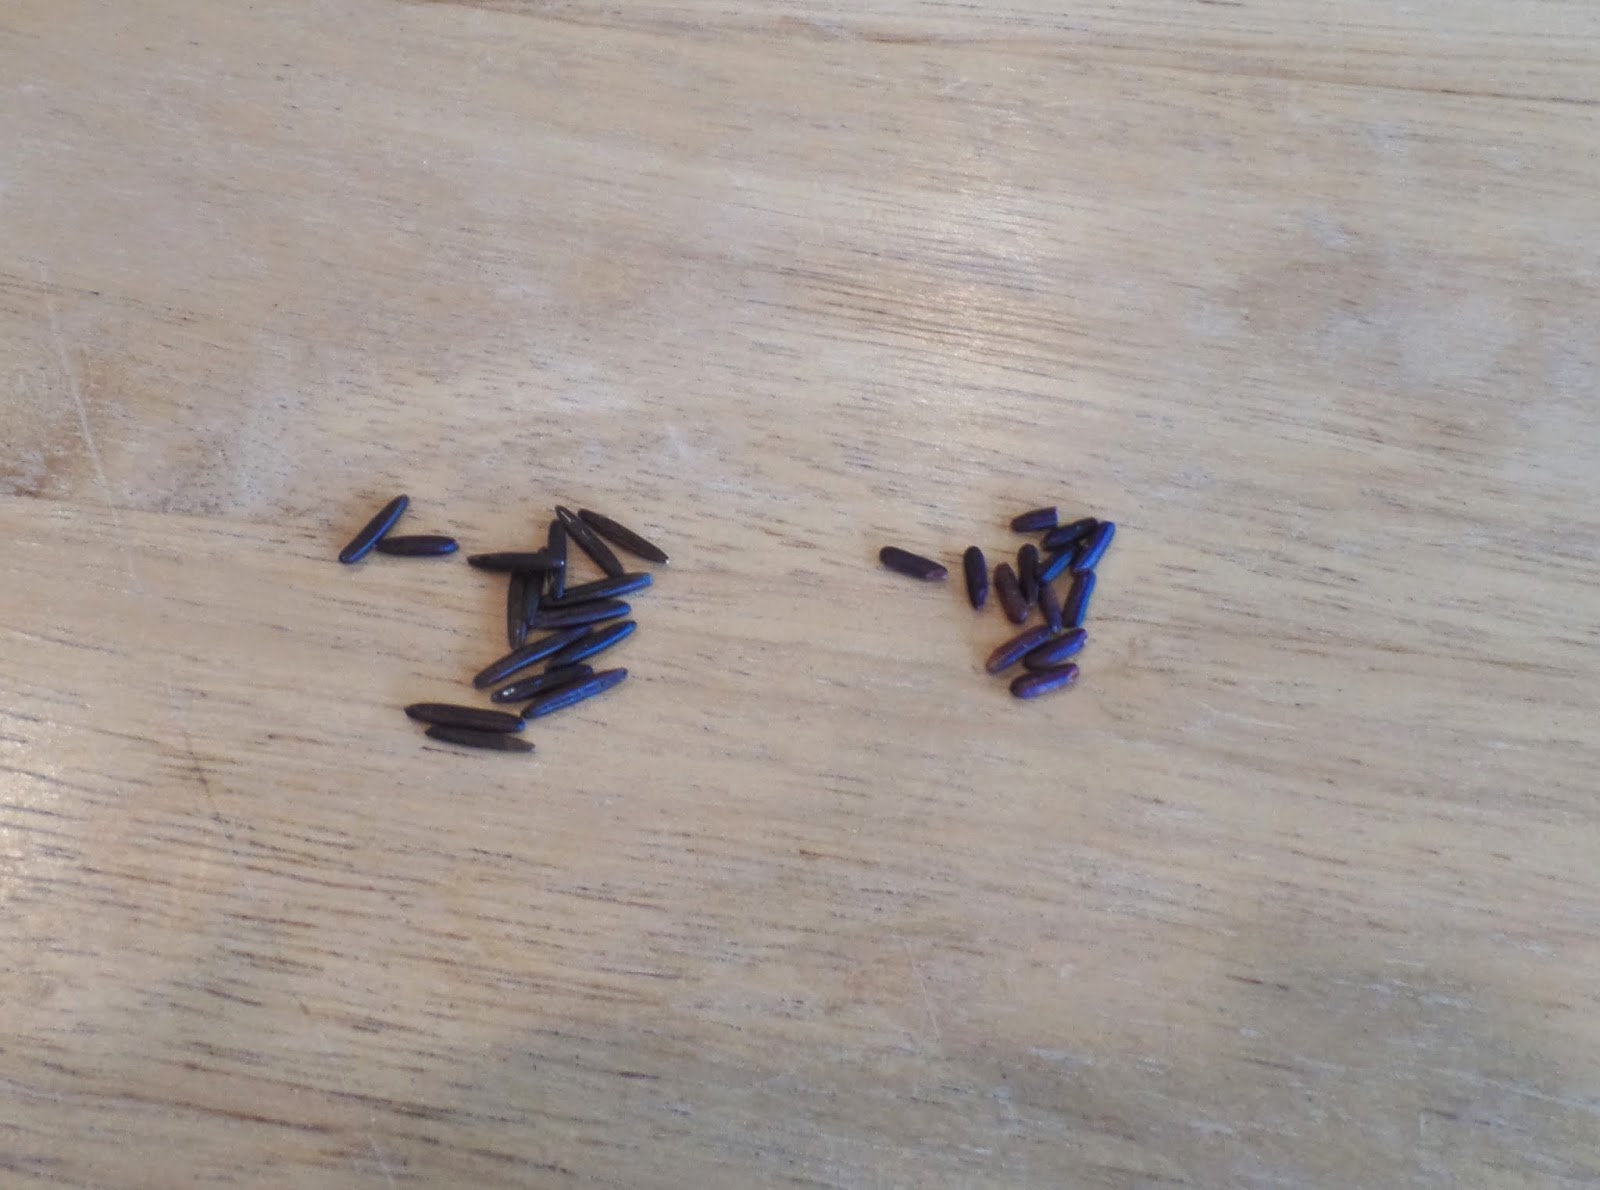
I thought it looked exactly like wild rice.  So I got some out and compared them.  The black rice on the right is shorter and more compact than the wild rice on the left

Regular rice pudding is sort of bland, but the Black Rice Pudding has a nutty flavor and is more chewy.  When you cook it, the milk turns a pretty purple color.


Forbidden Rice Pudding

1/2 cup forbidden rice ( Chinese black rice )
1 cup water
2 1/2 cups whole milk, divided use
3 Tablespoons sugar
1 large cinnamon stick
salt
2 eggs
1 teaspoon vanilla

chopped crystallized ginger for garnish


Combine the rice and water in a medium sauce pan. 


Boil and then reduce the heat to a simmer.  Cover and cook for 30 minutes.  Remove form the heat and let it stand for a few minutes.  I didn't have any excess water, but if there is, pour the rice through a strainer and return the rice to the pan.


Add 2 cups of the milk, the sugar, the cinnamon stick and a pinch of salt. 


Bring to a boil, reduce the heat to a simmer and cook uncovered for 40 minutes.  Stir every 5 minutes or so. 


When the 40 minutes are almost up, beat the eggs and the remaining 1/2 cup milk in a small bowl.  Take a large spoon of the rice mixture and whisk it in to the egg mixture.  Do it again.  And then one more time.  You are trying to temper the egg mixture  so that when you combine them, you don't have scrambled eggs in your rice pudding.  This would be bad.


Add the tempered egg mixture to the rice and milk.  Cook over medium low heat until the pudding thickens a bit, enough to coat the back of the spoon.  It will take about 4 or 5 minutes.  Do not let the pudding boil....more scrambled eggs...more bad...

Remove from the heat and stir in the vanilla.  Carefully pour the pudding into a bowl and chill for at least 2 hours.  It will thicken a bit more in the refrigerator.  What is that lump?  Oh, yeah.  The cinnamon stick.  Leave it in until you serve, then remove it.


Serve the pretty, purple rice pudding in a bowl with the crystallized ginger.  I added a bit of Cool Whip, just for fun.  And, by the way, don't skimp on the ginger.  It took a nice, nutty rice pudding and made it really good.

Monday, June 2, 2014

Mobius scarf


I'm working on a new knitting project.  I'm not sure Lee likes these projects, because I frequently do them at night in bed while watching TV.  They tend to take over the bed.  At least I am not working on an afghan this time.  They REALLY take a lot of room and take forever to finish.  The scarfs should go fairly quickly and not take up tons of room.  I like knitting because I can listen to TV and still accomplish something.  If I'm lucky I only get a FEW cat hairs knitted into the project.


This pattern is called Lava Flow and I found this picture on Pinterest. 


It is done in a Mobius pattern.  You knit it straight and the twist the finished piece once and attach the top to the bottom.  It looks pretty cool and I think it will be nice when I am done.


Because you don't want the area where you connect the scarf to show, you can't cast on in the usual way.  The directions called for a long crochet chain out of left over yarn from another project.  Then you slide the knitting needle through he bumps on the back of the chain and start knitting from there.  When you cast on stitches they are rarely the same tension and size as when you are knitting and this would be noticeable. 


Others recommend just knitting a few rows and then unraveling a row or two to get to a good place to attach the ends.  I decided to go with the original directions.  If I make another one, I might try it another way.


The other fun thing about this pattern in the GIANT cables that I knit in. I have never done 12 stitches in a cable before.  It does add interest to a simple pattern, other than the whole Mobius thing.

I have no idea how I am going to finish this piece.  I figure that is an issue for a later time.   I can always go back Yarn Explosion ( http://yarnexplosion.com/ where I bought the yarn and the patterns.  They are always helpful and don't make me feel TOO stupid!