Showing posts with label Kroger. Show all posts

Monday, December 15, 2014

Turkey Casserole

Kroger sends me recipes and coupons from time to time.  They had one for Thanksgiving leftovers that we decided to try.  I made extra stuffing and mashed potatoes just so I would have enough leftovers for the recipe.  We made one with turkey and one with leftover green beans for the vegetarian version.


Turkey Casserole

4 cups stuffing
4 cups chopped turkey, or a cup or two of green beans
1 cup Mayonnaise, divided use
1/4 to 1/2 cup cranberry sauce, the recipe called for 1/4, but I couldn't really taste the cranberry and may make it "pinker" next time.
2 cups mashed potatoes
1 1/2 cups shredded mozzarella cheese

Heat the oven to 375°.  Spray a 8 inch baking dish with Pam and set aside.


Spoon half the stuffing in the dish and top with the turkey, or green beans if you are going vegetarian.


Mix 1/2 cup mayo with the cranberry sauce and spread over the turkey or green beans.


Combine the remaining 1/2 cup mayo with the potatoes and cheese in a bowl.  Spread on top of the cranberry mixture.


Top with the remaining stuffing.


Bake for 40 minutes.

The addition of the Mozzarella made for a cheesy, goosy casserole, but if you are trying to watch your weight, and who does that at Thanksgiving?, you could probably leave it out.


We served this with corn pudding.


I liked this dish, but to be honest, I don't have a problem with heating up the stuffing and potatoes and eating them for a few days, along with a bunch of turkey sandwiches.  I only make stuffing for Thanksgiving and we rarely have mashed potatoes.

If you tend to get bored with the same old, try this casserole.  But I kind of missed heating up the leftovers for several days of post Thanksgiving fare.


Thursday, June 5, 2014

Forbidden Rice Pudding

I frequently tear out recipes from the local paper, The Roanoke Times.  I sometimes make those recipes.  Occasionally I make the recipe BEFORE the paper yellows and becomes brittle. This recipe is for rice pudding, which is a perennial favorite.  The twist is that it is made with black rice.

Black rice was first cultivated in China and was once considered so nutritious and so rare that it was reserved for the emperor.  Forbidden for all others.  I found it at a local Kroger, so it must no longer be very rare.


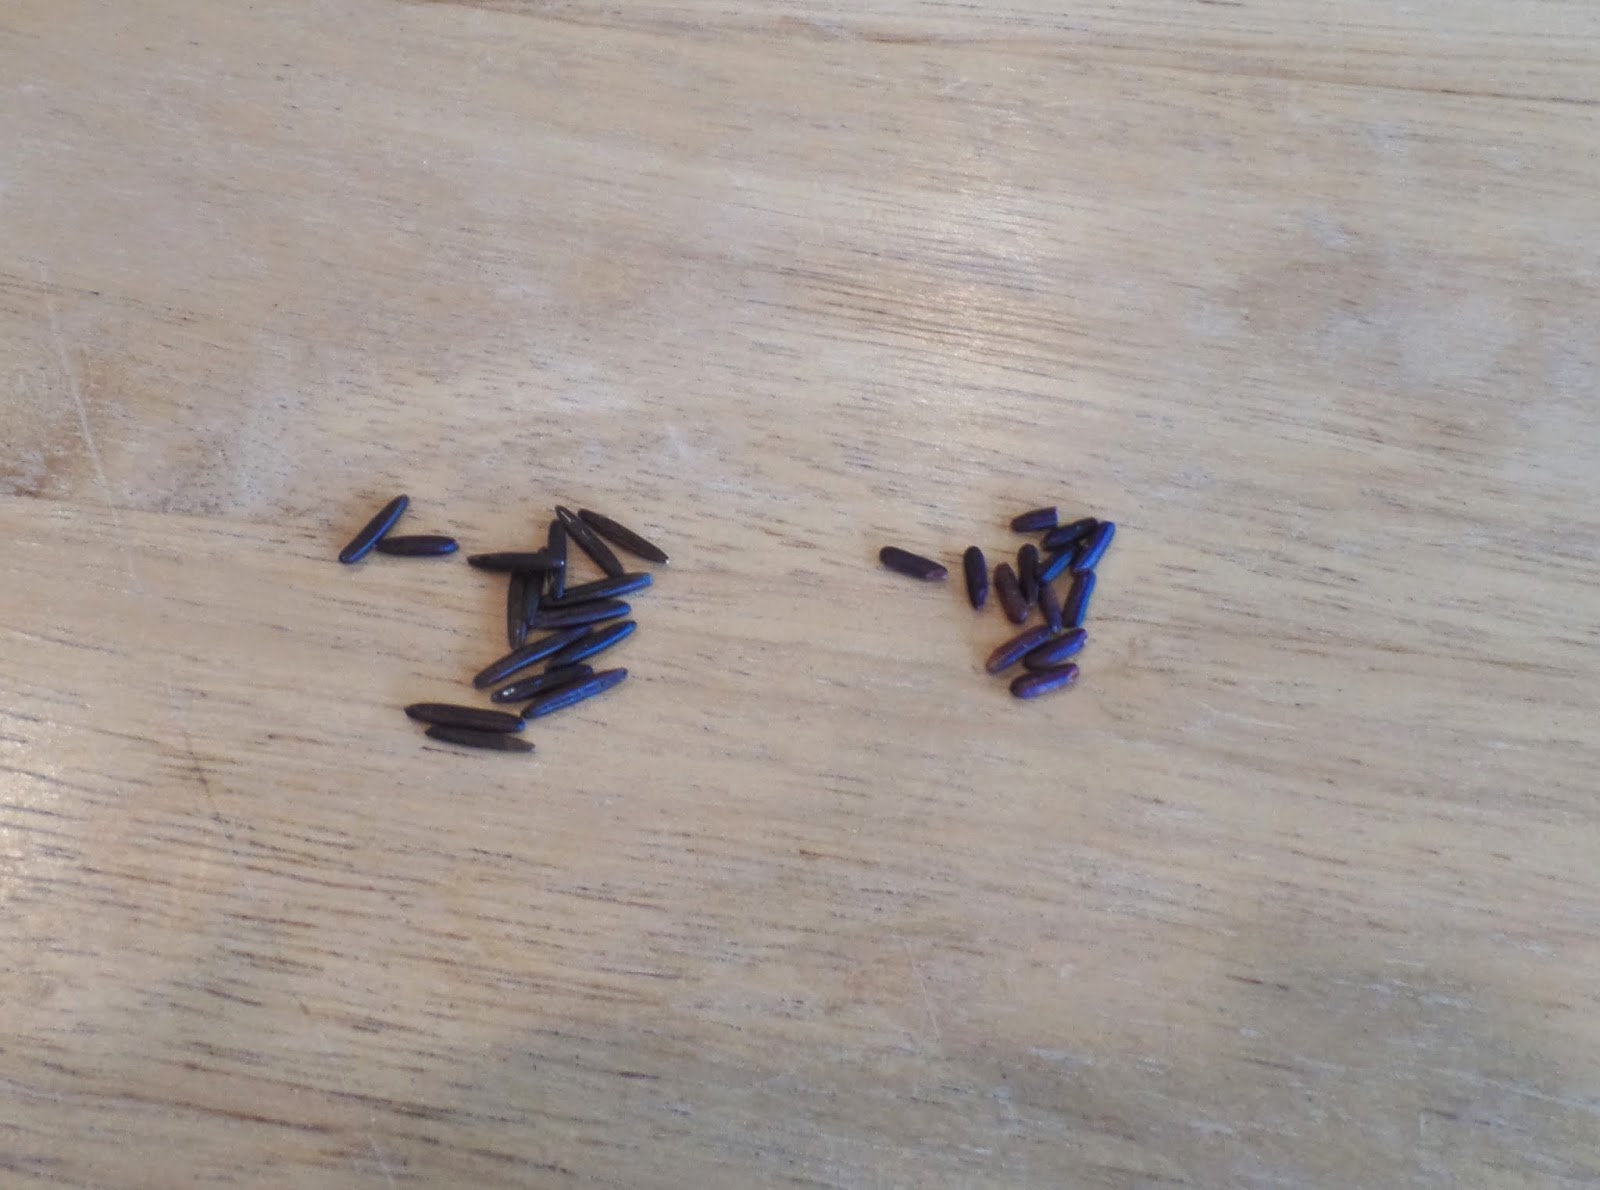
I thought it looked exactly like wild rice.  So I got some out and compared them.  The black rice on the right is shorter and more compact than the wild rice on the left

Regular rice pudding is sort of bland, but the Black Rice Pudding has a nutty flavor and is more chewy.  When you cook it, the milk turns a pretty purple color.


Forbidden Rice Pudding

1/2 cup forbidden rice ( Chinese black rice )
1 cup water
2 1/2 cups whole milk, divided use
3 Tablespoons sugar
1 large cinnamon stick
salt
2 eggs
1 teaspoon vanilla

chopped crystallized ginger for garnish


Combine the rice and water in a medium sauce pan. 


Boil and then reduce the heat to a simmer.  Cover and cook for 30 minutes.  Remove form the heat and let it stand for a few minutes.  I didn't have any excess water, but if there is, pour the rice through a strainer and return the rice to the pan.


Add 2 cups of the milk, the sugar, the cinnamon stick and a pinch of salt. 


Bring to a boil, reduce the heat to a simmer and cook uncovered for 40 minutes.  Stir every 5 minutes or so. 


When the 40 minutes are almost up, beat the eggs and the remaining 1/2 cup milk in a small bowl.  Take a large spoon of the rice mixture and whisk it in to the egg mixture.  Do it again.  And then one more time.  You are trying to temper the egg mixture  so that when you combine them, you don't have scrambled eggs in your rice pudding.  This would be bad.


Add the tempered egg mixture to the rice and milk.  Cook over medium low heat until the pudding thickens a bit, enough to coat the back of the spoon.  It will take about 4 or 5 minutes.  Do not let the pudding boil....more scrambled eggs...more bad...

Remove from the heat and stir in the vanilla.  Carefully pour the pudding into a bowl and chill for at least 2 hours.  It will thicken a bit more in the refrigerator.  What is that lump?  Oh, yeah.  The cinnamon stick.  Leave it in until you serve, then remove it.


Serve the pretty, purple rice pudding in a bowl with the crystallized ginger.  I added a bit of Cool Whip, just for fun.  And, by the way, don't skimp on the ginger.  It took a nice, nutty rice pudding and made it really good.

Monday, May 12, 2014

Apple Sour Cream Muffins

Our third group of B&B guests have come and gone.  They were here to celebrate the graduation of a cousin from Liberty University.  We are a bit far from Liberty, about an hour away, but finding a room in Lynchburg at graduation is probably difficult.  We were happy to host them, no matter how they found us.

I made muffins for breakfast the second morning.  My plan was to make blueberry muffins from an Ina Garten recipe.  Naturally, Kroger didn't have any blueberries.  I bought some apples instead.  I didn't take the sour cream off the list that I was to use for the blueberry muffins, so I had to find an apple muffin recipe that used sour cream.  You can't waste food, after all.  I used a bit of Ina's recipe and some off the Blue Jean Gourmet site.  The muffins were good and will go in my B&B repertoire.

Apple Sour Cream Muffins

1 3/4 cups flour
1 1/2 teaspoon baking powder
1 teaspoon cinnamon
1/2 teaspoon allspice
1/2 teaspoon nutmeg
1/2 teaspoon baking soda
1/4 teaspoon salt
2 eggs
1 1/2 cups brown sugar
1 cup sour cream
1/2 stick melted butter
1 teaspoon vanilla
1 1/2 cups peeled and diced apples, I used Granny Smith


Streusel topping:

2 Tablespoons brown sugar
1 1/2 Tablespoons butter, a bit soft
1 Tablespoon flour
1/4 teaspoon cinnamon
1/4 teaspoon allspice
1/4 teaspoon nutmeg


Preheat oven to 375°.  Spray or line a muffin tin.  My last batch of muffins stuck to the top of the tin, so I used liners this time and they were a lot easier to remove.  This recipe made 15 muffins.

Melt the butter and set aside to cool a bit.


Place the flour, baking powder, spices, baking soda and salt in a medium bowl.   ( Hint! When you are measuring out the spices and the flour, place the smaller amounts for the topping in a small bowl and save for later.)   Whisk everything together and set aside.


Place the brown sugar with the flour and spices you saved in a small bowl.  Add the slightly soft butter and mix well.  I used a fork and later finished it with my very clean fingers.


Whisk the eggs and brown sugar.  Add the slightly cooled butter and the vanilla and mix in.  Stir in the sour cream.


Fold in the flour mixture.  Don't over mix.  Just mix until everything is moist.  Then fold in the peeled and diced apples.  I used 1 1/2  large apples to make 1 1/2 cups of diced apples.


Use a large scoop to fill the muffin liners.  Then use your fingers to drop bits of the streusel topping on top of each muffin. Keep a damp rag handy.  This is messy.

Bake for 18 to 20 minutes, until a toothpick comes out clean..  Cool before moving to a wire rack.  They are best served warm.  And a bit of butter is always nice.  Place them in a covered container and if not finished the first day, place that in the refrigerator.


I was so busy serving the guest, that I neglected to get a finished picture.  But I did get one of the guests eating the muffins and they seem to be enjoying them.  I just took this one a day later and it is still good and will be my lunch!


Saturday, May 3, 2014

Ham and Broccoli Bake

I have a Kroger card and they send me recipes and coupons from time to time.  I bought a Honeybaked Ham for Easter (another coupon!) and decided to use some of it in a casserole.  They are big, so I break them up into batches and freeze them for future use.  I made changes because they had way too many steps and pans.


Ham and Broccoli Bake

2 Tablespoon Olive Oil
3/4 cup diced onion, about 1/2 of a medium onion.
1 teaspoon minced garlic
1 large broccoli crown, chopped into small bits
1/2 teaspoon salt
1/4 teaspoon pepper
1/2 cup ricotta cheese
1/4 cup sour cream
1 egg
1 1/2 cups cooked grains  I used a mix of brown rice and wild rice
1 cup diced ham
1/3 cup slivered cilantro or basil  I used cilantro because I didn't have basil
3/4 cup shredded jack cheese, divided use


If you don't have any cooked rice, start that first.  It should be done when you need to add it to the dish before baking.  If not, sit down with a cup of tea and finish when it is done.


Preheat the oven to 350°.  Spray Pam in an 8 or 9 inch square baking dish. 


Heat the oil in a large fry pan.  Add the onions and cook until translucent.  Add the garlic, broccoli, salt and pepper. Cook and stir the broccoli over medium high heat until the broccoli starts to brown.  Set aside to cool a bit.


In a large bowl, whisk together the ricotta, sour cream and eggs.  Place the broccoli mix in the bowl and add the rice, ham and cilantro or basil.  Mix in 1/2 cup of the cheese. 


Spread the mixture into the prepared baking dish and sprinkle the rest of the cheese on top.


Bake for 30 minutes.  If you are using rice from another meal and it is cold, you may need to bake a bit longer.  Everything has already been cooked, but you need to heat it through and melt the cheese.


Lee mentioned that it would be really good made with cauliflower.  But he thinks most things would improve with cauliflower.  Well, not dessert.

I will take it under advisement.

Sunday, February 23, 2014

Peanut Butter and Oat Cookies

I use my Kroger card when I shop there.  This gives me discounts and they send me coupons and recipes, from time to time.  A few weeks ago Kroger sent a cookie recipe and I set it aside.  It had peanut butter and oatmeal.  That's healthy right?  We have company coming today, so I fired up the oven and went to work.  Yay!  Cookies!


Peanut Butter and Oat Cookies

1 1/2 cups oatmeal, divided use
3/4 cup butter (1 1/2 sticks), softened
1/2 cup sugar
1/2 cup brown sugar, packed
1 egg
1 teaspoon vanilla
3/4 cup peanut butter The recipe called for creamy, I used crunchy and I STILL added the chopped peanuts
1 cup flour
1/2 teaspoon baking soda
1/4 teaspoon salt
1/2 cup peanuts, chopped

1 Tablespoon sugar


Heat the oven to 350°.  Line cookie sheets with parchment or Silpat baking sheets.  Set aside.


Place 1 cup of the oatmeal in a food processor.  Pulse for about 30 seconds to make oat flour.  Place the oat flour in a medium bowl and add the 1 cup of flour, baking soda and salt.  Stir it up with a whisk or fork and set aside.


Cream the butter and sugars for about 2 minutes on medium speed.  I use a stand mixer, Kitchen Aid, so I can do other things while it makes the butter and sugar fluffy.  I don't think this is doable by hand.  Scrape down once or twice.


Add the egg and the vanilla and mix.  Add the peanut butter and mix.


Carefully add the flour mixture to the peanut butter mixture.  Don't spill all over the counter like some people might do.  Mix slowly until the flour is incorporated and add the remaining 1/2 cup oats and the chopped peanuts.


Because I was using chunky peanut butter I used a tad more peanut butter and a tad less chopped peanuts.  I doubt it would have made a difference if I had done the exact amounts.  I just worried about setting off some unknown peanut butter to flour ratio.  At any rate, they turned out terrific.


Use a small cookie scoop to form balls and place about 2 inches apart on the lined cookie sheets.  Press down the dough balls with a fork in a cross hatch pattern.  This dough is sticky, so place a Tablespoon or so of sugar on a small plate. 


Dip the fork in the sugar between each time you press on a cookie.  Sure, you could use a dish of flour to keep the fork from sticking, but would you rather have extra flour on top or extra sugar?  Yeah, me too!

Bake for 12 minutes or until golden brown.  It wouldn't hurt to rotate the pans halfway through .  I didn't and had some cookies darker than others. 


Cool for two minutes before transferring to a  wire rack. 


Offer three (or four or five) to your impatient husband and then hide the rest for the company.

Sunday, May 19, 2013

Blueberry Pie


I had company this weekend and so I got to go off my diet.  YAY for company!  It is a self-imposed diet, partly determined by my upcoming high school reunion and partly by the fact that my pants are getting tight.  I don't know most of those people well, but they have likely been living in the LA/Orange County area and there is a strong chance of embarrassing my not-so-slim/wrinkly self.  So the diet.  But blueberries are so good for you that I have convinced myself that this is a health food and I should be able to eat health food on ANY diet, RIGHT?


Blueberry Pie

6 cups fresh or frozen blueberries, thawed and drained
1 teaspoon lemon zest
1 Tablespoon lemon juice
1/4 cup flour
1/2 cup sugar
1/4 teaspoon cinnamon
2 Tablespoons butter, cut up

2 uncooked pie crusts.  Treat yourself and buy them!


If you are going to make this using frozen blueberries, give yourself enough time to thaw them.  They will end up sort of soft and squishy and you will have to drain off a little blueberry juice.  IT WILL STAIN, so be careful!

AFTER they are defrosted and drained, get out the pie crusts,  I like the Kroger and the Pillsbury version, and let them warm up a bit.  Assemble all the other ingredients.


Preheat the oven to 425.  Spray a pie plate with Pam.  Unroll one of the crusts and place in the pie plate.  Press it gently in place.

Place the blueberries in a large bowl and add the lemon zest and juice.


You can carefully zest a lemon and measure it and then juice the rest of the lemon and measure that.  But I didn't.  I just zested the whole lemon and then squeezed the lemon and used the whole shebang.  I love lemon after all.

Sprinkle the flour, sugar and cinnamon on the blueberries and gently mix.  Spoon into the prepared pie crust.  Cut up the butter and dot the top of the berry mixture.


Unroll the last pie crust and center on top of the berries.  You can make cute cutouts with a small cookie cutter first, but I didn't have any so I just stuck the top crust on and crimped the edges together.  That's faster anyway!  Don't forget to cut a few slits in the top to let the steam escape.


If you wish, you can add an egg and milk wash on top


To do this whip up an egg and a Tablespoon of milk and brush the top of the pie.  I sprinkled a Tablespoon of sugar on top of the egg wash.  None of this is necessary, but it gives the top a shiny surface and the sugar adds a little bit of sweet to the crust.


Bake for 30 to 40 minutes or until the crust is turning a golden brown.  Mine got a little too brown at 35 minutes, so check at 30 minutes.   Let the pie cool until just warm or the blueberry filling will ooze all over the place and will not stay in a pie shape.  And you might burn your tongue. So curb your cravings and let it sit, at least 30 minutes to an hour.

Serve with vanilla ice cream.  The ice cream will melt from the warm pie and ooze all over the plate.  When you are done with the pie you will be tempted to lick the blueberry cream puddled on your plate.  Use a spoon, unless you are by yourself and no one will see your blue nose and chin.  Why not?   You have totally blown your diet and the next week will be boring, so indulge for now.