Showing posts with label Ziploc. Show all posts

Wednesday, December 22, 2021

Baked Apple Cider Donuts

When Fall hits, apple cider donuts are in a lot of places. I like them. I thought I would make some in my Wilton donut pans. This way I could bake them and they would be lower in fat.

This recipe calls for concentrated apple cider, so you may want to make it the night before to save time.

Baked Apple Cider Donuts


1 and 1/2 cups apple cider, reduced to 1/2 cup

2 cups flour

1 teaspoon baking soda

3/4 teaspoon baking powder

1 teaspoon cinnamon

1 teaspoon apple pie spice *

1/4 teaspoon salt

2 Tablespoons butter, melted

1 egg

1/2 cup brown sugar

1/2 cup sugar

1/2 cup milk

1 teaspoon vanilla


Topping

1 cup sugar

3/4 teaspoon cinnamon

3/4 apple pie spice*


Reduce the apple cider by simmering it in a small saucepan over low heat.  It took mine about 20 minutes, but you should check about 10 minutes and then again at 15.  Set aside to cool.  If you made it earlier, you can start right away.

Preheat the oven to 350°.  Spray the donut pans with Pam.  

In a medium bowl, whisk the flour, baking soda, baking powder, cinnamon, apple pie spice and salt together.  

In a large bowl, whisk the melted butter, brown sugar, sugar, milk and vanilla. Pour the dry mix into the large bowl.  

Add the reduced cider and mix together until smooth.

I use a medium freezer Ziploc bag to pipe the dough into at the donut pans.  The freezer bags are thicker and less likely to burst than the regular bags.  You can use a spoon and then clean the drips, that works, too. Cut off a corner of the filled bag and fill the holes about halfway.  Don't overfill as the donuts will overflow and not be a round shape.

I had more dough than I had donut pans. I put the rest into a mini cupcake pan. Then I would have donut holes!

Bake for 10-11 minutes or until the tops are lightly browned.  The tops should spring back when gently pressed.  Cool for 2 minutes, then transfer to a cooling rack.  If you also used a mini cupcake pan, cook them for 8-9 minutes.

While they cool slightly, mix the topping.  Place the sugar, cinnamon and apple spice mix in a medium bowl.  Dip and roll the donuts in the topping and set aside.  You can dip them first into melted butter to have the topping stick, but I don't do that.  

These donuts are best served immediately.  They will keep for a few days when covered tightly.  If eaten the next day, pop them into the microwave for about 8 seconds to refresh them a bit.  You can freeze them at this point, if you like.

I saved the remaining cinnamon sugar and used it in coffee.  It made a nice cinnamon coffee to go with the donuts!


*If you don't have apple pie spice, you can make your own.

1 1/2 Tablespoons cinnamon

1 teaspoon nutmeg

1/2 teaspoon cardamon

1/2 teaspoon allspice


Thursday, February 21, 2019

Baked Orange Donuts

I got up early Valentine's Day to make my husband some baked donuts for breakfast.  I had just bought some oranges and decided that was a good change from baked lemon donuts I have made before.  Besides, I didn't have any lemons!

Baking makes them a little less decadent, but they are still a special treat.


Baked Orange Donuts

2 cups flour
1 Tablespoon baking powder
1/4 teaspoon salt
3/4 cup sugar
2 Tablespoons melted butter
2 eggs, beaten
1/2 cup milk
zest from one orange
1/3 cup orange juice
1 teaspoon vanilla

Glaze

1 1/2 cups powdered sugar
1/3 cup orange juice
zest from one orange


Spray donut baking pans with Pam and preheat the oven to 425°.


Zest and squeeze two oranges.


Place the sugar and zest of one orange in a medium bowl, stir and let it sit to combine flavors.


In a large bowl, sift the flour, baking powder and salt.


Stir the melted butter into the sugar mixture.


Add the beaten eggs, orange juice and vanilla.  Whisk to combine.


Add half the sugar mixture and half the milk to the flour and stir.  Then add the rest of the liquids to the batter and mix, just until combined.

You can try to spoon the batter into the donut shapes on the pans, but it can get messy. The easiest way is to fill a quart sized Ziploc bag with the batter and pipe it into the donut pan.


Roll the top of the bag down and scoop the batter into it.  Grab the bag above the batter and snip of fa small bit of one corner. Then you can easily pipe the batter into the donut shapes without dripping all over the place.  Then just toss the Ziploc bag.


Bake for 8-9 minutes. I needed 9 minutes.


Let the donuts cool in the pan for 5 minutes. Use a plastic knife to remove them to the cooling rack.

While the donuts bake,  prepare the glaze.  Whisk the zest and juice into the powdered sugar until smooth.


Place some waxed paper under the cooling rack to catch the drips from the glaze.  Grab the donuts from the bottom and twist the tops in the glaze.  Return them top side up to the rack.  I had enough glaze to dip the donuts twice.


I served the donuts with scrambled eggs. It seemed like a (mostly) healthy meal to me!


Lee liked it, at least.


Friday, June 1, 2018

"T" is for Organization

I have a bin on a shelf in my pantry for tea and coffee.  The problem is I don't like just one brand or flavor. I also like to keep a selection for guests.  This makes for a messy bin that I paw through to find the tea I want at any given time.


I saw a random post about organizing tea and decided that was a great idea.  It was super easy and quick and I love the way it looks, now.

You'll need a small storage bin and some Ziploc bags.


Cut the front off a tea box so that you can see the type and flavor of the tea.  Place the label and the tea bags in a Ziplock bag.  Arrange the bags so they are straight and in two even rows.


Fold down the top of the Ziploc bag and place it in the storage bin

Repeat with all the boxes of tea.


Now I can find the tea I want or pull out the bin and offer it to guests.

So neat!  So tidy! So satisfying!


Thursday, June 29, 2017

Grilled California Chicken

Have you noticed that you can make almost any recipe a "California" recipe by adding an avocado?  That is what this is.  A great chicken recipe.....with avocado.  I started with a recipe from Delish and made minor changes.

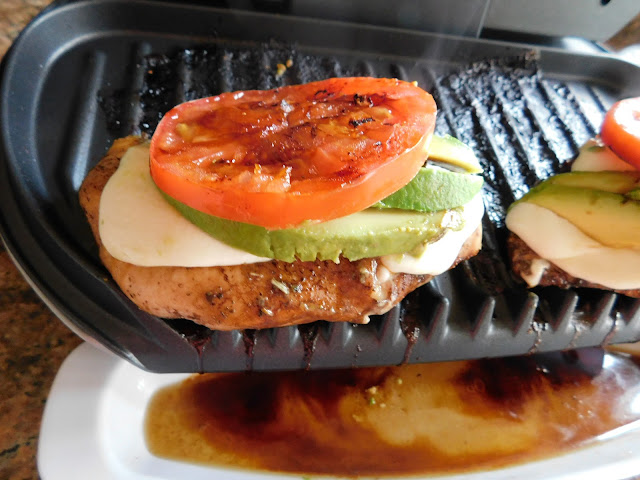
This is a great recipe for the grill, but we don't have one, so I used my George Foreman grill.  Don't judge me.  It counts!

Grilled California Chicken

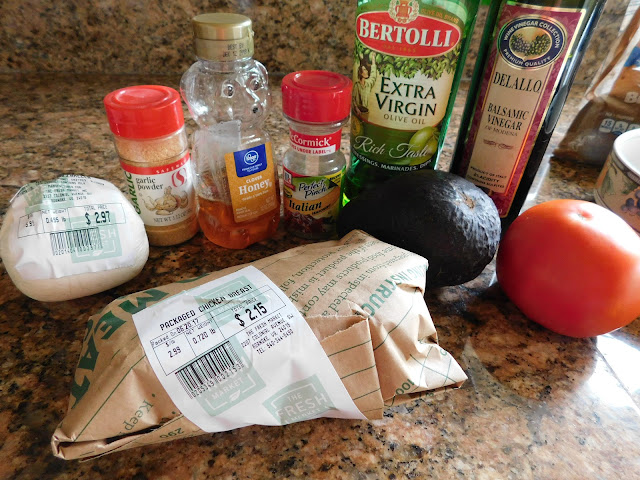
3/4 cup balsamic vinegar
1 teaspoon garlic powder
2 Tablespoons honey
2 Tablespoons olive oil
1 teaspoon Italian seasoning
pinch Kosher salt
ground black pepper
4 boneless, skinless chicken breasts

4 slices fresh mozzarella cheese
1 avocado, sliced
4 slices tomato
3 Tablespoons sliced basil IF YOUR STUPID GROCERY STORE HAS ANY!
sourdough bread, optional


Balsamic Glaze

1/2 cup balsamic vinegar
1 Tablespoon brown sugar


Place the chicken breasts in a gallon size Ziploc bag.  Mix up all the ingredients listed above chicken breasts. This is the marinade.  Pour it over the chicken.


Place the sealed bag in the refrigerator for at least 20 minutes. Longer is better.


Use the wait time to slice up the toppings and make the glaze.


Pour the balsamic vinegar in a small sauce pan and add the brown sugar.  Bring to a boil and reduce to a simmer.  Stir frequently until it is reduced by half.  Easy, right?  Set it aside for later.  Mine thickened too much to drizzle when it cooled, so I just reheated it and then it was perfect.  And quite tasty!


Grill the chicken until it is no longer pink in the middle.  If you have an instant read thermometer, it should be 170 ยบ.  Don't remove them from the grill.


Place the mozzarella, avocado and tomatoes on top of the chicken breasts.  Cover them to melt the cheese.

Place the chicken on toasted sourdough bread and drizzle the very delicious balsamic glaze over the top.  Sprinkle with basil, assuming your store didn't run out on you.....


My avocado didn't want to stay where it belonged.  I just smashed it on the toasted sourdough and placed the chicken on the avocado toast.  Avocado toast is a new ..ish.. trend and I happen to be trendy!

Friday, December 2, 2016

Bean with Bacon Soup

Do you remember making Campbell's Bean with Bacon soup?  That was always a rainy day favorite.  I still buy it occasionally to keep on hand for those days I don't feel like cooking. 

But that was before I started seeing other people's version of it on the internet.  I thought, I can do that.  So I did.

Bean with Bacon soup

4 cups chicken broth
2 cans Northern White Beans, rinsed and drained
8 or so slices of thick cut bacon
1 cup diced carrots
1 cup diced celery
1 cup diced onion
2 Tablespoons tomato paste
2 teaspoons minced garlic
pepper to taste
Don't add salt.  The bacon is plenty salty.


Place the broth and the drained beans in a large stock pot. 


Heat to a low boil.


Brown the bacon in a large fry pan.  It took me two batches.  Remove the pieces when brown on both sides and drain on paper towels.

Add 2/3 of the bacon bits to the soup pot.


Pour out most of the bacon grease, leaving a Tablespoon or so for cooking the vegetables.  Place the vegetables in the fry pan and cook until softened and the onions are translucent.  Add the tomato sauce. Even though the tomato paste comes in a small can, I rarely use the whole thing  I freeze the remainder in  Ziploc bag in lumps of about 2 Tablespoons.


Cook the veggies until the tomato paste is fully incorporated.  Then add them to the soup.


Cook for about 5 minutes more.  You want all the flavors to blend!


Serve with some of the reserved bacon pieces for a garnish.

I'm not going to say you will never buy a can of this soup again.  That is a nice and easy choice.  But this soup is more flavorful and has REAL bacon pieces, and big ones!  It is also pretty quick.  Most of the time is spent cutting veggies and cooking the bacon, and that goes pretty fast.

I could soak the beans overnight and make my own chicken broth.  But I won't.  I like to cook, but I am not a fanatic about it!

Monday, September 26, 2016

Honey Balsamic Glazed Pork Chops

Lee likes pork chops, but just frying them gets boring.  I found a recipe that sounded different.  I altered it a bit to suit me and they turned out amazing.


Balsamic and Honey Glazed Pork Chops

4 large pork chops
1/4 cup balsamic vinegar
1/4 cup honey
1/4 cup apricot jam
2 Tablespoons Dijon mustard
2 teaspoons minced garlic


Place the pork chops in a gallon sized Ziploc bag.  Mix the rest of the ingredients and pour over the pork chops.  Seal and place in the refrigerator for at least 30 minutes


I used this time to prepare my side dish of roasted vegetables and put them in the oven...another favorite.


Remove the pork chops from the bag.  Shake off the excess marinade into the bag and reserve it.

Drizzle some olive oil in a large pan and cook the pork chops about 4 minutes on each side, until golden brown.


Pour the reserved marinade over the meat and cook about 5 more minutes  The marinade has to boil for a few minutes, because it had the raw meat in it.  It has to boil but not burn so keep an eye on it.

Remove the chops and place on a plate.  Spoon some of the thickened and delicious balsamic glaze over them.  Serve with some nicely browned, roasted vegetables. At least that's what I did!


Pork chops are nice but this balsamic glaze really makes them delicious.  You should try it!