Sunday, December 29, 2024

Macaroni and Cheese

We were having our daughter and her family over for dinner. I wanted to serve something that adults and children both liked.  My daughter is a vegetarian so I wanted a main dish she could eat. I decided on macaroni and cheese.

I was chastised by my children long ago because the three cheese macaroni I laboriously prepared was not the favorite from the blue box. So I really wanted a kid friendly version.  That means no exotic flavors or any cheese but cheddar.

This recipe feeds 12.  We are four adults and two little kids. This meant we will BOTH have leftovers for another meal or more! 

Macaroni and Cheese

16 oz box elbow macaroni

1/2 cup and 2 Tablespoons butter, divided use

1/3 cup flour

3 cups milk

12 oz cheese, I chose sharp cheddar

3/4 teaspoon salt

1/4 teaspoon peper

4 Tablespoons bread crumbs

Preheat the oven to 350°. Spray a 9X13 casserole dish with Pam or butter it. Set it aside. Shred the cheese.

Cook the macaroni in a large pot according to directions on the box.  Drain.

In a large skillet or saucepan melt the 1/2 cup butter.  It will melt faster if you cut it up first.

Stir in the flour.  Stir it until incorporated and then a bit longer.  Cooking the flour a bit takes the raw flour taste out of it.

Slowly add the milk using a whisk to prevent lumps.  Bring to just below a boil, stirring for two minutes until it is thickened.  Remove from heat and add the shredded cheese, salt and pepper. Stir until the cheese is melted.

Add the drained elbow macaroni to the cheese mixture and stir to coat.

Carefully pour the macaroni and cheese into the prepared baking dish. 

In a small bowl melt the 2 Tablespoons of butter. Stir the 4 Tablespoons of bread crumbs until coated. Sprinkle over the Mac and Cheese.

Bake for 30 minutes.  

Place a small serving in a child's plate to cool.  It will be hot.

Make a salad and a veg.  I chose zucchini.  Serve with Swedish Limpa Bread also on this blog. It's really good.

It was a hit for all ages!

This was a good Macaroni and Cheese.  It was kid friendly but many steps up from the blue box.  That is fine and has a place, but it is not for company!

It was also good as leftovers.  To reheat, place in a skillet with some milk and heat.  Stir until the milk is absorbed.

Saturday, December 28, 2024

Swedish Limpa Bread

My husband had an uncle that we all loved.  Every year when we went to his home for Christmas, Archie made Swedish Limpa Bread.  I don't know if he made it other times, but it was a Christmas tradition.  

I decided I would attempt to make some and see if I could replicate it.  There are different recipes out there but this is the one I used. It turned out great.  And I will be making it again.

Swedish Limpa Bread

1/2 cup brown sugar

1/4 cup dark molasses

1/4 cup butter

2 Tablespoons orange zest, it took 2 large oranges for me

1 1/2 teaspoons salt

1 teaspoon anise seed, lightly crushed

1 cup boiling water

1 cup cold water

2 packages active dry yeast

1/2 cup warm water

1 teaspoon sugar

4 1/2 cups all purpose flour

3-4 cups rye flour, it took me a bit more than 3

2 Tablespoons cornmeal

2 Tablespoons butter, melted

When I'm making bread in my Kitchen Aid mixer, I like to put hot water in the metal bowl and set it aside.  The yeast likes warm and it is very cold today.

Cut the butter into cubes.  Lightly crush the anise seed. 

I had some star anise and thought I could just crush that.  Then I took a turn around the internet and discovered they are not at all interchangeable. This necessitated a quick trip to the store.  I used a mortar and pestle. 

Place the brown sugar, molasses, butter, orange zest,

salt and crushed anise seed in a large bowl. 

Add a boiling cup of water. I used a Pyrex measuring cup in the microwave for about 3 minutes on high.

Stir until the butter is melted and the sugar is dissolved. Carefully pour in a cup of cold water and let it stand.

Pour out the water in the Kitchen Aid bowl and add 1/2 cup of warm water back in.  Sprinkle the yeast on top and give it a stir to dissolve.  Wait about 5 minutes to see it bloom.  If it doesn't you have old yeast.

Stir the cooled molasses mixture into the Kitchen Aid.  Add the all purpose flour and gently mix it in.

Replace the paddle of the mixer with the dough hook and add 1 cup of the rye flour. Mix for three minutes. Then add the rye flour 1 cup at a time until you have 3 cups mixed in.  I needed just a bit more flour to have a stiff dough, about 1/3 cup.

Put a small amount of all purpose flour on a very clean counter. You may want to add a bit of either flour to knead it in. I used a bit of rye, but the all purpose worked in easier during the kneading. Knead about 6-8 minutes , or until the dough is smooth and elastic.

I washed the molasses bowl and then placed a tablespoon or so of vegetable oil in it. Roll the dough ball in the oil, then cover it and place in a warm spot to rise. 

When it has doubled in size, about an hour, punch it down and place it on the counter.

Lightly grease two baking sheets. Sprinkle with cornmeal.

Cut the dough in half and form into two oval loaves.  

Cover and let rise until doubled, about 30 minutes.

Preheat the oven to 350°.  Make four shallow cuts in the top of each loaf. Bake until golden brown, about 30-35 minutes.  I switched the loaves around to cook evenly, but the one on the bottom rack the longest needed a few more minutes than the other loaf.  Next time I make this I will use both of my ovens to prevent this.

Remove to wire racks.  Brush with the melted butter, if desired.

This bread was really good.  I wasn't sure if it would make a sweet bread.  But it just had a touch of sweetness and the anise and orange zest really came through.

It was good plain served with a meal.  It was delightful toasted with butter and with jam.  

It even made a nice sandwich.

This is a salmon sandwich and you can't get more Swedish than a fish sandwich on limpa bread!

Sunday, December 22, 2024

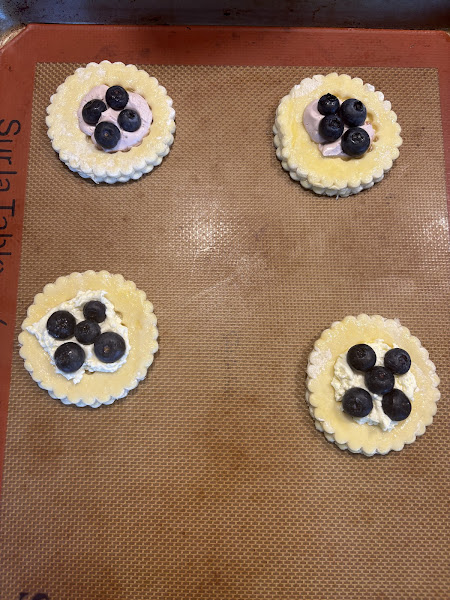
Blueberry Cheesecake Pastry Bites

I was having guests for a crafting day and wanted to have a treat to serve them. I had some Philadelphia no bake cheesecake from another splurge and I had an idea to make some baked items. Yes, I realize it is a no bake item.  But that means I can serve it as is. It doesn't mean I can't bake it in something. Or at least that was my hope.  I did make a test batch first!

I find making a treat with a bit of puff pastry elevates it to something cuter and more special than just a pie crust.  So I got out my graduated, fluted circle cutters to make a pastry with a well for the sweet part.

Blueberry Cheesecake Pastry Bites

1 package Pepperidge Farm puff pastry

Philadelphia no bake cheesecake

Philadelphia strawberry cream cheese or sweet flavor of your choice 

blueberries

1 egg

Turbinado or raw sugar

This recipe can make the whole box or one sheet of the puff pastry box.  It just depends on how many treats you want to make.

Set the puff pastry out to thaw.  Don't let it thaw out completely.  When you can unfold the pastry sheet,  roll it smooth. You may have to use fingers to seal the fold marks.

Preheat the oven to 400°. Prepare two baking sheets with SilPat mats or parchment paper.

I have some graduated circle cutters.  You can also use a biscuit/donut cutter.

I cut nine circles out of each pastry sheet with a 3 1/16 cutter. I took a smaller ( 1 7/8) cutter and cut the middle out of half of the circles.

Whisk the egg in a small bowl with about 1 Tablespoon of water. Use a pastry brush to paint the egg wash around the edges of a circle of the dough.  Place one of the rings centered on the circle and brush it with the egg wash.  Move it to one of the baking sheets.

Repeat until you have transferred all of the pastry circles on a baking sheet

Carefully place about 1 Tablespoon of cheesecake or cream cheese mixture in the center well.  Gently press 4 or 5 blueberries into the creamy center.

Take a pinch of turbinado sugar and sprinkle it around on the egg wash on the ring.

There will be leftover circles and diamonds of dough.  Don't discard them.  Brush them with the egg wash and sprinkle turbinado sugar on them. You can even add a bit of cinnamon. Put them around the pastry bites on the baking sheets for an additional set of treats.

Bake for 10-12 minutes.  I found the pastry bites puffed nicely.  Some of the dough circles puffed up and over.

Allow the pastry bites to cool for 5 minutes on the baking sheet and then transfer to a cooling rack.

Put a piece of waxed paper under the cooling rack.  Sprinkle a bit of powdered sugar through a small strainer over the finished bites.  I didn't think they needed more sugar.  I just did it to look a bit fancier. But that is your choice!

The pastry bites were a hit.  They were crispy with a creamy blueberry center. 

The pop of cinnamon sugar circles were equally delightful!

Saturday, December 21, 2024

Chewy Peanut Butter Chocolate Chip Cookies

 My husband likes a cookie. And I was expecting guests for a crafting day, so I started searching around the internet.  I  recently had a cookbook that I checked out of the library, but I returned it before I checked out the recipe for Chewy Peanut Butter Chocolate Chip Cookies.  Sally's Baking Addiction had a close version of this one.

One thing about her recipe that called to me was when she mentioned that she did not recommend the crunchy peanut butter for cookies.  She explained the smooth peanut butter was a better choice. It seems crunchy peanut butter makes cookies crumbly. If you want the crunch and the extra peanut butter flavor, then you should add chopped peanuts with the chocolate chips. So that's what I did.

Chewy Peanut Butter Chocolate Chips

2 1/2 cups flour

1 teaspoon baking powder

1 teaspoon baking soda

1/2 teaspoon salt

1 cup butter, room temperature (2 sticks)

1 cup sugar

3/4 cup brown sugar

2 large eggs

2 cups creamy peanut butter (Yes. It seems like a lot.  Do it anyway.)

2 teaspoons vanilla 

1 1/2 cups semi sweet cookies 

1/2 cup rough chopped peanuts

( If you don't want to add the nuts, increase the chocolate chips to 2 cups.

1/2 cup sugar for rolling the dough balls

I use a Kitchen Aid stand mixer. If you don't have one I hope you have a strong arm for lots of mixing.

Place the softened butter in the bowl of the mixer.  Add the brown sugar and 1 cup of granulated sugar.

Stir until the mixture is creamy.  You may have to stop the mixer and scrape down the sides.

While the mixer is working, put the flour, baking powder, baking soda, and salt in a medium bowl and whisk gently to mix.  Set aside.

Chop up 1/2 cup of peanuts.

Add the eggs to the mixing bowl and mix on high until combined.  You will need to scrape up from the bottom of the bowl and keep mixing.

Put the peanut butter and vanilla in the bowl and keep mixing.  

When it is all incorporated, carefully put the flour mixture in the mixing bowl.  Start it up slowly and then mix on slow.  

Add the chocolate chips and the chopped nuts. I chose to do this part by hand as I didn't want to break up any of the large chips.

The dough will be thick and soft so cover the bowl with plastic wrap and chill for at least an hour.

Preheat the oven to 350°. Prepare each baking sheet with a SilPat or parchment paper. Place 1/2 of sugar into a small bowl. 

Scoop the dough into large balls.  I have a 2 Tablespoon scoop, but it called for more than that, so I attempted to make a 3 Tablespoon ball. Roll the round ball in the bowl of sugar. Place on the prepared baking sheets and press down slightly so it doesn't roll around, but isn't flattened.

Bake for 14-15 minutes or until the sides appear set and lightly browned.  The tops will be soft.  Cool the cookies for 10 minutes and then transfer to a cooling rack.

These cookies were full of delightful chocolate and peanut butter flavor.  The sugar on the outside added a wonderful crunch.  They came out thick and chewy and I highly recommend!