Our latest two B&B guest just left. They were the first ones to use the screen porch since we had a bunch of work done. They seemed to like it and we are mostly happy with the new porch.
The biggest problem was that water collected at the edge of the porch and was starting to rot the fascia boards on the posts.
The posts that hold up the rest of the house. Important posts. Also, the railings around the perimeter were so low that I couldn't clean, or even vacuum, under them. Yuck.
The screens allow the most delightful breezes to circulate, making this an ideal three season porch. The screens also allow rain and snow in, thee root cause of the problems. Dilemma.
We thought about putting in windows and then opening them when we were out there. That sounded really pricey and HOT! Then we would have a greenhouse!
We decided to remove all the damaged fascia and replace it with concrete board, impervious to water. We also cut the wood all around the perimeter and replaced it with marine plywood and a sealer. I asked for Trex at the very edge and got something else, but it is also impervious to water and looks okay.
When we removed the railings, we noticed that the bottom rails had collected water and were gross. The water collected there was also held against the fascia on the posts and was causing problems, which is why we have the concrete boards up so high on the posts. The contractor said that the drop off the porch to the ground was not over 30 inches, so building codes didn't require a railing. We just put the top rails back and hope the animals don't decide to ruin the screens by running through them or scratching them up. So far, so good.
Wasn't Lee smart to mark all the rails? The openings weren't identical, so it would have been a real problem if he hadn't thought to do that.
Then we had some indoor outdoor carpet installed. This is a thinner carpet than the last one we had. It shows all the flaws and lumps in the subfloor and I don't like that. But because it is a thinner product, we hope it will dry sooner and cause fewer problems.
The room is even more open with just the one rail and we really like the color of the new gray carpet.
So Jeff and Ashley were the inaugural users of our refurbished screen porch. They only stayed one night, so they only had one breakfast here. They seemed to like it and said nice things in our guest book.
We hope future guests will also enjoy this area for their breakfasts, but we really did it for us. We eat most of our meals out here and it is one of my favorite places.
And it's even better, now.
Pages
▼
Monday, June 30, 2014
Saturday, June 28, 2014
Ham, Brie and Apple Sandwiches
Once again I was reading a book and one of the characters mentioned food. Then it stuck in my head and I had to have it. And this is why they do product placement in TV and movies! I am such a sucker.
The story had people at a wedding shower or something like that (THESE details escape me, not the FOOD) and they were served ham, brie and apple sandwiches. I thought it might be good to melt the brie. Or maybe have them in a Panini sandwich. One problem. I don't have a Panini press. Oh, but I DO have a George Foreman grill and that is the poor man's Panini press.
Ham, Brie and Apple Sandwich
Thinly sliced ham. I used Black Forest ham. I like the smokiness.
Brie
Apple, I used Granny Smith
French Bread
Mustard I used honey mustard
butter, softened
If I had been able to find a chutney, I would have added that. You should use it if you live in a civilized area.
Heat the George Foreman grill
Peel and thinly slice the apple. Slice the French bread about 1/2 to 1 inch thick.
Generously spread the mustard on both slices of the bread. Fold the ham to fit the slices and place on a slice of the French bread . Add a few slices of the brie to cover. Don't worry about the rind. You will never see it. Then place the apples on top.
Place the other slice of French bread on top and butter it.
Place the butter side down on the hot grill and butter the top slice of bread. Close the cover and wait for the magic.
I cooked it for about 4 minutes, but feel free to peek. I stopped when the top was brown and the brie started to ooze out of the sandwich.
Serve it with the rest of the apple. And a tall glass of Sangria, should you be so lucky.
Friday, June 27, 2014
Sangria
Summer has barely started and it is hot! I wanted a refreshing drink, but had some wine sitting in the pantry that I "had" to use up. Oh. You mean red wine doesn't go bad if you don't drink it? Fine. I wanted some wine, okay?
I threw a bunch of juicy things in a pitcher with some red wine and made my version of Sangria. The nice thing is that you can change it to suit yourself. This suited me just fine.
Sangria
One bottle of red wine
1 orange, sliced
2 lemons, sliced and pits removed
1/4 cup sugar
2 cups orange juice I made mine from concentrate
2 Tablespoons lime juice Feel free to add sliced limes if you have them. I didn't.
1/3 cup Triple Sec or Brandy or Peach Schnapps Use something fruity and booze related.
Ginger Ale
Place the sliced citrus fruit in a large pitcher.
Pour the sugar on top and muddle with a wooden spoon. You want to press on them hard enough to release the juice but not smash them into a big mess.
Add the juices and the wine.
Return to the refrigerator to chill until ready to serve.
Place some ice cubes in a glass and fill about 1/3 of the way with chilled ginger ale. Add the Sangria.
Drink one glass while fixing dinner and one glass while enjoying dinner. Save the rest for another night!
I didn't add the ginger ale to the Sangria because I knew we wouldn't finish it in one evening and the ginger ale would have gone flat over night. I will use fresh ginger ale tonight.
I threw a bunch of juicy things in a pitcher with some red wine and made my version of Sangria. The nice thing is that you can change it to suit yourself. This suited me just fine.
Sangria
One bottle of red wine
1 orange, sliced
2 lemons, sliced and pits removed
1/4 cup sugar
2 cups orange juice I made mine from concentrate
2 Tablespoons lime juice Feel free to add sliced limes if you have them. I didn't.
1/3 cup Triple Sec or Brandy or Peach Schnapps Use something fruity and booze related.
Ginger Ale
Place the sliced citrus fruit in a large pitcher.
Pour the sugar on top and muddle with a wooden spoon. You want to press on them hard enough to release the juice but not smash them into a big mess.
Add the juices and the wine.
For some reason I am now craving a tequila sunrise. |
Return to the refrigerator to chill until ready to serve.
Place some ice cubes in a glass and fill about 1/3 of the way with chilled ginger ale. Add the Sangria.
Drink one glass while fixing dinner and one glass while enjoying dinner. Save the rest for another night!
I didn't add the ginger ale to the Sangria because I knew we wouldn't finish it in one evening and the ginger ale would have gone flat over night. I will use fresh ginger ale tonight.
Thursday, June 26, 2014
Cream Cheese Filled Monkey Bread
We are having more guests for the B&B. This FORCES me to try new recipes for their breakfast. Lee reminds me that they are different guests each time and so I can make the same breakfast and no one will know. Good point.
So, naturally, I ignored him and made some monkey bread. The impetus for this was a recipe for cream cheese stuffed monkey bread I saw when cruising on the Web,. This is a dangerous activity and I have to stop it. Any minute now. I call mine cream cheese filled, instead of stuffed. Sounds better to me.
So, naturally, I ignored my own advice and thought it might be a good addition for the B&B. But you can't just make something like that for the first time when you are serving guests. You must try it yourself. Monkey bread is usually made in a Bundt pan. I wanted to try and see if I could make individual servings. I modified the recipe for just us and I will give you those amounts. If you want to do the version in the Bundt pan, double the amounts and bake for 35 to 40 minutes.
Cream Cheese Filled Monkey Bread
1/8 cup sugar
1/2 teaspoon cinnamon
honey nut cream cheese I used Philadelphia honey pecan
1 can Pillsbury crescent rolls
1/3 cup brown sugar
1/4 cup butter, 1/2 stick
Heat the oven to 350°. I used some heart shaped ramekins and sprayed them with Pam.
Mix the sugar and cinnamon in a small bowl and set aside.
Unroll the crescent rolls and press the seams together with your fingers. I did that and then I rolled it sort of smooth with a rolling pin.
Cut the rectangle of dough into 3 horizontal rows and then 8 rows vertically. A pizza cutter is great for this. Don't stress too much about them being even. As you can see, I didn't. On the other hand, my pizza wheel wiggles as I cut and I will blame it on that.
Place about 1/2 teaspoon of the flavored cream cheese in the center of each square you just cut.
Press the seams closed and then form them into a small ball.
After you have filled all the squares and turned them into balls, roll them in the cinnamon sugar mixture and place them in the prepared ramekins.
I sprayed four ramekins, but only filled three of them. Mine are kind of big. If you have little ones, you can make more individual servings, but then you should cook them for less time. I started at 15 minutes and then kept increasing it until they were done.
Sprinkle the remaining cinnamon sugar over the filled ramekins.
Melt the butter, I used the microwave, and add the brown sugar. Mix and pour over the filled dough balls. Place them on a cookie sheet. Mine bubbled over. Burnt sugar in your oven is a pain to remove. Use the cookie sheet.
Bake for 20 to 25 minutes. Cool for 10 minutes. Use a spatula around the edges to loosen. Place a plate over the top and carefully turn it over. Remove the ramekins and let cool for 10 more minutes.
Monkey bread can be sliced, but the best way is to use your fingers, or a fork, and pull the balls off and pop them in your mouth. Well, these balls are a bit more than a mouth full, so bite off half, chew, swallow and THEN pop the rest into your mouth.
Yum. I'm not sure if I will use this version. I also have some mini bread pans. They might be nice, also. Guess I need to make another batch for us....
So, naturally, I ignored him and made some monkey bread. The impetus for this was a recipe for cream cheese stuffed monkey bread I saw when cruising on the Web,. This is a dangerous activity and I have to stop it. Any minute now. I call mine cream cheese filled, instead of stuffed. Sounds better to me.
So, naturally, I ignored my own advice and thought it might be a good addition for the B&B. But you can't just make something like that for the first time when you are serving guests. You must try it yourself. Monkey bread is usually made in a Bundt pan. I wanted to try and see if I could make individual servings. I modified the recipe for just us and I will give you those amounts. If you want to do the version in the Bundt pan, double the amounts and bake for 35 to 40 minutes.
Cream Cheese Filled Monkey Bread
1/8 cup sugar
1/2 teaspoon cinnamon
honey nut cream cheese I used Philadelphia honey pecan
1 can Pillsbury crescent rolls
1/3 cup brown sugar
1/4 cup butter, 1/2 stick
Heat the oven to 350°. I used some heart shaped ramekins and sprayed them with Pam.
Mix the sugar and cinnamon in a small bowl and set aside.
Unroll the crescent rolls and press the seams together with your fingers. I did that and then I rolled it sort of smooth with a rolling pin.
Cut the rectangle of dough into 3 horizontal rows and then 8 rows vertically. A pizza cutter is great for this. Don't stress too much about them being even. As you can see, I didn't. On the other hand, my pizza wheel wiggles as I cut and I will blame it on that.
Place about 1/2 teaspoon of the flavored cream cheese in the center of each square you just cut.
Press the seams closed and then form them into a small ball.
After you have filled all the squares and turned them into balls, roll them in the cinnamon sugar mixture and place them in the prepared ramekins.
I sprayed four ramekins, but only filled three of them. Mine are kind of big. If you have little ones, you can make more individual servings, but then you should cook them for less time. I started at 15 minutes and then kept increasing it until they were done.
Sprinkle the remaining cinnamon sugar over the filled ramekins.
Melt the butter, I used the microwave, and add the brown sugar. Mix and pour over the filled dough balls. Place them on a cookie sheet. Mine bubbled over. Burnt sugar in your oven is a pain to remove. Use the cookie sheet.
Bake for 20 to 25 minutes. Cool for 10 minutes. Use a spatula around the edges to loosen. Place a plate over the top and carefully turn it over. Remove the ramekins and let cool for 10 more minutes.
Monkey bread can be sliced, but the best way is to use your fingers, or a fork, and pull the balls off and pop them in your mouth. Well, these balls are a bit more than a mouth full, so bite off half, chew, swallow and THEN pop the rest into your mouth.
Yum. I'm not sure if I will use this version. I also have some mini bread pans. They might be nice, also. Guess I need to make another batch for us....
Monday, June 23, 2014
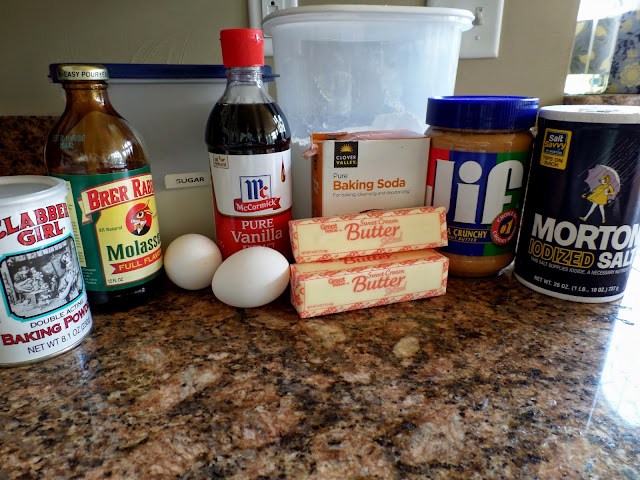
Peanut Butter Melts
We don't have any grandchildren so I borrowed a couple of kids from my cousin. Her two middle children, girls, said they wanted to come learn to knit. We had an enjoyable (by me and I hope them) afternoon. I have not been baking recently, so I HAD to make some cookies. You must feed guests and children guests should be served cookies. Right?
I decided to make some peanut butter cookies and then remembered that Joanne Fluke, my go to "mystery with recipes" novelist, had some peanut butter cookie recipes. I couldn't remember which books they were in, so I searched the Web and found a list of recipes paired with the book where they reside. This one was in the Blueberry Muffin Murder.
Peanut Butter Melts
1 cup melted butter (2 sticks)
2 cups sugar
2 teaspoons vanilla
2 Tablespoons molasses (1/8 cup)
1 1/2 teaspoons baking soda
1 teaspoon baking powder
1/2 teaspoon salt
1 cup peanut butter, I used chunky
2 eggs, slightly beaten
2 1/2 cups flour
1/2 to 1 cup sugar for rolling, optional
Heat the oven to 375°.
Melt the butter in the microwave. (I cover the bowl with a paper towel to keep it from spitting all over the microwave. Then I used the paper towel to wipe the mouth of the molasses before returning it to the pantry.)
Pour the melted butter into a large mixing bowl (I used a Kitchen Aid mixer, but you can do it by hand.) where you have placed the sugar, vanilla, and molasses.
Beat until mixed thoroughly. Add the baking soda, baking powder and salt. Mix some more.
Before you measure out the peanut butter, spray the inside of a 1 cup measure with Pam. Look how easy it comes out!
This is a hint from Ms. Fluke.
Mix the peanut butter in with the rest of the batter. Place the eggs in a small bowl and mix with a fork. Add the eggs to the bowl, mix and then add the flour to the bowl. Mix.
I use Silpat liners for cookie sheets. Nothing sticks to them and they are reusable. You may use parchment paper or just grease the cookie sheets. Form the dough into walnut sized balls. I used the smallest cookie scoop.
The next step is optional. I placed about 1/2 cup sugar in a small bowl and rolled the balls in it for a sugary crunch on the outside of the cookies. I ended up adding a bit more as I went along. It is not necessary, but a nice addition.
Place the dough balls on the prepared cookie sheet and partly flatten the cookies with a fork. Then press it again in a crisscross pattern. If the fork sticks, you can dip it in a small dish of sugar or the bowl in which you are rolling the cookies.
Bake for 8 to 10 minutes, or until the edges are just starting to turn brown. Cool on the cookie sheet for 2 minutes and transfer to a wire rack to finish cooling.
Enjoy with a nice, cold glass of milk. Especially if you have some sweet children visiting.
We are expecting guests this weekend for the B&B, so I froze all but a couple of dozen for making freshly baked cookies for our guests.
And, you know, maybe for Lee. I am above eating cookies and other baked goods.
HA! You didn't buy that, right?
Friday, June 20, 2014
Two Down, One To Go
I bought enough yarn and the patterns for three scarfs. I made one one, but needed help in finishing it. This particular pattern calls for Kitchener stitch which grafts the two sides together so you can't see the seam. I set that scarf aside until I could get back to the yarn shop for help.
I finished the lace cowl I started. I like it and it was fast and easy. I may make another with a different yarn. What do you think?
I even had time to start on third scarf. I like the color and the pattern is interesting.
Finally we got into town. This is an issue when you live out in the country and any shopping is an expedition.
The Kitchener stitch is one developed by Earl Kitchener who was a field marshal, among other things, in the British Army. He is thought to have developed this grafting method to avoid a seam lump in the socks that had been causing problems for soldiers.
There are instructions online and videos you can watch done by experts, so I won't try to show you the technique. But the hint that really helped was to take a sticky note and place it on the instructions for each row. After you finish that row, you move the note down. From all I have read, the biggest problem is losing your place and this technique HELPS to prevent that. Just remember to set the time aside to do the whole job without stopping.
I sat in the yarn shop for over an hour. I got it done and I like the finished product. It's not perfect, but it IS my first time. I love the yarn.
Now I want to make another one with a different yarn so I can use the Kitchener stitch while it is still (sort of) fresh in my mind.
How many scarves do I need to knit? Apparently, quite a few. I like a fast project that gives me a challenge. What other scarves shall I knit?