Pages

Thursday, December 30, 2021

Pecan Praline Pie Bark

 I found this recipe online. It is by Wendy Wilkes from the Stir The Pot Recipe Group.

I just happened to have everything I needed and had this made and cooling in about 30 minutes.


Pecan Praline Pie Bark


2 sleeves of honey graham crackers

1 cup (2 sticks) butter.

1 cup brown sugar

1 teaspoon vanilla

1 1/2 cups chopped pecans

Preheat the oven to 350°. Line a rimmed baking sheet with foil.  Spray it with Pam.

Cover the baking sheet with a single layer of the graham crackers.  You may have to break some to make them fit.

Melt the butter in a medium saucepan over medium heat. Add the brown sugar and stir to blend. 

Continue stirring until it starts to boil and start a timer for two minutes.  I had my phone on the counter and just yelled to Siri to start the timer.

Add the vanilla and chopped peans and give a quick stir.

Quickly pour the VERY hot mixture over the graham crackers and quickly spread it.  It will start to set up fast, so have a spoon or offset spatula ready to spread.  

Bake for 10 minutes or until the mixture is bubbling.  Allow the pan to cool to room temperature.  Break up the bark into pieces.  Store them in an airtight container.


These are very good.  Addicting, maybe.  I made sure to give some away so that I don't eat the whole thing.

Saturday, December 25, 2021

Mugs and Masks

I have a friend with a black lab and a beagle and I thought she would like a mug rug.  I went online and found a great fabric with lots of dogs.  There was a black lab and a beagle in the groups so I ordered it and started on the rug.


The Lab's name is Blossom, so I put her in a field of blossoms! After I finished it, I thought it would be fun to make a mask using the same fabric.  


I liked the way it turned out and was pleased that she liked it, too.

I have a good friend and former roommate that I have known since college. She has a gentleman friend (there has to be a better term at our age, but there you have it) who has a fabulous cactus garden, along with an artist's home.  You can see it here.

She also has a much loved granddaughter.  I wanted to take these two aspects of her life and make a mug rug.


My Cricut helped with the shapes. I got a cactus shape and a dress shape and played around with them. 


I sized them and cut out some templates.  Then I used Steam-A-Seam to cut out the shapes on fabric that I appliquéd to even more fabric.  


I used the dress to make a star quilt square and added the cactus on some fabric with rocks on the side.  I added some darker green thread to finish the cactus during the quilting process.


I used the horse shapes I had on Cricut for the horse quilt to make two rugs for another close friend that I have known since elementary school.  She has a young granddaughter that helps her with her MANY horses.  She breeds them. and frequently has as many as 40 at a time.  I made one for each of them, just in case they wanted to have a tea party!


The last one was for a friend from when we lived in Laguna Niguel.  She is a good friend who loves gardening.  And  a good cup of coffee or tea.  My Cricut came in handy again for the coffee pot and I used the Steam-A Seam for the flower I cut out of fabric.  She loves purple.


I mailed these all off and now I have no projects. Maybe I'll start on a quilt!


Wednesday, December 22, 2021

Baked Apple Cider Donuts

When Fall hits, apple cider donuts are in a lot of places. I like them. I thought I would make some in my Wilton donut pans. This way I could bake them and they would be lower in fat.

This recipe calls for concentrated apple cider, so you may want to make it the night before to save time.

Baked Apple Cider Donuts


1 and 1/2 cups apple cider, reduced to 1/2 cup

2 cups flour

1 teaspoon baking soda

3/4 teaspoon baking powder

1 teaspoon cinnamon

1 teaspoon apple pie spice *

1/4 teaspoon salt

2 Tablespoons butter, melted

1 egg

1/2 cup brown sugar

1/2 cup sugar

1/2 cup milk

1 teaspoon vanilla


Topping

1 cup sugar

3/4 teaspoon cinnamon

3/4 apple pie spice*


Reduce the apple cider by simmering it in a small saucepan over low heat.  It took mine about 20 minutes, but you should check about 10 minutes and then again at 15.  Set aside to cool.  If you made it earlier, you can start right away.

Preheat the oven to 350°.  Spray the donut pans with Pam.  

In a medium bowl, whisk the flour, baking soda, baking powder, cinnamon, apple pie spice and salt together.  

In a large bowl, whisk the melted butter, brown sugar, sugar, milk and vanilla. Pour the dry mix into the large bowl.  

Add the reduced cider and mix together until smooth.

I use a medium freezer Ziploc bag to pipe the dough into at the donut pans.  The freezer bags are thicker and less likely to burst than the regular bags.  You can use a spoon and then clean the drips, that works, too. Cut off a corner of the filled bag and fill the holes about halfway.  Don't overfill as the donuts will overflow and not be a round shape.

I had more dough than I had donut pans. I put the rest into a mini cupcake pan. Then I would have donut holes!

Bake for 10-11 minutes or until the tops are lightly browned.  The tops should spring back when gently pressed.  Cool for 2 minutes, then transfer to a cooling rack.  If you also used a mini cupcake pan, cook them for 8-9 minutes.

While they cool slightly, mix the topping.  Place the sugar, cinnamon and apple spice mix in a medium bowl.  Dip and roll the donuts in the topping and set aside.  You can dip them first into melted butter to have the topping stick, but I don't do that.  

These donuts are best served immediately.  They will keep for a few days when covered tightly.  If eaten the next day, pop them into the microwave for about 8 seconds to refresh them a bit.  You can freeze them at this point, if you like.

I saved the remaining cinnamon sugar and used it in coffee.  It made a nice cinnamon coffee to go with the donuts!


*If you don't have apple pie spice, you can make your own.

1 1/2 Tablespoons cinnamon

1 teaspoon nutmeg

1/2 teaspoon cardamon

1/2 teaspoon allspice


Tuesday, December 21, 2021

Butter Mints

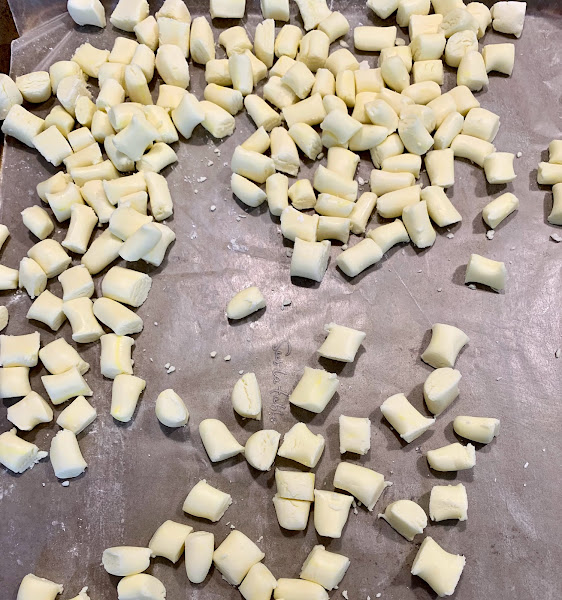
When I was a child my parents used to have butter mints in a dish for parties.  If I was lucky there would be some left over afterwards and I could have a few.  So when the recipe popped up on Facebook, I thought it would be fun to make some. 

It was pretty easy and they are delicious.  Strangely the mint is peppermint and I hadn't remembered that as the flavor.  I had forgotten that Lee sneezed when he ate mint of any kind.  So I gave some away and froze some for a future date. I have been popping them in my mouth when I pass the Rubbermaid container on the counter.

Butter Mints


1 Stick butter (1/2 cup)

4 cups powdered sugar, plus a bit more

1/4 teaspoon peppermint extract

1 teaspoon vanilla 

1 Tablespoon half and half

pinch of salt

gel food coloring (optional)


Place the butter in a mixer. I use Kitchen Aid. Beat the butter for several minutes.  Add 2 cups of butter and mix slowly until moist and then increase until incorporated. 

Add the next 2 cups and mix well.  Add the peppermint extract, half and half and salt. Beat until smooth.

Lightly dust a clean surface with powdered sugar. 

Divide the dough into five and wrap each with cling film.  If you want to color them different colors use gloves and knead in the food coloring until well blended. I only wanted to add a bit of yellow food coloring. so I added it with the other liquids. 


Take one lump of dough and pull off a section. Roll out into a rope about 1/2 inch thick. I used a bench scraper to cut the ropes into 1/2 inch sections.  Then I used the bench scraper to transfer the cut pieces to a parchment or wax paper covered baking sheet.  

Let dry uncovered for at least 12 hours. I put them in Rubbermaid containers. I also put about 1/3 in the freezer.  I hope they don't get moist and ruined. But that's better than eating them all this week!

Sunday, December 5, 2021

Horse Quilt

 I wanted to make a quilt for a grandchild. The problem is, I have already made at least one quilt for each grandchild I current have. But what if I die and then there is another grandchild?  They might feel unloved by me!  So I decided to make a horse quilt for a yet to be named grandchild.  On the other hand one of my currently existing grandchildren may become horse crazy and they can have the quilt. Anyway, I made a horse quilt.

I have a Cricut.  This is a machine that cuts out shapes. There is a huge catalog of shapes that you can download to an iPad and then it will cut out paper, card stock, fabric and other thin items. I downloaded a bunch of horse shapes, sized them to fit on a 6 1/2 inch square and cut them out on card stock.

There is a product called Steam A Seam. It is fabric glue pressed between two sheets of paper. I used the templates of horse shapes to draw the designs on the Steam a Seam.  You have to be careful to draw on the proper side!

I cut roughly around the shapes and ironed them on to the backside of the fabric I wanted to use. Then I cut out the shapes, peeled off the paper and ironed them onto a white 6 1/2 inch square.  

I had some fabric with horses on it that I also cut out and appliquéd to white squares.

I had enough fabric for the horse silhouettes but wanted to look for fabric for the rest of the quilt.  I found a quilt shop in Winchester that actually allowed people in to shop.  COVID has closed many stores or made them closed to in-person shopping.  It is hard to find the right colors on a computer screen. I wanted to go in and found a very cute and helpful store.

I did a small quilt as it is so much easier to quilt them in my sewing machine. I like to do the whole thing myself. 

They even had some fabric with horses all over for the backing!

So now it is finished and waiting for the first kid that wants a horse!

Monday, October 4, 2021

Bee Rug

I just finished my favorite Mug Rug so far. I have a mug rug pattern using bees and I also have some really cool yellow fabric with bees buzzing all over it.


I've made this pattern before with a different center to the star block. This time it's all about the bee's!  

I did some fussy cutting of just the bees and scattered them about the beehive.

I assembled the three different bee designs.

Then I quilted with a meandering pattern that, in my mind, replicates the dance that bees do for each other to direct them to the best flowers.  I finished with a coordinating green with tiny flowers.

And I love it!

Wednesday, June 2, 2021

Lemon Ricotta Almond Muffins

When I am reading and a character eats something that sounds interesting, I go online and look up recipes.  If I find one that looks like something I would like, I make it.  I started looking around for a lemon ricotta muffin mix.  This recipe I found on giadzy.com.  It is a Giada De Laurentiis site.  It makes for a light and fluffy muffin that is lemony and delicious with a hint of almond.  Give it a try!

Lemon Ricotta Almond Muffins egg


2 cups flour

1/2 teaspoon baking powder

1/2 teaspoon baking soda

1/2 teaspoon salt

1 cup plus 1 Tablespoon sugar. Or more as needed for sprinkling

1/2 cup (1 stick) butter, room temperature

1 Tablespoon finely grated lemon zest from 2 lemons

1 cup ricotta cheese

1 egg

1 Tablespoon fresh lemon juice

1/2 teaspoon almond extract

1/3 cup thinly sliced almonds


Preheat the oven to 350°.  Place paper cupcake liners in a muffin pan.  

Unwrap the butter and place it in a stand mixer. You will need to mix for at least 5 minutes, so a stand mixer is really helpful.  

Zest the lemons and add that to the mixer.  Add 1 cup sugar and scrape down the butter.  Keep mixing and scraping the butter until it is much lighter and fluffy.

While the mixer is running, place the flour, baking powder, baking soda, and salt in a medium bowl and mix with a whisk or fork.  

Add the flour mixture to the mixer.  Start it up slowly and mix until just blended. You don't want to mix out all the fluffiness you just mixed in!

Divide the mixture into the muffin cups.  I used a large scoop to mostly fill the muffin cups.  But I didn't fill the scoop completely.  I tried to scoop up about 3/4 of a full scoop.  They got a bit over filled, so feel free to place a few muffin cups in another muffin pan and make smaller muffins.

Sprinkle the almond slices on the muffins and then sprinkle the reserved sugar over the tops.  Bake for about 20 minutes, or until the tops become a pale golden brown.  Cool for 5 minutes and then remove to a cooling rack.  

These muffins are great for breakfast, but also as a side dish to a large fruit salad.  They are so light and lemony delicious and I have already made them twice.