Pages

Tuesday, June 30, 2015

Baked Cream Cheese Wontons

My theory is that  BAKED cream cheese won tons are lower in fat.  I have no knowledge that this is so.  But it made me think I could make some and eat them without any guilt.  Well, maybe a bit of guilt.


Baked Cream Cheese Won Tons

Won Ton wrappers
These are frequently found in the produce section but our Kroger's had them in the vegetarian section.
About 5 oz. cream cheese or 3/4 of a block
1 Tablespoon minced green onion
1 teaspoon minced garlic
1/4 teaspoon salt


Heat oven to 400°.  Oil a baking sheet generously.  Set aside.

Take half of the won ton wrappers, tightly wrap the rest and freeze for a later date.


Mix the cream cheese, onion, garlic and salt in a small bowl.  Put some water in another small bowl and assemble the won ton.


I put about a teaspoonful of the cream cheese mixture in the center of one wrapper.    Wet your finger in the bowl of water and wipe all around the edge of the wrapper. 


Fold it over and press the air out to make a triangle.  You may leave it this way or wrap it up any fancy way you wish. The wrapper of the won ton wrapper (say that three times, fast) has a diagram, if you are interested.


Place the finished wontons on the oiled baking sheet and when you are finished, spray them with Pam or brush more oil on top.  I tried both ways and the tops still did not get sufficiently brown and crispy for my taste, but the tops and sides were plenty crispy.

Bake for 8 to 10 minutes.  Serve warm.


These weren't as crispy as the deep fried version, but I didn't have to figure out how to dispose of half a pan of used oil and I considered them lower in fat.  They were delicious, however!

Friday, June 26, 2015

Another basket

I'm really enjoying the clothesline basket making.  I am not ready to make enough for a site on Etsy, but it is fun and I like the creativity of it.  I'm enjoying playing with the colors and sizes and shapes.


I had a basket of fabric strips I had left over from my large purse project.  I thought it would be enough to make another small basket.


I wrapped the strips around some clothesline and zig zagged them together as I have done since I learned it for my first basket.


This time I went to Jo-Ann fabrics and bought some beads and findings to decorate the baskets.  I wrapped a short length of clothesline with a single strip of fabric and did a zig zag stitch down the middle.  I attached it by hand to the basket as a sort of handle.  I added a few beards of a matching color and decided I liked it. 


Now I want to make MORE!!!

Tuesday, June 23, 2015

Angel-Berry Trifle

A trifle is a traditional English dessert with rum soaked sponge cake, custard and fruit.  I found this lighter version and it was the perfect way to end a hearty meal.


Angel-Berry Trifle

1/2 angel food cake... from the market, easy peasy
1 quart fresh strawberries
1 pint fresh blackberries
2 cups Cool Whip
2 Tablespoons sugar or equivalent sugar substitute
3 Tablespoons rum, optional


I was making this for 4 people, so these are the amounts I used. 


Wash and dice the strawberries and place in a bowl.  Gently stir in the sugar or sugar substitute and set aside.


Slice the angel food cake and cut the slices into cubes.  I made this ahead of time and placed the cubes in a sealed container.


Gently fold the rum into the Cool Whip.  I returned the Cool Whip to the refrigerator until we were ready for dessert.


Layer the dessert by placing a large dollop of the Cool Whip on the bottom of the bowl.  Add the sliced strawberries and then the cubes of cake.  Spread another small mound of the Cool whip and then add the blackberries and another layer of the small cubes of cake.

Finish with another mound of the rum topping and the last of the strawberries.


I don't like the traditional trifle because the cake is soggy.  This version is light and satisfying. It was not too sweet and didn't make me feel stuffed or guilty for having a refreshing dessert.

Thursday, June 18, 2015

Different Mashed Potatoes

I saw a commercial where they made mashed potatoes with a packet of Hidden Valley Ranch mix.  That sounded good to me.  When I lived with a friend in Pasadena, back in the 70s for crying out loud(!)  she used to make a great veggie dip.  She would mix a packet of Hidden Valley Ranch Dressing ( called HVRD by those in the know)  with sour cream and mayo.  It was delicious! (Hi Sande, thanks for showing me how to cook.)

I knew I liked that, so I figured I would like it in mashed potatoes, too!  It is super easy

HVRD Mashed Potatoes

4 huge Russet potatoes, peeled and diced
3/4 cup sour cream
1 packet HVRD mix
1/2 teaspoon salt, or to taste
1/4 cup milk, optional


Boil the potatoes until soft, but not falling apart.  Drain and place in a large serving bowl. 


Place the sour cream and the packet of HVRD on top and commence the mashing.  It was not creamy enough for me, so I added a bit more milk and a bit of salt.


Serve all by itself, or with gravy like I did here.


I pretty much like potatoes any way you want to fix them, but this is a nice way to do something different.


Caramelized Onion Pot Roast

I found a recipe in the Sunday Roanoke Times.  It was for a pot roast that you cook in a Crock-Pot.  It sounded easy and delicious, so I rounded up some guinea pigs guests and bought a big hunk o' meat.


Caramelized Onion Pot Roast

1 Tablespoon oil
1 (3 to 3 1/2 pound) chuck roast
1/2 teaspoon salt
1/2 teaspoon pepper
4 medium onions
1 1/2 cups beef broth...I used beef base and water
3/4 cup beer.  I used a little beer and it was 7 ounces.  I needed 6, so I had a swallow left over.
2 Tablespoons brown sugar
3 Tablespoons Dijon mustard
2 Tablespoons cider vinegar


I made a few substitutions that I will explain. 


Heat the oil in  a large non-stick skillet.  Cook the roast over medium heat for about 10 minutes, or until browned on both sides.  Sprinkle the meat with the salt and pepper.


While the roast is browning, slice up the onions.  I had big ones and used three.  Place the onion slices in the bottom of the slow cooker.  Then place the browned meat on top of them. 


I had some beef base, which is essentially beef broth in concentrated form.  I used 1 1/2 teaspoons of the beef base and 1 1/2 cups warm water and stirred to dissolve.  Then add the beer, brown sugar, mustard and vinegar. 


I had some honey Dijon mustard, so I used 4 Tablespoons honey Dijon and 1 Tablespoon brown sugar.  Not for more sweetness, but the flavor. ( It was really good and with more flavor than any other Pot Roast I have made!)


Mix them together and pour over the roast and onions in the slow cooker.

Turn it on to low and go somewhere else for 6 to 8 hours.  I put it in at 10 and served it at 6:00.

The meat fell apart nicely and the onions were perfectly lovely when paired with the meat.  I made it with gravy and mashed potatoes and now have left overs for sandwiches!


I made the gravy with.....

Gravy

2 Tablespoons butter
2 Tablespoon flour
1 teaspoon Worcestershire sauce  Don't try to say the whole thing.  It is Wooster sauce.
1/2 teaspoon Kitchen Bouquet
s&p
about 2 cups of the liquid left in the Crock-Pot.


Melt the butter in a large skillet and add the flour.  Cook for a few minutes until thickened and add the liquid from the slow cooker.  Stir with a whisk and add the flavorings to taste.  Stir until the lumps are broken up and the gravy is smooth.  Add more liquid  if needed.


Pour over the Pot Roast, the onions and the mashed potatoes and resolve to diet tomorrow!

Sunday, June 14, 2015

Mexican Chocolate Flan

I was perusing some Mexican recipe books and noticed that I had marked the page for Mexican Chocolate Flan as a recipe I should try.  But then I didn't.

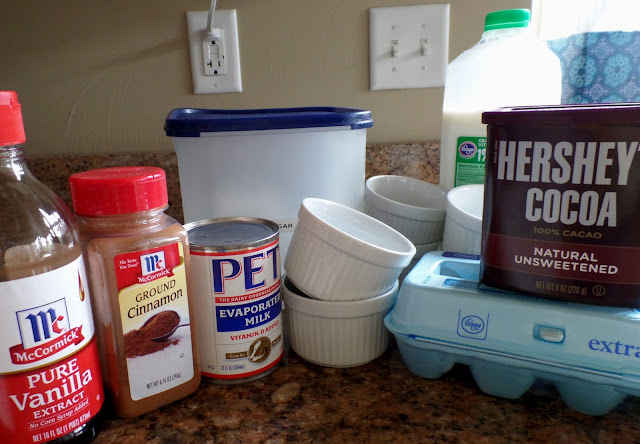
Flan is a custard and a traditional Mexican dessert.  As far as I can tell the Mexican chocolate is just one with cinnamon.  It is easy to make, but you have to start a few hours before you want to serve it.  After it cooks it needs to cool in the refrigerator for at least an hour.


Mexican Chocolate Flan

Topping

3/4 cup sugar
1/2 cup water

Flan

1/2 cup milk
1/2 cup sugar
1/4 cup unsweetened cocoa
1/2 teaspoon cinnamon
1 can (12 oz.) evaporated milk
1/2 teaspoon vanilla
3 eggs


Heat the oven to 325°.   Get out 6 ramekins or custard cups.


Mix the water and sugar in a heavy 1 quart saucepan.  Heat to boiling over medium heat.  Cover and boil for one minute.  Uncover and cook until the sugar just starts to turn a golden brown color.  DO NOT STIR.  Do not do something else.  It can burn or get too brown, if you aren't careful.


Pour the BOILING HOT sugar syrup into the ramekins.  Swirl the cups to coat.  Set aside.


In a larger saucepan, mix the milk, sugar, cocoa and cinnamon.  I used a whisk and the cocoa powder coated the bubbles in the milk so I had chocolate bubbles!  Heat to boiling over medium high heat.  Stir constantly with a whisk.  You don't want to burn the milk or let it get a skin on top.  Boil for one minute.  Time it.


Remove rom the heat and whisk in the evaporated milk and vanilla.  Beat the eggs in a medium bowl and then temper them.  You do this by adding a bit of the hot milk mixture to the beaten egg mixture.  Mix it in.  Then add a bit more of the hot mixture to the eggs and mix some more.  I do this about 3 times and then add the eggs to the hot mixture stirring as it goes in.

Pour the custard mix into the ramekins, on top of the sugar.


Place the ramekins in a 9X13 inch baking dish.  Take it next to the oven and then add hot water until it is half way up the sides of the cups.  Bake for 50 to 55 minutes.  Test with a knife in the middle of a flan.  If it comes out clean it is done.


Remove from the oven and let cool.  Carefully remove the ramekins from the hot water and cool some more.  Then chill in the refrigerator for at least an hour.

When you are ready to serve, fill the 9X13 baking dish with hot water and let the ramekins sit in it for about one minute.  Run a spatula around the edge of the flan and then turn it upside down on a small plate.  The syrupy topping will flow over the chocolate custard and add just the right amount of sweetness.


I like to add a small dollop of Cool Whip or whipped cream.  OK.  Ice cream would work, too.

I like the touch of cinnamon and the creamy texture of the flan.  It is a nice way to finish a spicy Mexican meal. 


Friday, June 12, 2015

I Like To Flush The Toilet

When we used to live in California, we went through periods of drought, like they are doing now.  Half of California is essentially desert, but they continue to build more and more houses and many years they don't have the water resources to service the existing residents.  The cities and counties want the tax revenues from the new construction, but they have no water.  We used to have odd/even days to water and were told not to flush every time a toilet was used.  You could get a citation and fine for using too much water.  Water police.

There used to be bumper stickers ( Build it, Dam it) trying to get water reservoirs built for storage in rainy years, but also for recreation and hydroelectric energy.  Each time this comes up one of the arguments against it are that it would take years to build a dam.  Well, we lived in the Sacramento area in the 1980's and I think a BUNCH of dams could have been built since then!


Now we live in beautiful, green Virginia and have plenty of water.   The average rainfall is over 30 inches.  We have a well and there is no one telling me not to flush.  EXCEPT when we have a power outage.  They are not common, but we get one about four times a year.  They might last from an hour to a day.  Once we had no power for a week.  In summer.

I can deal without lights and I can keep the refrigerator closed, but I hate that I can't use water. There is some water in the tank from the well, but once that is gone there is no water, because the pump runs on electricity.  We have also rented the barn to someone who has 5 horses and hauling 100 gallons of water a day would be a real chore.  Not to mention the B&B guests who would have to be without when we are.

Our last power outage lasted from the afternoon until the middle of the night.  In the winter.  When it was below freezing.  A three dog night, and we only have one dog.  GET ME A GENERATOR. 


We went to Lowe's and arranged to have a back up generator.  The installers have to reroute all the electric lines coming into the house to the generator and then back into the house.  We have two electric boxes, so that is two lines and two switches.


They ran a line from the propane tank line to run the generator.  It is timed to run once a week to keep the batteries charged and to let us know that it is really working. 


We didn't buy a generator big enough to power the whole house with everything running full out. That would have added thousands and just isn't necessary. 


But we will have enough to run a small A/C unit to do the bedroom and the B&B area.  We will have power outlets and the refrigerator covered.  And the Wi-Fi.  Gotta have internet!.


And the WELL PUMP.  So I can flush.  Every time I deem it necessary....which is every time.

Wednesday, June 10, 2015

CHOMP the Battlebot

 
Did you ever watch the Battlebot show on Comedy Central?  These were not little toy robots, but monster, heavy, remote controlled killing machines.  They were placed in a cage and they fought to the death.  Some had circular saws or a heavy mallet to kill the opposing robot.  I remember a wedge-shaped robot that slammed into the opponent and flipped it over, rendering it defenseless.  Each robot had several remote controls to operate the different systems, one for driving, one for fighting, etc.  It is a ballet of cooperation for the controllers of these heavy weight machines.
 
Our son, Travis, LOVED these things and was in the process of building one to compete when the show went off the air.  Since then he has volunteered with high school robotics teams and gone with them to regional competitions.  Now ABC is starting up the Battlebot show and is promoting it heavily during the NBA basketball championship games.


And Travis is on a team!  His team's robot is called CHOMP.  You can go see the CHOMP Facebook page and follow them.  Their Battlebot is in this commercial. 

I know nothing about Twitter, but Travis says he has been running the Twitter and you can follow it here

The first competition is going to be shown on June 21.  What a fun Father's Day treat!  I can't wait.

Sunday, June 7, 2015

Clothesline Purse

 I have been working for weeks on a clothesline purse.  In May I finished a clothesline basket.  It was such a fun project and I liked it so much that I wanted to try more things.   I decided to try to make a purse out of scraps from some of the quilts I have made.  I like the idea of using up every bit of the scraps and not having closets full of unused fabric, like some quilters do.


When I made the basket I cut strips of fabric, wrapped it around some clothesline and made a coil. 


Once the base was established I started lifting the edge of the coil until it was at a 90 degree angle and then completed the basket.  I wanted this to be a scrappy project with no set colors or stripes, so I cut strips of many fabrics and placed them in a basket.  In fact, I used the basket I made first. I pulled random strips and started to wrap on a new length of clothesline.  This project called for an oval base, rather than a coil.


Once I established the size of the bottom of the purse, I angled the base as I stitched and wrapped and soon the sides of the purse slowly started to add up. 


I had strips from about 12 inches to about 24 inches and I wrapped, glued and stitched for HOURS. 


Including the handle, I used most of 4 packages of clothesline at 100 feet each!


I bought two large buttons to use as a closure for the purse.  I wrapped one small length of clothesline with some of the fabric and attached it with  a zigzag stitch down the middle.  I made a loop and sewed it to one side by hand.  I covered the base of the loop with a button and the sewed a button on the opposite side so that the loop could fit over the button

Many of the purses in the book I was using as an example had purchased handles sewn to the top of the purse.  But the purse is made by sewing the coils together and if it was to be USED and not just looked at on a shelf, it had to be more sturdily constructed.  I was afraid some stitches may pull loose, especially where the handles were attached, and then the whole thing would fall apart.


I chose to make the handle wrap all around the bottom of the purse and support it that way. 


I used a length of clotheslines and wrapped it around the purse until I had what I thought was a sufficient length to be one continuous handle.  Then I tripled that length and sewed all three layers into one flat handle.  I cut fabric to fit and sewed that around the handle.  That was the easy part.


The hard part has been sewing the handle to the purse.  I tried pinning the handle to the purse to hold it in place.  The pins poked into the bag and stabbed me when I was pulling the thread in from the outside.  Pulling the thread through all the coils of fabric and two layers of clothesline was not easy.  I finally went and bought  a small circle of rubber to grip the needle.  It is amazing the things you can find at a sewing store that you didn't know existed and are thrilled to find! 


It still took me many hours over four days to attach the handle.