Yesterday was a crazy day. There were storm warnings early in the afternoon. Then I got a call from the trainer that she was bringing the horses back. And I mean right now, before the weather broke. It is winter and no one is looking for horses to buy. She would keep them but the board bill would have to go up because there was no grass and she had to feed a lot more to keep weight on them.
Right after she left them here, the rain started. It lasted the rest of the day and night with bursts of heavy, sideways rain. It was also strangely warm. Like mid-fifties warm. It was mid-twenties warm (?) last week.
I made a wonderful casserole, which we both really enjoyed and then watched TV and went to bed. At 10:00 the neighbor down the hill called. Our bridge was blocked by all the debris from up the creek and the water was flowing over our bridge. The onslaught was looking to undermine his house.
This happens about once or twice a year. We keep our part of the stream clear, but upstream, things fall into it and are caught by our bridge. So Lee gets in the tractor and I get into a slicker and gather tools. This time the water took the top of our rake. Last year ts broke the hoe. It is very dramatic and I wish I had pictures for you, but it was too dark and we were too wet and busy for that.
Between Lee maneuvering the bucket on the tractor and me hauling logs and sticks up by hand, we managed to unblock most of the bridge. The water still crested over it occasionally, but that was from the force and amount of water in the creek. Nothing we could do about that. The main thing is most of the water was now diverted down the creek and away from the neighbor's house. I sure hope he appreciates us. As Lee said, we won't be able to do that much longer. He is in his twenties and presumably in better shape than us old folk, so we should just give him permission to clear away and don't call us! But the tractor really does help.
So it is a good thing we had a delicious and warm meal the night before! And I do mean delicious. Usually I am ambivalent when it comes to cauliflower. Lee loves it, though, so I make some every couple of weeks. This was so good I will definitely make it again soon. Plus, it was fast and easy. Always a plus in my mind! Oh, and low carb, too.
Swiss, Chicken and Cauliflower casserole
4 cups cooked chicken, chopped. Buy one already cooked from the market or buy the frozen pre-cooked variety, like I did.
2 cups cauliflower flowerets
1 1/2 cups Swiss cheese, shredded. Buy the shredded kind when you are getting the pre-cooked chicken and dinner is almost made!
3 stalks celery, diced
1/2 onion, diced
1 teaspoon garlic, minced
1/2 to 1 teaspoon curry. Your preference. I used about 3/4 teaspoon.
2/3 cup Mayonnaise
1/2 cup milk
Heat the oven to 350. Find your 2 quart casserole dish.
In a small bowl, mix the milk and Mayo with the curry. I used a mini whisk to get it smooth. Set it aside.
The frozen precooked chicken breast strips I had were in big chunks. I allowed it to thaw a bit and chopped them up in to bite sizes. Cut off any yucky parts.
If you think all parts are free from yuckiness, good for you. Saves time. It irritates the cats and the dog that are hoping for those bits, however. Keep chopping until you have 2 cups. Dump those in a medium bowl.
Cut up most of the cauliflower into flowerets. When you have 2 cups, add that to the chicken and save the rest for another day.
Chop up 3 or so celery stalks, the onion and add them with the garlic to the bowl. Dump the bag of Swiss cheese shreds over the top and mix. Drizzle the sauce over the top and mix again. That's IT.
Now dump, er, gently spoon the chicken mixture into the casserole dish and cook for about 50 minutes, or until bubbling nicely and the cauliflower has softened.
Serve with a salad or some fruit. Or just eat two heaping servings like we did and still have some for the next dinner!
Pages
▼
Thursday, January 31, 2013
Tuesday, January 29, 2013
What Colors Should I Choose?
The plaster is currently drying in our basement remodel. Now I need to pick the wall colors. Actually, I have picked the colors, sort of.
I want blue for the bedroom. I want yellow or a peachy color for the bathrooms. And I want gray with glossy white trim for everything else.
That's the plan. Then I went to Home Depot. If there were two shades in each color choice, then I could make my decision. I am having a hard time deciding between all shades ever invented
These are the colors I am trying to decide between.
Here is the blue.
Here are the bathroom choices. Wow. They came out pinker on the computer.
I guess there really are fifty shades of gray.
And here they are all together.
So, I am open to suggestions. Just remember that this is a basement we are taking about. So I am leaning more towards light, bright colors to offset the fact of limited natural light.
In a perfect world I would hire a decorator and let them make the decisions. In a not perfect, but better situation, I would have my sister-in-law come make these decisions as she is a great amateur decorator. But she lives three hours away and is not willing to relocate for the duration. Kinda selfish, don't you think?
Kielbasa and Potatoes with Honey Mustard
I love me some baked vegetables. Particularly potatoes. I found a recipe with Kielbasa and honey mustard and I was IN!
Kielbasa and Potatoes with Honey Mustard.
3/4 cup white wine The alcohol will all bake out, but you can substitute chicken broth if you wish.
1/4 cup sweet, hot mustard
2 Tablespoons brown sugar
1 lb. Kielbasa I used the Lite version
1-1 1/2 pounds red potatoes
1 large onion, sliced
Heat oven to 400.
Mix the wine, mustard and brown sugar in a small bowl until well blended.
Here is my OCD coming to the forefront. I don't like the casing on the kielbasa. It looks like paper. I know perfectly well it is edible, or they wouldn't put it there, but I can't like it. So I take it off.
It is time consuming and messy, but the dog likes me to do it because I let him eat the trimmings. He doesn't mind paper as long as it tastes like kielbasa. You, on the other hand, are probably normal, so just cut the kielbasa into chunks. You may have to slip a small piece to your dog, because he will not be getting any trimmings!
You don't need to peel the potatoes, but I like to peel off any weird looking bits. I know. I know. I am strange. Then cut them into 3/4 inch pieces.
You will be relieved to know that I am content with merely peeling my onions before slicing them. No strange, OCD rituals necessary.
I used a cast iron pan, but the food was a bit crowded. If you don't have one, use a shallow baking sheet. Put the meat, potatoes and onions in the pan and drizzle with the mustard mixture. Stir to coat.
Bake for 55 minutes or until the potatoes are tender. Stir once or twice while it is baking to coat everything with the mustard sauce. By the time the potatoes are cooked through, the sauce will have thickened. It makes a great addition to the usual mixed veg dinner.
Serve with a salad. Sure, potatoes are a vegetable, but we need our greens!
Better Than Grilled Cheese
I have been rather lax in getting my posts up, lately. Our computer died and I am using our very old (7 years?) laptop. It has been acting up, also. When that happens I save what I have and walk away. No point in throwing it out the window. So the following post was written a few days ago and has been waiting for me to finish it and add pictures. Here's hoping!
It has been cold and snowy. I decided on grilled cheese for dinner. But not just any grilled cheese. Special grilled cheese. There is a tiny hole-in-the-wall diner in Roanoke called Pop's and they serve a plethora of yummy grilled cheese sandwiches. If they can do it so can I.
Better Than Grilled Cheese
Bread This should be obvious!
Sharp Cheddar Cheese
1 Granny Smith Apple
Ham
Sweet, Hot Mustard
Butter, softened
My favorite ham is Honeybaked Ham. We had some in the freezer left over from Christmas. In a perfect world, I would always use Honeybaked ham. But it is expensive and a long trip into Roanoke, so I was thrilled to know it was there for the taking! I trimmed all the fat and set it aside
Core, and peel the apple. Slice it in 1/4 inch slices. Slice the cheese. Cut enough pieces to cover one slice of bread for each sandwich. No. You can't use American cheese wrapped in plastic. You have to use REAL cheese. Make sure it is the SHARP cheese. You want to taste cheese in your grilled cheese sandwich, don't you?
Assemble your sandwich. After I cut everything and started layering it, I wanted to add something extra and remembered the sweet, hot mustard. Don't leave this out, either. It really added some sweetness and a bit of punch, all at the same time. I spread a thin layer on one slice of bread.
Heat a pan or griddle on medium, or use a panini. I am not a panini fan as I don't like smooshed sandwiches, but use what you like. Butter the top side of the sandwich and place it butter side down on the pan. Then butter the side facing you.
Heat until brown, about 2 minutes, and then carefully flip it over. I do this using two spatulas, one on top and one on the bottom.
When the second side is nice and brown, remove to a cutting board and cut it. Serve immediately with something healthy, like fruit or a salad. Because this is not healthy. But it is goooood.
Sheesh. More computer problems. Can't wait for the new one to get here!
Sunday, January 27, 2013
We're Plastered
The plasterboard was hung and the plasterers came and plastered us. Now we are plastered.
In more ways than one. They left all the scraps. I guess it is cheaper for us to dump them than for us to pay them to cart everything away. But it was two loads in the Lee's truck to the dump, and that is a lot of scrap. The hardest part is cleaning up after we hauled all the board to the dump. There is plaster everywhere. Lee swept up the big stuff.
I did a closer sweep and then used the ShopVac to vacuum the whole floor. I took particular care to vacuum under the edges.
Now we are mopping. Mopping and scraping. It seems the little clumps of plaster that fell to the floor have now hardened to the point that we have to scrape them off. We USED to have a scraping tool. We left that in California because we were buying a new house and would never need THAT again. So we are using a hoe. Then we mop. We, meaning I.
It's not fun working in 80 percent humidity. And that is after two days of drying before we checked.
When I mop a section, the mop does what it is supposed to do and picks up loose plaster. When I rinse it, I then have a bucket of plaster water which I then use to mop the next section. Oops. Gotta take the dirty bucket up to dump it and get a clean bucket of hot water and take it back down to the basement. Up and down, up and down.
Lots of stairs and a few blisters. I would try to tell you it is because I am working so hard. But in reality it is probably because I haven't been working for quite some time and I lost all my calluses.
It is looking better, but I will need to rinse it a few times before I will be even close to happy. Why mop a construction site, you say? Well, partly because every thing we step in is being tracked upstairs where we LIVE. Another reason is I don't want lumps under the carpet and plaster dust working its way up through the new carpet wehn we install it.
Our next project is hiring someone to paint the ceiling. I don't like the idea of working above my head and I imagine all kinds of shoulder and neck pain. I plan on painting the rest. I PLAN on it. We'll see how it goes. There is no time frame in which I have to finish, so I can take my time, but once you get a roller full of paint it makes sense to get a good portion of wall painted before you throw it away.
It IS a lot of work, but it is starting to look like real rooms and I am getting excited.
Wednesday, January 23, 2013
Copper Foiling Done
I cut all the glass for my transom and then it was time to put on the copper foil. This is what the solder sticks to. Solder will not stick to plain glass. It has to have some metal.
Copper foil comes in different sizes. I chose 1/4 inch. It has a sticky side and you have to peel the paper backing off and adhere the copper strip to the glass. It is important to place the glass right in the middle copper foil. If it is too much on one side you will be able to see it through the clear glass. And you want an even amount of solder on each side to hold everything together.
After I wrap the whole piece of glass, then I overlap it a bit and tear off the copper pulling it across my fingernail. I smooth it around the outside with my fingers. Press the edges down and when you get to the corners you have to mitre them. Kind of like hospital corners on a bed, or wrapping a Christmas present. Use your fingernail to push one edge all the way to the top and then fold down the other edge over it.
When you have smoothed everything down with your finger, you need to use a fid to press it tight. You don't want any loose spots. Burnish the edges and both sides with the fid. It is a made out of smooth plastic or wood and looks like a letter opener .
I tried to buy some flux at the local hardware, but they didn't have the kind I need. Plus, I really like way the copper looks with the blue glass. After I solder it, it will turn a dull silver. There is a chemical I can paint on after soldering that will give it back some of the copper patina. I ordered it from the same place I got the bevel cluster and the glass, Timeless Tiffany.
The plan is to have everything ready to go when the order gets here. I did learn a lesson about soldering glass in the cold. Years ago I was making a piece for my parents. I had it outside in our garage. It was winter, but not freezing or anything. When I started to solder, one of the glass pieces cracked. Oops. Re-cut, re-foil, remove solder from adjoining pieces so they can be moved and it can be put back, take in the house, re solder. No problem. Easy fix!!!
So this time I will warm up the room before I start to solder!
Another Project
Rob. Go away. Don't look. Spoiler Alert. Danger Will Robinson!
I get the impression that Lee is not pleased when I take on another project when I have a bunch still not finished. I have a quilt that is ready for quilting. I am waiting until I get a new machine to finish that. The craft room is currently full of the stained glass transom project, so I wouldn't be sewing even if I had a machine. Too many glass slivers. The stained glass is waiting until the order for flux and copper patina arrives so I can solder it.
Naturally I had to start a NEW project. This one is SUPPOSED to be one I can work on when I am in bed watching TV. But I need to start it in full light.
I am making a stocking for my favorite son-in-law. Well, my only son-in-law, but my favorite so far! He and Trista have promised to come to Christmas next year. I have made all the kids and my daughter-in-law a stocking, so he's next. My kids all have crewel stockings, but nobody make crewel patterns any more. I did find old ones on EBay, but as much as he is my favorite, I am not paying hundreds of dollars for one. You would think if people would pay hundreds for the old one, somebody would start re-issuing them, but not yet. That's a good idea for when I win the lottery!
The pattern I chose is on fabric with wee tiny squares. In the past I have made them where the pattern is printed on the fabric and then you get a code that shows which stitches go where. This is just a blank canvas with lots of counting tee tiny squares. That means there is a lot of taking out of stitches. Because a lot of the stitches are cross stitched, that means taking out two stitches for each square you put in wrong. You can see why this is a project best started in the light.
I have a collection of wooden frames from making crewel, needlepoint and cross stitch projects in years past. It is easier for me to mount (staple) the whole thing on a wooden frame rather than using a hoop. This way I don't have to move it around and risk damaging the stocking. It does make it awkward in bed. And I have to get up off the bed and put it up high when I am done. It is too big to shove in a drawer. It is not something I want the cats to play with. I am sure it will come away with multiple cat hairs no matter what I do!
This is the top half of the stocking and the pattern.
My plan is to get a good start so that future stitches are easier to locate. Plus, I seem to have a bit of OCD ( I can hear my kids screaming, "A BIT!!!"), so once I start something I become obsessed with finishing it. I have until Christmas, so it's not like there is a big rush or anything!
I like it because it has a old time, nostalgic flavor to it. A kind of country feel. My son-in-law is very much of a big city, grew up in London, kind of guy, so I hope he likes it. He'd BETTER.
Monday, January 21, 2013
Lemon Blueberry Coffee Cake with Cream Cheese Filling
Lee really likes coffee cake. And he really likes blueberries. I decided to do some research on combining the two. I love lemon, so let's just please both of us. During my research I found one with a cream cheese filling. Why not?
Lemon Blueberry Coffee Cake with Cream Cheese Filling
Coffee Cake
2 cups flour
3/4 cup sugar
2 1/2 teaspoons baking powder
3/4 teaspoon salt
1 teaspoon vanilla
lemon zest from one lemon
1/2 cup butter, softened
3/4 cup milk
2 eggs
2 cups blueberries, thaw and drain if they are frozen
Cream Cheese Filling
1 8 oz. package cream cheese, softened I use Philadelphia
1 egg
3 Tablespoons sugar
2 teaspoons flour
2 teaspoons lemon juice
One of the reasons I decided to use the cream cheese is I bought too much of it at Christmas. And then every package was opened by a different person and a bit was used. I needed to use some up.
Streusel Topping
1/2 cup butter, softened
1/3 cup brown sugar
1/3 cup sugar
1/3 cup flour
1/2 teaspoon cinnamon
Glaze
1/2 cup powdered sugar
1 Tablespoon lemon juice
Whew!!!
Heat oven to 375. Grease a 9 inch springform pan or a 9 inch square pan. Set aside.
Wash a lemon and zest it. Make sure you don't zest through to the bitter white part. Squeeze the lemon juice into a bowl and save it for later. You will get about 2 Tablespoons.
I have a Kitchen Aid mixer that is great for cream cheese. Use whatever electric mixer you own. Beat the cream cheese until it is soft and fluffy.
Scrape it down and add the egg and sugar. Add 1 Tablespoon of the lemon juice and the flour. Save the rest of the lemon juice for the glaze. Mix until it is creamy. Scrape it into a bowl and set it aside. Wash the bowl to reuse it.
After all that, NOW you start the coffee cake.
Cream the softened butter. Add the eggs and the sugar. Beat until smooth and creamy. Lots of smooth and creamy going on here. Add the vanilla extract, milk and lemon zest. Mix carefully or the milk will go flying.
Add the flour, baking powder, and salt. Add the flour one cup at a time. Fold in the blueberries. Set aside.
Get out a medium bowl for the streusel topping. I could have used the mixer, but I didn't want to wash it AGAIN. Well, I did wash it , but then I put it away.
Cream the softened butter with the flour, sugar and cinnamon.
Now you get to assemble the coffee cake. Scrape about 3/4 of the coffee cake mixture into the pan. Spread the cream cheese filling to within an inch of the edge.
Cover it with the rest of the coffee cake batter. I used my very clean fingers to drop small bits of the streusel on top of the cake.
Bake for 45 to 55 minutes. Test it with a toothpick. Make sure it comes out clean before you remove the cake from the oven. I ended up needing just a tad more than 50 minutes.
Set the cake on a rack to cool. When it is mostly cool, loosen the edges of the cake with a plastic utensil. Open the springform and remove it.
Now make the glaze. It is super easy. Put 1/2 cup of powdered sugar in a bowl and add 1 Tablespoon of lemon juice. Stir until it is kind of runny. I ended up heating mine for 10 seconds in the microwave to make it drizzle better without thinning it too much.
Drizzle the glaze over the whole coffee cake. Let the glaze drip over the edge.
The streusel topping gave a crunchy sweetness to the moist coffee cake. The cream cheese added some creaminess with a touch of sour. The blueberries gave the cake a sweet, moist pop. Yum.
You could make this cake with out the cream cheese filling. But I am glad I used it!
Saturday, January 19, 2013
Orange Marmalade
I have some jars left over from my summer jam making. I wanted to do something with them. But what could I "put up" that was in season? Oranges are in season! So I decided to try to make some marmalade. Love the Internet. Both Ina Garten and Alton Brown (from the Food Network) posted recipes! They are two of my favorites on the Food Network. I had to go to the store. I don't keep oranges and lemons in quantity at home. And it takes two days. We had a snow day coming and it sounded like a perfect snowy day activity.
Orange Marmalade
4 seedless oranges (I used 5 because my ends got smooshed and I couldn't use them, so buy a few extra)
2 lemons
8 cups sugar
8 cups water
You may think 8 cups of sugar is a lot. Get over it. If you use less it won't set up and you will be mad. Just give most of the marmalade away and you won't end up eating all eight cups.
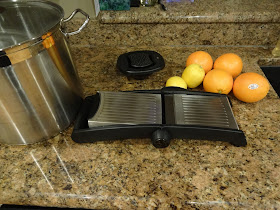
Wash the oranges and lemons and take off the fruit stickers. Discard them where certain people, who shall be nameless, can't see them and be nauseated If you have a mandoline, this would be a good place to use them.
Cut them in half crosswise and remove the seeds. Cut them in thin slices. The smallest that I could go was 1/4 inch. It helped to kind of zig zag the fruit across the blade As I said, the ends got smooshed and lumpy and I just tossed them and used an extra orange.
Place the sliced fruit and their juices in a large stainless steel pot. Add 8 cups of water and bring to a boil.
Remove from the heat and add the sugar. Stir until it dissolves. Cover the pot and let it sit there all night at room temperature. Go take a bath. Take a cup of tea in with you. That was exhausting and you need some R&R. Lock the door and don't let anyone bother you. You're making marmalade.
In the morning, after breakfast and at least two cups of coffee, turn the mixture back on and bring the mixture to a boil. Reduce the heat to simmer and let it cook uncovered for two hours. If someone asks you to help, remind them that you are cooking, here. Look busy by stirring once in a while. Get out enough Mason jars for about 10 cups. Wash them and put them in a pot of simmering water, lids and all. You want them hot and very clean for the canning...Jarring???
Now you want to bring the mixture up to a low boil, about medium heat. My orange peels were hanging in there pretty good. I have eaten a lot of marmalade in my life and it didn't have complete circles of orange peels. Alton had told me to cut them, but Ina didn't. I was worried about losing too much juice on the cutting board, so I didn't cut the slices. Now what?
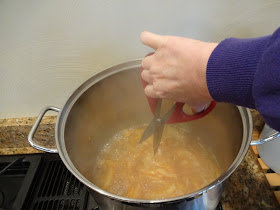
I took my kitchen scissors, washed them and started cutting. Right in the pan. Then stir a bit and cut some more. Your hand may get a bit hot, so take a break. If it is boiling too hard to keep your hand in there, it is too hot anyway! If you see any seeds you missed, this is a good time to scoop them out. If there is any foam on the top, skim that off while you are in there.
Cook the marmalade until your candy thermometer shows 220. Thank you, Tara! If you don't trust the thermometer, put a dollop on a plate and put it in the refrigerator to cool. If it is a bit loose ( it is jam, after all), but not liquid it is done. If it is too runny, cook a bit longer. Too hard, add some water.
I have a funnel for filling Mason jars. It makes it so much easier and cleaner to fill them. I scooped up the hot marmalade with a one cup plastic measuring cup. It even has a lip to make pouring easier. Wipe the rims with a wet paper towel and seal tightly. I heard them all pop sealed within about 20 minutes.
Store in a cool place for up to a year.
I wrote all that before our power went out due to the heavy snowfall. I couldn't toast anything to put the marmalade on. I needed a final picture and I wanted to taste it before I posted it. What if it was terrible and you made some and hated me? Then I couldn't load it. I'm starting to not like snowy days so much.
The end result is, I had it two ways on a toasted bagel. One with butter and marmalade and one with cream cheese with marmalade. Both were quite tasty and worth the wait. It was also good with scrambled eggs and grapefruit!